A beautiful patio is the heart of any outdoor living space, but standing water can quickly turn your dream oasis into a soggy, unusable mess. Pooling water not only damages expensive paving materials and threatens your home's foundation but also creates a perfect breeding ground for mosquitoes and other pests. Protecting your investment and ensuring year-round enjoyment hinges on one critical factor: effective water management.
This guide provides a comprehensive roundup of the top eight patio drainage solutions, moving beyond generic advice to deliver actionable insights. We will detail the specific pros, cons, installation considerations, and ideal applications for each method. Whether you are contending with the dense clay soil common in the Morgan Hill area or simply looking to manage heavy seasonal downpours, this list will equip you with the knowledge to make an informed decision. Understanding these options is the first step toward implementing a robust system that keeps your patio dry, safe, and ready for use, regardless of the weather. From simple grading adjustments to sophisticated permeable systems, we will cover the strategies necessary to reclaim your perfect outdoor retreat.
1. French Drain Systems: The Subsurface Workhorse
A French drain is a classic and highly effective subsurface solution for managing water on and around your patio. It consists of a sloped trench, a perforated pipe, a layer of gravel, and a protective geotextile fabric. The system intercepts and collects both surface runoff and groundwater, channeling it away from your patio to a designated outlet. This prevents water from pooling on the patio surface or saturating the ground beneath it, which can cause pavers to shift or concrete slabs to crack.
French drains are one of the most reliable patio drainage solutions because they tackle the problem at its source, below the surface, making them ideal for properties with persistent water issues.
When to Use a French Drain
This method is particularly effective in several key scenarios:
- Clay Soil: Homes built on heavy clay soil often suffer from poor natural drainage. A French drain provides a direct path for water to escape.
- Hillside Patios: For patios situated on or at the base of a slope, a French drain installed along the uphill perimeter acts as a barrier, intercepting runoff before it ever reaches your outdoor living space.
- High Water Table: If groundwater is a constant issue, a strategically placed French drain can lower the water level around your patio's foundation, ensuring long-term stability.
For homeowners in Morgan Hill dealing with seasonal rains, a French drain ensures your patio remains a usable and beautiful extension of your home year-round, protecting your investment from water damage.
Pro-Tip: For an eco-friendly approach, consider directing the French drain's outflow to a rain garden or a dry well. This allows the collected water to slowly and safely percolate back into the ground, recharging the local aquifer instead of overwhelming storm drains.
Installation and Best Practices
Proper installation is critical for the longevity and effectiveness of a French drain.
The infographic below highlights key data points to consider for this project, including typical costs, lifespan, and maintenance needs.
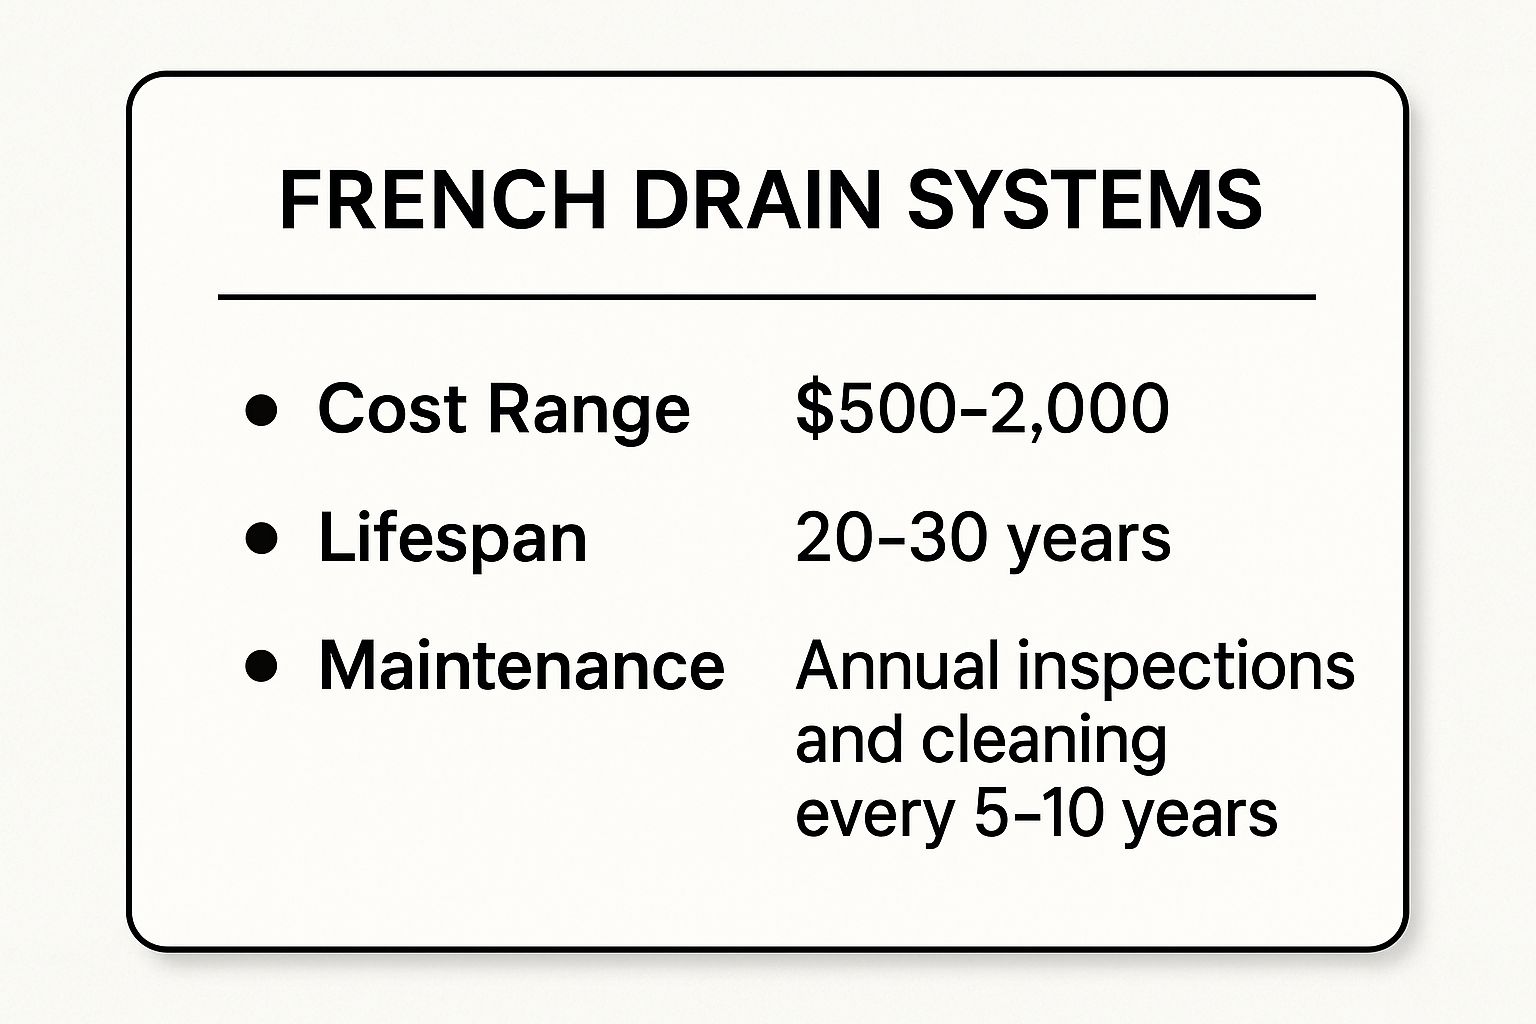
As the data shows, a well-installed French drain is a long-term investment that requires minimal, yet important, upkeep to function optimally.
To ensure your system lasts for decades, focus on these details:
- Correct Slope: The trench and pipe must have a minimum 1% slope, which is roughly a 1/8-inch drop for every foot of length. This gravity-fed slope is essential for moving water effectively.
- Protective Fabric: Always wrap the trench and gravel with a high-quality, non-woven geotextile fabric. This filter fabric is the most critical component for preventing silt and soil from clogging the pipe.
- Cleanout Access: Installing vertical access pipes (cleanouts) every 50 to 75 feet allows for easy inspection and flushing, extending the life of your system significantly.
2. Proper Grading and Sloping: The Foundational Fix
Proper grading and sloping is the most fundamental and often overlooked principle of effective water management. This technique involves carefully reshaping the ground surface to use gravity to your advantage, creating a gentle, consistent slope that guides water away from your patio and home foundation. It's a proactive measure that prevents water from ever having a chance to pool, saturate the soil, or cause damage.
Proper grading is one of the most essential patio drainage solutions because it addresses water flow at the most basic level. Getting the slope right is the first line of defense against standing water and is often a prerequisite for the success of other drainage systems.
When to Use Proper Grading
This method is a non-negotiable first step in nearly all patio projects and is critical in these scenarios:
- New Patio Construction: Establishing the correct grade before laying pavers or pouring concrete is the easiest and most effective time to implement this solution.
- Flat Yards: Properties with very little natural incline are prone to drainage issues. Regrading creates the necessary slope to direct water to a safe discharge point.
- Water Pooling Near Foundation: If you notice water consistently collecting against your house after it rains, regrading the area around your patio can redirect it, protecting your home's structural integrity.
For homeowners in Morgan Hill with clay-heavy soil, establishing a proper grade is crucial. It ensures that seasonal downpours flow away from your outdoor living areas rather than sitting on the surface, keeping your patio safe and usable.
Pro-Tip: Combine grading with other elements for a comprehensive solution. A gentle slope leading to a decorative swale (a shallow, vegetated channel) can guide water to a rain garden, creating a functional and beautiful landscape feature that also supports local ecology.
Installation and Best Practices
Achieving the correct grade requires precision and an understanding of how water behaves on your specific property.
A common misconception is that a visible slope is needed; in reality, a subtle, carefully measured grade is all that’s required.
To ensure your grading project is successful, focus on these details:
- The Right Slope: The ground should slope away from your home's foundation and patio at a minimum rate of 2%, which is roughly a 1/4-inch drop for every foot of distance.
- Use String Lines: To ensure a consistent and accurate slope, set up string lines and a line level. This simple tool is invaluable for visualizing and executing the correct grade across the entire area.
- Soil Compaction: When adding soil to build up an area, apply it in thin layers (4 to 6 inches at a time) and compact each layer thoroughly. This prevents the soil from settling over time, which could undo your hard work and alter the slope.
- Consider Retaining Walls: In cases of steep slopes or significant grade changes, a retaining wall may be necessary to hold back soil and create a stable, level area for your patio. A professionally built wall is key to a long-lasting and safe landscape. You can learn more about the factors that influence retaining wall projects to see if it's the right choice for your yard.
3. Permeable Paving Materials: Letting Water In, Not Across
Permeable paving materials offer an innovative approach to patio construction by allowing rainwater to pass directly through the surface into the ground below. Instead of shedding water, these surfaces absorb it, dramatically reducing runoff and eliminating standing water. This category includes options like permeable pavers, porous concrete, and specially designed gravel systems that manage water right where it falls.
This method is one of the most eco-friendly patio drainage solutions available because it mimics natural hydrology, recharging groundwater and reducing the burden on storm drains. Modern permeable materials, such as those from Unilock or Belgard, combine this advanced function with high-end aesthetics, providing both beauty and performance.
When to Use Permeable Paving
This solution is ideal for homeowners in Morgan Hill looking for a sustainable and effective way to manage rainfall:
- Environmentally Conscious Designs: For those wanting to minimize their ecological footprint, permeable surfaces are a perfect fit, as they help reduce water pollution from runoff.
- Strict Municipal Codes: Some areas have regulations limiting the amount of impervious (non-draining) surface area on a property. Permeable patios can help meet these requirements.
- Eliminating Puddles: If your primary goal is to create a consistently dry, puddle-free patio surface for entertaining, this method provides an elegant and integrated solution.
Pro-Tip: Before committing to a permeable system, conduct a percolation test on your soil. This test measures how quickly water drains, helping you or your contractor design the appropriate depth for the crushed stone base layer needed for effective water storage and infiltration.
Installation and Best Practices
The success of a permeable patio hinges on the preparation of the sub-base, which acts as a reservoir for rainwater. For stunning designs that integrate this technology, you can explore various landscape ideas with pavers to see what's possible.
To ensure your permeable patio functions correctly for years to come, pay attention to these critical details:
- Proper Base Depth: The foundation is key. A base layer of open-graded, clean-crushed stone, typically 12 to 18 inches deep, is necessary to hold water as it soaks into the ground.
- Material Selection: Choose materials suited to your climate and use. Permeable pavers are excellent for residential patios, while porous asphalt might be used for larger driveways or paths.
- Regular Maintenance: To prevent the pores from clogging with fine sediment and organic debris, the surface should be vacuum swept at least once or twice a year. Avoid using sand for jointing, as it will impede drainage.
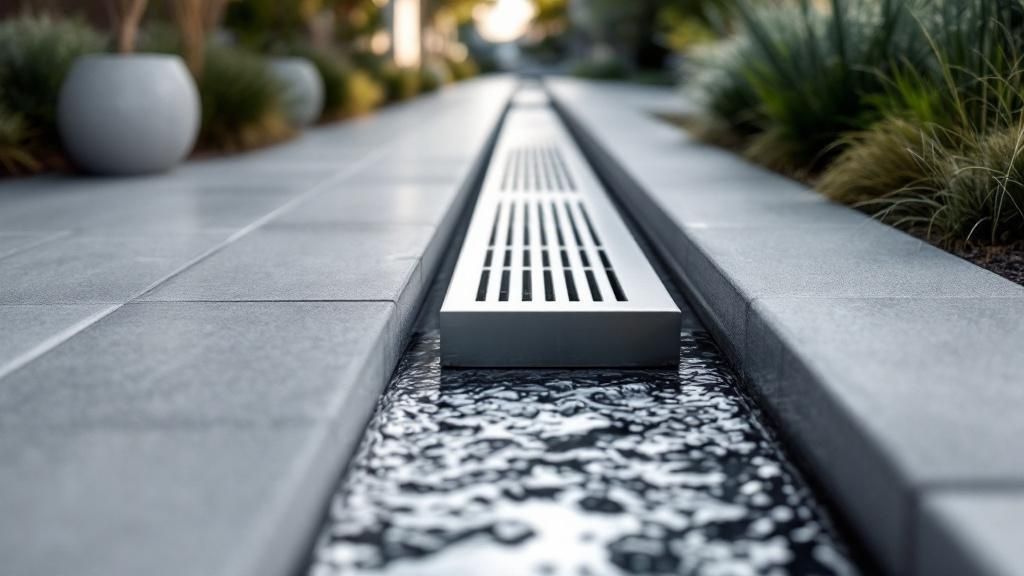
4. Drainage Channels and Trench Drains
Drainage channels, often called trench drains, are linear surface-level systems designed to capture and redirect water runoff efficiently. Installed flush with your patio surface, they consist of a channel or trench covered by a removable grate. This design allows them to collect a high volume of water across a wide area, making them one of the most effective and aesthetically pleasing patio drainage solutions available.
These systems are highly visible yet can be integrated seamlessly into the patio design, preventing water from pooling and protecting the underlying structure from moisture damage.
When to Use a Drainage Channel
Trench drains are a superior choice in specific situations where other solutions might fall short:
- Large, Flat Patios: For expansive, non-sloped surfaces like large paver patios or pool decks where grading is minimal, a trench drain can effectively collect water across the entire plane.
- Concentrated Flow Paths: If your patio is at the bottom of a driveway or a long walkway, a trench drain installed at the transition point will intercept the concentrated sheet flow before it floods your space.
- Doorway Protection: Placing a channel drain directly in front of sliding glass doors or entryways provides a critical line of defense, preventing water from seeping into your Morgan Hill home during heavy rainfall.
These systems are popular for both commercial applications, like hotel pool decks, and residential patios in areas like Florida and Chicago, where managing intense rain is crucial.
Pro-Tip: Elevate your patio's design by choosing decorative grates. Brands like ACO and NDS offer grates in various materials (cast iron, stainless steel, bronze) and patterns (from simple slots to intricate floral designs), turning a functional necessity into a stylish architectural feature.
Installation and Best Practices
Successful installation hinges on precision to ensure proper function and a clean look.
To guarantee your trench drain works flawlessly and complements your patio design, pay close attention to these details:
- Sufficient Slope: The channel itself must be installed with a slight slope, typically between 0.5% and 1%, towards the designated outlet. This ensures water flows out and doesn't sit stagnant in the drain.
- Appropriate Grate Selection: Choose a grate with a load rating suitable for the traffic it will receive. For a standard patio, pedestrian-rated grates are sufficient. If it crosses a driveway, you'll need a vehicle-rated grate.
- Channel Material: Select a channel material based on your climate and budget. Polymer concrete offers excellent durability and chemical resistance, while High-Density Polyethylene (HDPE) is a lightweight and cost-effective alternative.
5. Dry Wells and Soakaways: The Infiltration Solution
A dry well, also known as a soakaway, is an underground structure designed to collect excess runoff and slowly disperse it into the surrounding soil. It’s essentially a buried pit, often made from a prefabricated high-density plastic chamber or filled with gravel, that acts as a holding tank for water. Runoff from the patio is directed into the well via a pipe, where it then percolates down and out into the ground.
This method is one of the most eco-friendly patio drainage solutions because it recharges local groundwater tables rather than sending water into the municipal storm system. It’s an effective endpoint for channel drains, downspouts, or French drains.
When to Use a Dry Well
This infiltration system is an ideal choice for specific site conditions and goals:
- Good Soil Permeability: Dry wells work best in sandy or loamy soils that allow water to soak in at a reasonable rate. They are not suitable for heavy, non-porous clay.
- Space Limitations: When there is no suitable location to discharge a drainage pipe, like a street or a lower part of the yard, a dry well provides an on-site disposal solution.
- Eco-Conscious Designs: For homeowners in Morgan Hill looking to manage stormwater sustainably, a dry well minimizes your property’s impact on the public drainage infrastructure. For integrated site water management, understanding how your patio drainage interacts with systems like septic tanks is also crucial for overall property health.
A historic home in Virginia might use a dry well with a decorative cover to manage patio runoff while preserving the landscape’s aesthetic, proving its versatility.
Pro-Tip: Always conduct a percolation test before installation. This simple test measures how quickly your soil absorbs water and is essential for determining if a dry well is viable and how large it needs to be.
Installation and Best Practices
The success of a dry well hinges on proper sizing and placement.
To ensure your system functions effectively for years, focus on these critical details:
- Proper Sizing: The well's volume must be calculated based on the square footage of the patio area it serves and local peak rainfall data. An undersized well will quickly become overwhelmed.
- Safe Placement: Install the dry well at least 10 feet away from your home's foundation and other structures to prevent water from saturating the ground near critical load-bearing walls.
- Clean Aggregate: Use clean, graded gravel or stone to fill the pit around and under the chamber. This creates voids for water storage and prevents sediment from clogging the system.
- Include a Pre-Filter: Installing an inline filter or a small catch basin before the pipe enters the dry well will capture leaves and debris, significantly extending the system's life.
6. Gutters and Downspout Management
Often overlooked in patio design, your home's roof drainage system is a primary source of water that can flood your outdoor living space. Gutters and downspouts are designed to collect and route massive amounts of rainwater away from your foundation. If this system directs water onto or near your patio, it can quickly cause pooling, erosion, and staining. Effective gutter and downspout management is one of the most fundamental patio drainage solutions available.
By strategically controlling this concentrated flow of water, you can prevent your patio from becoming the default drainage field for your entire roof. This proactive approach protects the patio surface and its sub-base from the damaging effects of water saturation.
When to Use This Method
Managing roof runoff is essential for almost every patio adjacent to a house, but it's especially critical in these situations:
- Large Roof Areas: Homes with expansive roofs collect significant volumes of water that can easily overwhelm a patio if not diverted properly.
- Proximity to House: For patios built directly against the home, downspouts are the number one cause of localized flooding and moisture issues against the foundation.
- Integrated Design: In a townhouse in Oregon, a rain chain might replace a traditional downspout, directing water into a decorative collection basin that then connects to an underground drain, blending function with aesthetics.
For a deeper dive into how these systems protect your property, you can read more about the overall importance of gutters and their role in comprehensive water management.
Pro-Tip: Match your downspout extensions and splash blocks to your landscape aesthetic. Buried drainage pipes offer a seamless look, while decorative rain chains or stone-filled splash guards can become attractive features in your garden design.
Installation and Best Practices
Simple adjustments can make a world of difference in protecting your patio. Focus on moving water far away from your patio and foundation. A colonial home in Massachusetts might solve this by connecting downspouts directly to underground pipes that daylight far from the house, while a ranch home in Arizona could use decorative splash blocks to disperse water into surrounding desert landscaping.
To ensure your system effectively protects your patio, follow these key practices:
- Proper Sizing: Ensure your gutters are correctly sized for your roof. A common rule is to provide at least one square inch of gutter cross-section for every 100 square feet of roof area.
- Extend Downspouts: Downspout extensions are a simple, inexpensive solution. They should carry water a minimum of six feet away from the patio and foundation.
- Buried Drainage Lines: For a permanent and invisible solution, connect downspouts to solid, non-perforated PVC pipes buried in a shallow trench that directs water to a safe discharge point.
- Regular Maintenance: Clogged gutters will overflow directly onto your patio. Clean them at least twice a year, in late spring and late fall, to ensure they function as intended.
7. Rain Gardens and Bioswales
Rain gardens and bioswales are beautifully functional, landscaped depressions designed to capture, treat, and slowly absorb patio runoff. Instead of piping water away, these systems use a specialized mix of soil, mulch, and water-tolerant native plants to filter pollutants and allow stormwater to percolate naturally into the ground. A rain garden is typically a bowl-shaped garden, while a bioswale is a more linear, channel-like feature, but both serve the same eco-friendly purpose.
These are among the most aesthetically pleasing and sustainable patio drainage solutions available, turning a water problem into a vibrant garden feature that supports local ecosystems and reduces strain on public storm drains.
When to Use a Rain Garden or Bioswale
This nature-based approach is ideal for homeowners who want to manage runoff in an environmentally responsible way:
- Eco-Conscious Properties: For those looking to create a sustainable landscape, a rain garden adds beauty while actively improving local water quality.
- Large Patio Areas: Patios with significant non-permeable surface area generate substantial runoff. A rain garden can effectively manage this volume.
- Managing Downspout Discharge: They are perfect for capturing and treating water directed from roof downspouts that would otherwise flood a patio area.
For Morgan Hill homeowners interested in green infrastructure, a rain garden not only solves drainage issues but also creates a habitat for pollinators like birds and butterflies, enhancing your property's natural appeal. If you are interested in creating a more sustainable outdoor space, you can learn more about eco-friendly landscaping on tamuradesigns.com.
Pro-Tip: Connect your patio's drainage outlet, such as a channel drain or downspout, directly to the rain garden's inlet. This creates a seamless, self-sustaining system that requires minimal intervention once established.
Installation and Best Practices
Successful rain gardens and bioswales depend on proper design and plant selection. Their effectiveness is rooted in soil science and hydrology, so careful planning is key.
Focus on these critical details for a thriving, low-maintenance installation:
- Correct Sizing: The garden should be sized to roughly 20-30% of the impervious drainage area it serves (e.g., your patio and any connected roof sections).
- Strategic Location: Place the rain garden at least 10 feet away from your home's foundation to prevent any risk of water intrusion. It should be in a naturally low spot where water can be easily directed.
- Engineered Soil Mix: The key to infiltration is the soil. A typical mix is 50-60% sand, 20-30% compost, and 20-30% topsoil. This ensures water drains within 24-48 hours, preventing standing water and mosquito issues.
- Native Plant Selection: Choose hardy, native plants adapted to your local climate and varying moisture levels. They will thrive with minimal care and provide maximum ecological benefits.
8. Sump Pump Systems: The Active Water Evacuator
A sump pump system is an active, mechanical solution designed to forcibly remove water from a specific collection point. It involves a sump pit or basin installed at the lowest point of the area, a pump that sits inside the pit, and a discharge pipe that carries water away from your home. When water fills the basin and reaches a certain level, a float switch activates the pump, which then ejects the water to a safe location.
While often associated with basements, sump pumps are powerful and effective patio drainage solutions, especially for sunken patios or areas where gravity-fed systems are not feasible. This active approach provides a reliable defense against flooding and persistent water accumulation.
When to Use a Sump Pump System
This powerful solution is the best choice for challenging drainage situations:
- Sunken or Below-Grade Patios: If your patio sits lower than the surrounding landscape, gravity drainage is often impossible. A sump pump is the only reliable way to lift and remove collected water.
- High Water Table: For homes in areas with a consistently high water table, a sump pump connected to a French drain or channel drain system can actively manage groundwater, keeping the patio's sub-base dry.
- Extreme Rainfall: In regions like Miami that experience intense downpours, a high-capacity pump can evacuate large volumes of water quickly, preventing patio flooding that other systems might not handle.
For Morgan Hill homeowners with a uniquely challenging patio layout, such as a walk-out basement patio, a sump pump system provides peace of mind that your outdoor space will remain dry and usable, regardless of the weather.
Pro-Tip: Always install a battery backup system or a generator hookup for your sump pump. The worst storms often cause power outages, and a backup ensures your pump keeps working when you need it most, preventing a catastrophic failure.
Installation and Best Practices
The reliability of a sump pump system hinges on proper installation and regular maintenance. Leading brands like Zoeller, Wayne, and Superior Pump offer a range of dependable models.
To ensure your system operates flawlessly for years, focus on these critical details:
- Correct Sizing: The pump’s horsepower (HP) must be matched to the expected water volume. A 1/3 HP pump is suitable for most residential patios, but areas with higher risk may need a 1/2 HP or stronger model.
- Proper Discharge: The discharge pipe must terminate at least 10-20 feet away from your home's foundation, preferably on a downward slope, to prevent the evacuated water from simply cycling back to the patio.
- Regular Testing: Test your pump monthly during wet seasons. Pour a bucket of water into the sump pit to ensure the float switch engages and the pump activates correctly. This simple check can prevent a major headache later.
Patio Drainage Solutions: 8-Option Comparison
| Drainage Solution | Implementation Complexity 🔄 | Resource Requirements 💡 | Expected Outcomes ⭐📊 | Ideal Use Cases 💡 | Key Advantages ⚡ |
|---|---|---|---|---|---|
| French Drain Systems | Medium-High (excavation, slope needed) 🔄🔄 | Moderate to High (materials, possible pro) 💡 | Highly effective for surface & subsurface water ⭐⭐📊 | Persistent water problems; patios with drainage issues | Long-lasting, low maintenance, versatile ⚡ |
| Proper Grading and Sloping | Low-Medium (soil reshaping, compaction) 🔄 | Low (tools like laser level, compactor) 💡 | Cost-effective drainage; prevents pooling ⭐📊 | New patios; flat or low-slope areas needing basic drainage | No ongoing maintenance, foundational ⚡ |
| Permeable Paving Materials | Medium-High (specialized installation) 🔄🔄 | High (materials + expertise) 💡 | Eliminates surface pooling; eco-friendly ⭐⭐📊 | Patios requiring runoff reduction and aesthetics | Environmentally friendly, groundwater recharge ⚡ |
| Drainage Channels & Trench | Medium-High (precise leveling, installation) 🔄🔄 | Moderate-High (materials & professional install) 💡 | Efficient surface water collection ⭐⭐📊 | Areas with concentrated water flow; aesthetic integration | Handles high volumes, professional look ⚡ |
| Dry Wells and Soakaways | Medium (excavation, testing needed) 🔄 | Moderate (excavation, materials) 💡 | Slow water dispersal underground ⭐📊 | Areas without outlets or as endpoints for drainage systems | Underground, low maintenance, effective ⚡ |
| Gutters & Downspout Mgmt | Low-Medium (modifications & extensions) 🔄 | Low to Moderate (materials & minor labor) 💡 | Prevents roof water overload on patios ⭐📊 | Roof runoff management; patios affected by downspouts | Inexpensive, protects foundation, immediate impact ⚡ |
| Rain Gardens & Bioswales | Medium (landscaping & planting) 🔄 | Low to Moderate (plants, soil prep) 💡 | Sustainable runoff filtering & aesthetics ⭐⭐📊 | Environmentally conscious landscapes needing runoff control | Adds beauty, filters pollutants, low maintenance ⚡ |
| Sump Pump Systems | High (mechanical install, power needed) 🔄🔄🔄 | High (pump, power, backup systems) 💡 | Active water removal for severe issues ⭐⭐📊 | Below-grade patios or persistent groundwater problems | Rapid removal, effective in poor soils, reliable with backup ⚡ |
Crafting Your Dry-Patio Strategy
After exploring the diverse array of patio drainage solutions, from the foundational importance of proper grading to the sophisticated mechanics of a sump pump system, one truth becomes clear: there is no single "magic bullet" for a waterlogged patio. Instead, the most effective approach involves creating a customized, multi-layered strategy tailored to the unique topography, soil conditions, and rainfall patterns of your Morgan Hill property. A truly resilient system doesn't rely on one method alone but integrates several components into a cohesive, high-performance network.
Think of it as building a defensive line for your outdoor living space. Your first line of defense is proactive water management. This includes directing roof runoff with properly maintained gutters and downspouts and establishing a fundamental slope away from your home’s foundation. This initial step handles the bulk of the water before it ever becomes a problem on your patio surface.
Integrating Your Solutions
For the water that remains, your second line of defense comes into play. This is where you select the right tools for the job based on the specific challenges you face.
- For widespread, persistent dampness: A combination of a French drain system to intercept subsurface water and permeable pavers to allow surface water to percolate through can be a powerful duo.
- For concentrated runoff from driveways or large hardscapes: Strategically placed trench drains or channel drains are indispensable for capturing and redirecting high volumes of water efficiently.
- For properties with heavy clay soil or low-lying areas: A dry well or sump pump acts as a final collection point, actively removing water that has nowhere else to go.
- For an eco-conscious approach: Integrating a rain garden or bioswale not only manages excess water but also adds a beautiful, sustainable feature to your landscape that benefits local ecosystems.
Key Insight: The most successful patio drainage solutions are not isolated installations. They are integrated systems where each component supports the others, creating a comprehensive plan that addresses water from its source to its final, safe destination.
From Planning to Execution
Executing this strategy requires careful planning. You’ll need to map out the flow of water across your property, understand the specific materials required for each solution, and ensure every connection is secure. For systems like French drains, dry wells, or channel drains, this involves a variety of essential pipe fittings and connectors to create a leak-proof and efficient pathway for water. Taking the time to select the right components is just as critical as the installation itself, ensuring the long-term durability and effectiveness of your entire drainage network.
Ultimately, investing in a robust patio drainage solution is an investment in your home’s longevity, value, and your enjoyment of it. A dry, stable patio prevents costly foundation damage, eliminates slippery and hazardous surfaces, and transforms your outdoor area into the reliable, welcoming retreat it was meant to be. By moving beyond a single fix and embracing a strategic, integrated approach, you can protect your Morgan Hill home and ensure your patio remains a perfect setting for relaxation and entertainment for many years to come.
Ready to turn your drainage plan into a professional, lasting reality? The experts at Tamura Designs Landscape and Construction specialize in creating custom-designed drainage systems that protect and enhance your property. Contact Tamura Designs Landscape and Construction today to schedule a consultation and build a patio that stands the test of time and weather.