Smart Planning That Prevents Costly Mistakes
This is the point where so many DIY projects go wrong. Eager to get started, people grab a shovel and start digging without doing the real homework first. But the truth is, the success of your flagstone walkway installation is decided long before you ever lift a stone. It’s all about reading your landscape like a pro to understand its unique quirks and prevent expensive do-overs later.
Assessing Your Property’s Natural Flow
Every yard has a story, and a big part of that story is how it handles water. Before you even sketch a design, go outside during a heavy rain and watch what happens. Where does water pool up? Where does it naturally run off? Trying to fight your property's drainage is a battle you'll never win. A walkway that accidentally becomes a dam can cause a soggy lawn, a flooded basement, or a path that simply washes away. The trick is to make your walkway work with the land's natural contours.
I remember a project for a client in Morgan Hill who wanted a dead-straight path from their patio to a new garden shed. The problem was, that route went right across a subtle dip in the yard that turned into a small creek during storms. If we had built it there, it would have been a constant puddle with an unstable base. Instead, we designed a gentle, organic curve that followed the higher ground. This not only solved the drainage problem but also created a more visually interesting and structurally solid walkway.
Balancing Aesthetics with Practical Needs
A walkway needs to do more than just look pretty; it has to be functional for your daily life. Before you fall in love with a design, think through these practical points:
- Foot Traffic: How many people will use this path at once? A main path to your front door should be at least 48 inches wide, giving two people enough room to walk together comfortably. A less-traveled garden path can be a bit narrower, maybe 36 inches.
- Accessibility: Will you need to roll a lawnmower, a wheelbarrow, or your trash cans down this path? Make sure the width and any curves are generous enough to handle that without a struggle.
- Existing Features: Work with what you’ve got. That huge, beautiful oak tree is a feature, not a roadblock. Plan your path to curve gracefully around its root system. This avoids damaging the tree and prevents its roots from pushing up your stonework in a few years.
As you map out your project, it's smart to think about the total investment, whether you're doing it yourself or hiring a pro. Looking at resources that explain how to price handyman jobs can give you a solid idea of how to budget for materials and labor, making sure your plan is financially sound from the get-go.
This kind of careful planning is part of a larger trend toward high-quality outdoor living spaces. The global market for paving stones, including flagstone, was valued at around $40.3 billion in 2021 and is expected to hit $86.7 billion by 2031. You can read more about these market trends on Allied Market Research. It shows that people are investing more in creating durable, beautiful outdoor areas.
Ultimately, great preparation is the foundation of any successful project. If you're looking for more inspiration, checking out examples of custom landscaping design and installation can give you some fantastic ideas for making your walkway a seamless part of a bigger, more beautiful picture.
Choosing Materials That Match Your Vision and Budget

With a solid plan in hand, it's time for the fun part: picking out the materials that will bring your walkway to life. This is where your vision starts to become tangible, but it's also a point where smart choices can save you from future headaches and budget issues. The world of flagstone is surprisingly diverse, and not all stone is created equal, especially when it comes to a successful flagstone walkway installation.
Decoding the Stone Yard: What Really Matters
Walking into a stone yard for the first time can feel a bit overwhelming with all the pallets of stone in different colors, textures, and names. The secret is to look past the surface appearance and focus on performance. Here’s what I always tell my clients to look for:
- Thickness and Consistency: Always aim for flagstones that are at least 1.5 to 2 inches thick. Anything thinner is just asking for trouble, as it's more likely to crack underfoot or heave during freeze-thaw cycles. Consistent thickness is another huge time-saver; if your stones are all roughly the same depth, you’ll spend much less time leveling each one.
- Surface Texture: A slightly cleft or natural texture provides great slip resistance, which is absolutely critical for a walkway. Polished or super-smooth stones might look sleek, but they can become a serious slipping hazard when wet.
- Durability and Type: Think about your local climate. Softer stones like sandstone are easier to cut and shape but can absorb more water and weather faster in damp climates. Harder, denser stones like quartzite or slate are far more durable. A stone that looks great in a dry, sunny climate might not hold up through a tough Pennsylvania winter.
Before you pick your stone, it helps to understand the main players. Here's a quick comparison of some popular choices to help you see how they stack up in the real world.
Flagstone Types and Performance Comparison
| Stone Type | Cost Range (per sq ft) | Durability Rating | Climate Suitability | Best Applications |
|---|---|---|---|---|
| Sandstone | $3 – $7 | Moderate | Best for dry, arid climates. Can be prone to flaking in freeze-thaw cycles. | Casual walkways, desert-style gardens. Easy to shape. |
| Bluestone | $6 – $12 | High | Excellent in most climates, including freeze-thaw. Very dense. | Formal walkways, patios, pool surrounds. |
| Slate | $5 – $10 | High | Good for wet and cold climates due to low water absorption. | Modern walkways, patios. Naturally slip-resistant. |
| Quartzite | $7 – $15 | Very High | Extremely durable in all climates. Resists weathering and heat. | High-traffic walkways, areas with extreme weather. |
| Limestone | $5 – $9 | Moderate-High | Varies; denser varieties perform well. Can be stained by acid rain. | Formal gardens, classic walkways. Softer and easier to cut. |
This table shows there’s a perfect stone for every project, but it requires matching the material's properties to your specific needs and environment. Choosing a durable stone like quartzite might cost more upfront but will save you maintenance and replacement costs down the road.
The growing demand for natural stone isn't just something we're seeing locally; it's a major market trend. The stone flooring market, which includes flagstone, was valued at an estimated $12.8 billion in 2023 and continues to expand. You can learn more about the global stone flooring market on gminsights.com. This proves that an investment in high-quality stone is a choice with lasting value.
More Than Just Stone: The Unsung Heroes
The flagstones are the star of the show, but their supporting cast is what guarantees a professional-grade installation. Forgetting these materials is a classic rookie mistake that I see all too often.
- Base Gravel: This is the foundation of your entire project. I recommend a crushed, angular aggregate, often called road base or ¾” minus. The sharp, interlocking edges are what lock together to provide rock-solid stability.
- Leveling Material: Step away from regular sand. We exclusively use stone dust, which also goes by names like quarry screenings or decomposed granite. It packs down incredibly firm, won’t wash away like sand, and isn't an open invitation for ants to build a home. You'll use this to create a perfect bed for setting each stone.
- Joint Filler: For a dry-laid walkway, your best options are either more stone dust or a polymeric sand. Polymeric sand is a fantastic product—it's a mix of fine sand and special additives that harden when wet, locking the stones in place and seriously deterring weed growth.
For more on these foundational materials, our guide on installing a flagstone patio discusses these concepts in more detail, and the principles apply directly to building your walkway.
The Right Tools for the Job
You don't need a full-blown workshop, but having the right tools makes the work go faster, feel safer, and be a lot more enjoyable.
- Must-Haves: A sturdy wheelbarrow, a pick mattock, a good shovel, a 4-foot level, quality knee pads, and a dead blow mallet are non-negotiable. That mallet is especially important for tapping stones into place without cracking them.
- Worth Renting: For any walkway over 100 square feet, do yourself a favor and rent a plate compactor. It ensures your gravel base is uniformly compacted, which is the key to preventing settling later on. Trying to hand tamp a large area is back-breaking work and you’ll never get the same solid result.
- Consider Buying: An angle grinder fitted with a diamond blade is a lifesaver for making clean, precise cuts around edges or for creating curves. While a hammer and chisel can get the job done, a grinder gives you far more control and a much cleaner finish.
Finally, an underrated tip: build a good relationship with your local stone yard. They can be an incredible resource, often helping with quantity calculations and arranging delivery. A good supplier can become a true partner in your project.
Excavation and Base Prep That Stands the Test of Time
If there’s one part of a flagstone walkway installation that separates a professional-looking job from an amateur one, it’s the prep work. This is where the project truly succeeds or fails. Before you even think about laying a single beautiful stone, the work you do in the dirt will determine if your walkway stays level for years or turns into a wavy, uneven mess. This isn't just about digging a trench; it's about building a hidden foundation that can handle everything from heavy rain to seasonal ground shifts.
Getting the Depth Right for Your Climate
You’ll often hear the standard advice to dig down 6 to 8 inches, and while that’s a decent benchmark, it’s not one-size-fits-all. The right depth really depends on your local climate and soil type. Here in Morgan Hill, we don't deal with severe freeze-thaw cycles, so a 6-inch excavation is usually enough for a solid base. However, a contractor working in a colder climate like Pennsylvania, as one expert points out, would likely need to dig deeper to prevent the ground from heaving during harsh winters.
The main goal is to remove all the dark, organic-rich topsoil until you reach the firm subgrade. This layer is your real starting point. If you have heavy clay soil that holds water, you must make sure your trench is designed to drain water away from the path. On the other hand, for sandy soil that shifts easily, a deeper, well-compacted base is absolutely essential to prevent the stones from settling over time.
This screenshot shows excavation on a large, professional scale, but the principle is the same for your walkway.

No matter the size of the project, the final stability depends entirely on the quality of the ground preparation underneath.
Building a Bulletproof Base Layer
After you've dug to the correct depth, it's time to build your base. This is where you create a stable foundation with layers of engineered material designed to support the flagstone and manage water effectively.
This infographic breaks down the essential flow of preparing the site for a durable flagstone installation.
The visual clearly shows that after marking the area, the key actions are removing soil and then compacting the earth to create a solid, unyielding platform for your base materials.
First, compact the native subgrade soil. For any walkway bigger than a few stepping stones, renting a plate compactor is one of the smartest moves you can make. It delivers powerful vibrations to create a rock-solid foundation. Once the subgrade is compacted, you'll lay down your base material. We always recommend a 4-inch layer of ¾-inch angular gravel, sometimes called road base. The trick is to add it in 2-inch lifts (or layers), lightly watering and compacting each lift before adding the next one. This process locks the gravel together, creating a stable mass that resists settling.
To finish the base, you'll add a 1 to 2-inch layer of stone dust on top of the compacted gravel. This material acts as your leveling bed. Unlike sand, which can be washed out by rain or disturbed by ants, stone dust packs down hard, providing a firm yet forgiving surface to set your flagstones. It’s perfect for making slight height adjustments to individual stones while holding them securely once everything is tamped down. This layered, compacted method is the pro's secret to a walkway that looks great for decades.
Stone Setting Techniques That Create Professional Results
With a solid, compacted base ready to go, we've arrived at the most rewarding part of building a flagstone walkway: the art of setting the stones. This is where your pile of rocks transforms into a beautiful, functional path. Think of it as a giant, heavy jigsaw puzzle, but one where you get to shape the pieces. The aim is to build a surface that’s both stunning and solid, blending your creative vision with sound technique.
The Art of Placement and Pattern
When you're working with irregular flagstone, the goal is to make the layout feel natural and deliberate, not jumbled. I always start by placing the "hero" stones—the biggest, most interesting ones—at key spots, like where the path curves or at the start and end. These become the anchors for your design. From there, you can fill in the gaps with smaller stones, turning and flipping them to find the perfect fit.
A common pitfall is getting fixated on one small section. I suggest laying out several stones loosely across a larger area before you set them permanently. This gives you a better feel for the overall pattern and allows for adjustments on the fly. Pay attention to the flow. Try to avoid long, straight joints that run parallel to the walkway's edge; they can look artificial and pull the eye in an odd way. Instead, aim for staggered, interlocking joints that give it a more organic look. This is a fundamental principle in quality stonework, which you can see in examples of professional custom stone masonry services.
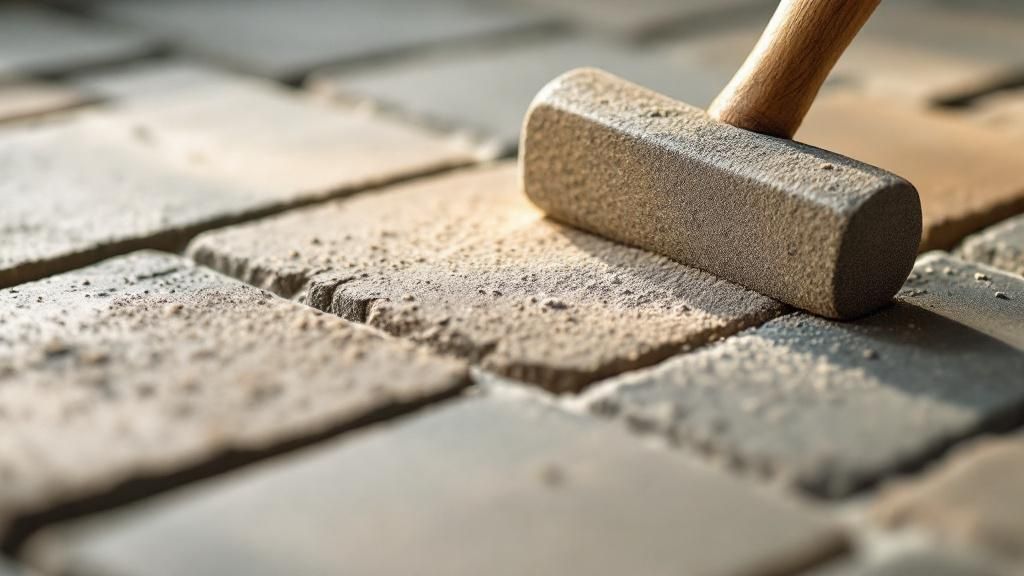
Leveling: The Secret to a Stable Surface
A wobbly stone isn't just a nuisance; it's a trip hazard and a clear sign of a rushed job. Getting a perfectly level surface with stones of different thicknesses takes patience, but it's completely doable with the right approach. This is where your stone dust leveling bed is critical.
After you place a stone, press down on its corners. If it rocks, it’s not stable. Lift it out and use a small hand trowel to add or scrape away a bit of stone dust to fix the high or low spots. Set the stone back in place and check it again, first by hand and then with a 4-foot level. A few firm taps with a dead blow mallet will help it settle securely into the dust. Remember to check the level not just on the stone itself but also against its neighbors. You want a smooth, continuous surface with no raised edges to trip over. On bigger jobs, a vacuum lifter like a GRABO can be a real back-saver.
To help you get this part right, here’s a breakdown of the essential tools and techniques for setting stones like a pro.
| Tool | Primary Use | Skill Level Required | Safety Notes | Alternative Options |
|---|---|---|---|---|
| Dead Blow Mallet | Gently tapping stones to settle them into the base without cracking them. | Beginner | Wear gloves to protect your hands. | Rubber mallet (less effective at transferring force). |
| 4-Foot Level | Checking for level across individual stones and between adjacent stones. | Beginner | Place it gently on stones to avoid scratching the surface. | A shorter level can work, but a longer one gives a more accurate reading. |
| Angle Grinder | Making precise cuts to shape stones for tight fits or smooth edges. | Intermediate | Always wear safety glasses, hearing protection, and a dust mask. | Hammer and chisel (for rough, rustic shaping only). |
| Hand Trowel | Making fine adjustments to the stone dust leveling bed. | Beginner | Keep hands clear when lifting and placing heavy stones. | Your hands can work in a pinch, but a trowel offers more precision. |
| Vacuum Lifter | Lifting and placing heavy or awkward stones with less strain. | Beginner | Ensure a proper seal on the stone's surface before lifting. | Strong helpers and good lifting technique. |
This table shows that while some tools make the job easier, the core techniques of leveling and fitting can be done with basic equipment and a bit of patience.
Managing Joints and Making Cuts
The gaps between your stones are just as important as the stones themselves for the final look and durability. Aim for consistent joint widths, typically between ½ inch and 2 inches. If the joints are too narrow, the stones can chip as they expand and contract with temperature changes. If they're too wide, they can look messy and create weak spots in the walkway.
You'll inevitably hit a point where no stone in your pile seems to fit a specific spot. That’s when it’s time to start cutting. While you can use a hammer and chisel for rough shaping, an angle grinder with a diamond blade offers much better control for clean, precise cuts. It's especially handy for creating smooth curves or getting a tight fit against a hard edge. Don't shy away from cutting a stone to make it fit just right—a few well-placed cuts can elevate your walkway from a simple DIY project to something that looks truly professional.
Finishing Details That Transform Good Into Great

With your stones perfectly set, it's easy to feel like you've crossed the finish line. But the details that come next are what truly separate a good walkway from a great one. This is the stage where your hard work becomes a stunning, long-lasting feature of your landscape. We're talking about the joints, the edges, and the final cleanup that make your project shine.
Choosing the Right Joint Filler
The material you sweep between your flagstones does more than just fill a gap; it’s a critical piece of the puzzle for stability and weed prevention. For dry-laid walkways like this one, you have two main options:
- Stone Dust: Also known as screenings, this is the same stuff you used for your leveling bed. It’s a fantastic choice because it packs down firmly. If any part of the leveling bed settles over time, the stone dust in the joints will naturally work its way in to fill small voids, creating a cohesive, stable system.
- Polymeric Sand: This is a more modern option, a mix of fine sand and special additives that harden when you add water. It costs more but offers top-notch weed resistance and won't wash out in a downpour. A flagstone walkway installation using polymeric sand requires careful application to avoid staining the stones, but the low-maintenance result is often worth the extra effort.
For most irregular flagstone paths where the joints are between ¼ inch and 1.5 inches wide, either material works well. Polymeric sand will give you a harder, more permanent joint, while stone dust offers a more traditional, slightly softer look that’s easy to top off if needed down the road.
Securing the Edges for Longevity
A walkway without a solid edge restraint is like a book without a cover—it will eventually fall apart. The edging is what holds everything together, stopping the stones from shifting outward under foot traffic and the freeze-thaw cycles of the seasons. While you could pour a concrete curb, it’s often overkill for a garden path and can look a bit harsh.
A much better, less visible solution is a high-quality, flexible plastic or aluminum paver edging. You install it along the perimeter of the walkway and secure it into the ground with long, heavy-duty spikes driven through the compacted base. Once it's in, you just backfill it with soil and mulch. The edging completely disappears, leaving you with a crisp, clean line that locks your stones securely in place for decades. This subtle detail ensures your path stays put without distracting from the natural beauty of the stonework.
The Final Flourish: Cleanup and Landscaping
Now it's time for the big reveal. After filling your joints, the most important step is to thoroughly clean the surface of your walkway. Use a leaf blower on a low setting, followed by a soft-bristled broom, to get rid of every last bit of dust and debris. This is absolutely critical if you used polymeric sand, as any leftover dust can create a hazy stain once it gets wet.
Once the walkway is pristine, you can blend it into the surrounding landscape. Soften the edges by planting low-growing, durable plants like creeping thyme or mondo grass. These can spill slightly over the stone, creating a natural, organic transition from the path to the garden bed. Adding some subtle, low-voltage path lighting can also transform the space, making it safe and inviting after dark. Take a step back and admire what you've built—not just a walkway, but a lasting enhancement to your home.
Troubleshooting When Things Don't Go as Planned
No matter how carefully you plan your flagstone walkway installation, the real world has a habit of throwing curveballs. Knowing how to adapt is what separates a frustrating weekend from a project you can be proud of. Let's look at some common hiccups, from wobbly stones to bigger issues that might show up later, and talk about how to fix them.
Dealing with Wobbly Stones and Uneven Joints
This is the classic flagstone frustration. You set a stone, it looks perfect, but then it rocks back and forth when you put weight on it. The temptation is to just pack more joint filler around it, but that's a band-aid solution that won't last. The real fix is to lift the stone and address the leveling bed underneath.
Use your trowel to scoop out or add a little stone dust. It's a game of small adjustments until the stone sits completely solid. Before you move on, double-check that it’s level with its neighbors. A wobbly stone is almost always a sign of an uneven base.
You might also find yourself with a gap between stones that just looks too wide. Instead of trying to force a fit, you can create what’s called a "dutchman"—a small piece of flagstone custom-cut to fill an awkward space. It’s a time-tested masonry trick that looks professional and intentional.
When Your Walkway Starts to Settle
Imagine this: you’ve finished the project, it looks amazing, but a few weeks later, one section has noticeably sunk. This almost always points back to the base preparation. Maybe you dug into a patch of softer soil, or a section of the gravel base wasn't compacted as well as the rest.
Here’s the right way to handle it:
- Carefully pull up the flagstones in the sunken area.
- Dig out the leveling sand and the gravel base material underneath.
- Add new base gravel in 2-inch layers, making sure to compact each layer thoroughly with a hand tamper.
- Once the base is solid, re-lay your leveling bed and set the stones back in place.
It feels like a lot of rework, but it's the only way to create a permanent fix and stop the problem from getting worse.
Navigating Unexpected Delays and Shortages
Sometimes the challenge has nothing to do with the stones themselves. You might hit a surprise utility line, find a massive tree root in your path, or learn your material delivery has been pushed back. For instance, the COVID-19 pandemic created major ripples in the paving stone market, affecting supply chains for quality materials like flagstone. You can find more details about how the global paving stone market was impacted on worldconstructiontoday.com.
When these things pop up, the key is to stay flexible. If you hit a buried line, stop work immediately and figure out if you can safely move forward or if you need to call a professional. If your stones are delayed, use that time to double-check your measurements or work on another part of the yard. A forced pause can sometimes give you the breathing room to make the final project even better.
Protecting Your Investment for Decades of Beauty
You've put in the time and effort to create a gorgeous flagstone walkway, and now it's time to make sure that investment pays off for years to come. Keeping your path looking its best isn't about constant work; it’s about a simple, seasonal maintenance routine that protects both its beauty and its structure. A little bit of care goes a long way in making sure your flagstone walkway installation remains a standout feature of your home.
Creating a Realistic Seasonal Maintenance Plan
The biggest threat to a walkway isn't foot traffic—it's the weather. Those freeze-thaw cycles in winter can be brutal, causing stones to shift and heave. A proactive approach is your best defense against mother nature.
- Spring Check-Up: Once the ground has thawed, take a walk down your path. Look for any stones that feel wobbly underfoot. Catching these early is key. You can usually fix a wobbly stone in minutes by lifting it, tossing a handful of stone dust underneath for support, and tamping it back down. This is also the best time to inspect the joints and top off any filler that washed away over the winter.
- Summer Vigilance: Sunny days and warm weather mean one thing: weeds. If you used stone dust for your joints, a few unwanted guests will likely pop up. Pull them by hand before their roots dig in deep. If you went with polymeric sand, you'll have far fewer weeds to worry about, but it’s still smart to do a quick check every now and then.
- Fall Preparation: Before the first frost, it's cleanup time. Grab a leaf blower or a stiff broom and clear away all the leaves, dirt, and other organic debris. This stuff traps moisture, which can lead to slippery moss growth and even stain your beautiful stones. Give the joints one last look-over to make sure they're in good shape for the winter ahead.
Refreshing Joints and Replacing Damaged Stones
Even a perfectly installed walkway will show some wear over time. Knowing how to handle small repairs will keep your path looking brand new and save you from calling in a pro for minor issues.
One of the simplest and most effective maintenance tasks is refreshing the joint material. After a few years, the filler can settle or get washed out by heavy rain. Topping it off is easy:
- Use a small brush or a shop vac to clean any loose dirt and debris from the joints.
- Pour fresh stone dust or polymeric sand over the walkway.
- Sweep the material across the stones, allowing it to fall into and fill the joints.
- Once the joints are full, use a leaf blower on a low setting or a soft broom to gently remove all the excess from the surface of the stones.
But what if a stone actually cracks? It might seem like a huge problem, but replacing a single stone is totally manageable. You'll need to carefully break up the damaged piece and remove the fragments. Then, dig out the old base material, and essentially repeat the same setting process you used for the original installation. Add and compact fresh gravel and stone dust, set the new stone in place, and make sure it’s perfectly level with the surrounding stones.
With over 30 years of experience, we've seen that a well-built walkway paired with simple, consistent care is the formula for enduring beauty. If you're dreaming up a new stone project or need advice on maintaining your current landscape, the team at Tamura Designs is here to help. Contact us today and let’s talk about how we can bring your outdoor vision to life.