Understanding Your Paver Driveway Project From Start to Finish
Starting a paver driveway installation is more than just a quick upgrade to your home's curb appeal. It's a full-on construction project that needs real planning to get it right. Seeing the whole picture—from the first shovel in the ground to the final sweep of sand—helps you set a realistic budget, timeline, and understand the work involved.
Think about it like this: you wouldn't build a house without a rock-solid foundation, right? The same logic applies here. The beautiful pavers you see on top are just the final layer of a carefully constructed system built to handle heavy vehicles and whatever Mother Nature throws at it for years to come.
Mapping Out the Project Journey
A successful paver driveway project isn't just about picking pretty stones. It starts with a good, hard look at your property to catch any potential issues before they turn into expensive headaches. For example, a driveway in a Morgan Hill neighborhood with heavy clay soil needs a totally different approach to digging and base prep than one on sandy ground near Monterey.
Before you even think about digging, you need to cover your bases:
- Permitting and Regulations: Give your local city or county building department a call. Many areas require permits for projects that change how water drains off your property or cover a certain amount of ground.
- HOA Guidelines: If you're in a community with a Homeowners Association, they often have strict rules on driveway materials, colors, and even how the work is done. It’s always best to get their approval first.
- Budgeting for the Unexpected: A smart move is to add a 10-15% contingency fund to your budget. It’s not unusual to find old utility lines, massive rocks, or poor soil once you start digging, and those surprises can add to the final bill.
DIY vs. Professional Installation: Making the Right Call
One of the biggest decisions is whether to do the paver driveway installation yourself or bring in a pro. While the DIY route might seem like a great way to save on labor costs, it’s a tough, physically demanding job that requires a lot of precision. One of the most common reasons paver driveways fail early is a poorly prepared base, which leads to sinking spots and drainage problems.
A professional contractor brings not just experience but also specialized gear like heavy-duty plate compactors and a deep understanding of local soil and weather conditions. They can spot problems a novice might miss and make sure your driveway is built to last. This expertise is especially important when you want the driveway to flow nicely with the rest of your landscaping. You can see how a pro handles this by checking out our guide on designing and installing custom entryways.
The popularity of pavers is surging because people appreciate how tough and stylish they are. The global market for paver blocks was valued at around USD 4.6 billion in 2024 and is expected to climb. This means more choices for you, from classic concrete styles to beautiful natural stone. You can learn more about this growing market and its trends with this industry analysis. Knowing this helps you see the value in your investment and why getting the installation right from the very beginning is so important.
Choosing the Right Pavers for Your Climate and Lifestyle

Picking the right pavers for your driveway is about much more than just finding a color you like. The materials you settle on will have a huge say in the durability, safety, and long-term look of your investment. A paver that looks fantastic in the mild, dry climate of inland Morgan Hill might not fare so well against the coastal fog and salt air in Monterey. This is exactly why your local climate and your family’s lifestyle should be at the top of your mind during this process.
Material Matters: Concrete, Clay, and Stone
Let's get into the main options you'll be considering. Concrete pavers are the go-to for many homeowners, and for good reason. They come in a massive variety of styles, colors, and textures, all while being extremely durable and budget-friendly. Because of how they are made, they have high strength ratings, making them perfect for handling the weight of vehicles day in and day out. The market for concrete pavers reached USD 16.4 billion in 2023 and is expected to keep growing, which tells you a lot about their reliability. You can dig deeper into the market forecast for concrete pavers here.
Natural stone pavers, like travertine or bluestone, offer a one-of-a-kind, premium look that simply can't be manufactured. Every single stone has its own character with unique veining and color variations. This uniqueness comes with a higher price tag, and some stones need specific care. For example, slate can sometimes flake in freeze-thaw cycles, making it better suited for milder areas. On the other hand, clay brick pavers give you that timeless, classic feel. They are famous for holding their color because it’s baked all the way through the brick, meaning it won’t fade. They're a great fit for traditional homes but can be more brittle than concrete.
To help you visualize the trade-offs, here’s a quick comparison of the most common paver materials.
Paver Material Comparison Guide
A comprehensive comparison of different paver materials including durability, cost, maintenance requirements, and climate suitability.
| Material Type | Durability Rating | Cost Per Sq Ft | Maintenance Level | Climate Suitability |
|---|---|---|---|---|
| Concrete Pavers | Very High | $4 – $8 | Low | Excellent for all climates, including freeze-thaw cycles. |
| Clay Brick Pavers | High | $5 – $10 | Low | Good for most climates, but can be brittle in extreme cold. |
| Natural Stone | Varies | $15 – $30+ | Varies (by stone) | Depends on stone type; some are not ideal for freeze-thaw. |
| Permeable Pavers | High | $8 – $15 | Low-Moderate | Excellent for rainy areas; helps with drainage. |
This table shows that while natural stone offers a premium look, concrete pavers often provide the best balance of cost, durability, and versatility for most homeowners.
Matching Pavers to Your Life and Location
Take a moment to think about how your driveway is actually used. Do you have kids who might turn it into a basketball court? A paver with a smoother texture will probably be a better, safer choice than a rough, cobbled one. If you live somewhere with heavy rainfall or are looking for a more eco-friendly choice, permeable pavers are a fantastic solution. They are designed with slightly larger gaps between the stones, which lets rainwater drain directly into the ground instead of running off into the street. This helps reduce local flooding and is great for the groundwater table.
Paver thickness is another detail that's easy to overlook but incredibly important.
- For a standard family driveway that sees cars and SUVs, a paver thickness of at least 60mm (about 2 3/8 inches) is the industry standard.
- If you expect heavier vehicles, like a work truck or an RV, you should step up to an 80mm (about 3 1/8 inches) paver. This provides the extra structural strength needed to prevent the pavers from cracking or shifting over time.
Choosing the right material isn't just about looks; it's about making sure your paver driveway installation is a long-lasting success that perfectly fits your home and your life.
Site Assessment and Excavation: Getting the Foundation Right
Before you even think about laying a single paver, the real work for your paver driveway installation begins. The success or failure of your entire project is determined by the quality of this initial groundwork. Proper preparation here is what prevents future headaches like sinking spots, shifting pavers, and drainage nightmares. Think of this stage as creating a stable canvas for your beautiful new driveway.
The first move isn't with a shovel—it’s with your phone. Calling 811 is a free and absolutely essential service that prompts local utility companies to mark underground lines for gas, water, and electricity. Trust me, hitting one of these is a dangerous and costly mistake you want to avoid. Once the pros have marked the area, you can grab your stakes and string lines to outline the perimeter of your driveway. This visual guide is your best friend for keeping lines straight and dimensions accurate.
Understanding Drainage and Soil Conditions
Water is the number one enemy of any paved surface. If you don't plan for it, rainwater will pool on your driveway, leading to ugly stains, moss, and even potential water damage to your home’s foundation. The industry standard is to build a slope of at least 1/4 inch per foot, which gently guides water away from your house and towards a drainage area like your lawn or the street. An easy trick is to tape a small block to one end of a 4-foot level to check your grade as you dig.
Your local soil type plays a huge role in how you should excavate. For instance, the heavy clay soil common in areas like Morgan Hill holds a lot of water and expands and contracts as temperatures change. For this soil, you'll need a deeper excavation, often 8 to 12 inches, to build a robust base that can handle that movement. On the other hand, sandy soil drains well but can be less stable. In this case, we often lay down a geotextile fabric before adding the base material to keep the layers from mixing over time and add long-term strength.
The Art of Digging and Preparing the Subgrade
Excavation is much more than just digging a hole; it’s about creating a perfectly uniform and solid foundation, called the subgrade. You can calculate your dig depth by adding up the height of your pavers (usually 2 3/8 inches), the sand bedding layer (1 inch), and the compacted base material (anywhere from 4-8 inches, depending on soil and how much weight the driveway will hold).
As the picture shows, big projects use heavy machinery to get the ground ready. While your driveway is on a smaller scale, the goal is exactly the same: create a solid, unmoving base. The final look of your driveway depends entirely on how well you do this initial work.
During the dig, you'll almost always run into a few surprises.
- Rocks and Boulders: You can usually pop out small rocks with a pickaxe. For larger ones, you might need a pry bar or even a sledgehammer to break them apart.
- Tree Roots: Be careful here. Cutting large roots can seriously harm or kill a tree. If you can't adjust the driveway layout, it’s best to call an arborist. Smaller roots can be handled with an axe or a reciprocating saw.
After digging to the right depth, the final critical step is compacting the soil you've just exposed. Rent a plate compactor and go over the entire area several times until the ground is firm and solid. This ensures it won’t settle later under the weight of the base, pavers, and your cars. Rushing this part is one of the main reasons driveways fail, making it one of the most important moments in your paver driveway installation.
Building Your Base: The Critical Layer Most People Rush
Now that your subgrade is solid and properly sloped, it’s time to construct the heart of your driveway—the base layer. I can't stress this enough: this is the most important part of a paver driveway installation. It's also the step where I see most DIY projects go wrong because people get impatient. A weak base is a recipe for disaster, leading to sinking pavers and an uneven surface, no matter how much you spent on the pavers themselves.
Mastering Base Materials and Compaction
Think of the base as the structural support for everything above it. Its job is to spread the weight of your cars evenly across the subgrade. The go-to material for this is crushed aggregate base, which is a mix of different-sized, angular crushed stones. The variety in size is what makes it work so well; the stones interlock tightly when compacted, forming a foundation that's incredibly strong and drains water effectively.
For a standard driveway, you'll want a base that's at least 4 to 6 inches deep after it has been fully compacted. If you're in an area with a lot of clay soil, like Morgan Hill, or if you plan on parking a heavy RV, I'd strongly recommend bumping that up to 8 inches or more. It’s a smart move that adds years to your driveway's life. You'll bring the aggregate in with a wheelbarrow, spread it evenly, and then compact it in layers, or "lifts," of about 2-3 inches each. Compacting in thin lifts ensures you get a rock-solid base from the bottom up. It’s tedious work, but it’s the difference between a professional result and a driveway that fails in a couple of years.
The Unsung Hero: Edge Restraints
Before you lay the final layer of your base, you have to install your edge restraints. These are the rigid borders that act like a frame for your paver field, keeping everything locked in place. They prevent the pavers from shifting outward over time, a problem called "creep." Without them, you’ll see gaps forming along the edges of your driveway, making it look sloppy and unstable. You have options like heavy-duty plastic, aluminum, or a poured concrete curb. Whatever you choose, secure them to the compacted base with long metal spikes driven deep into the ground.
This simple infographic breaks down how these essential pieces fit into the puzzle.
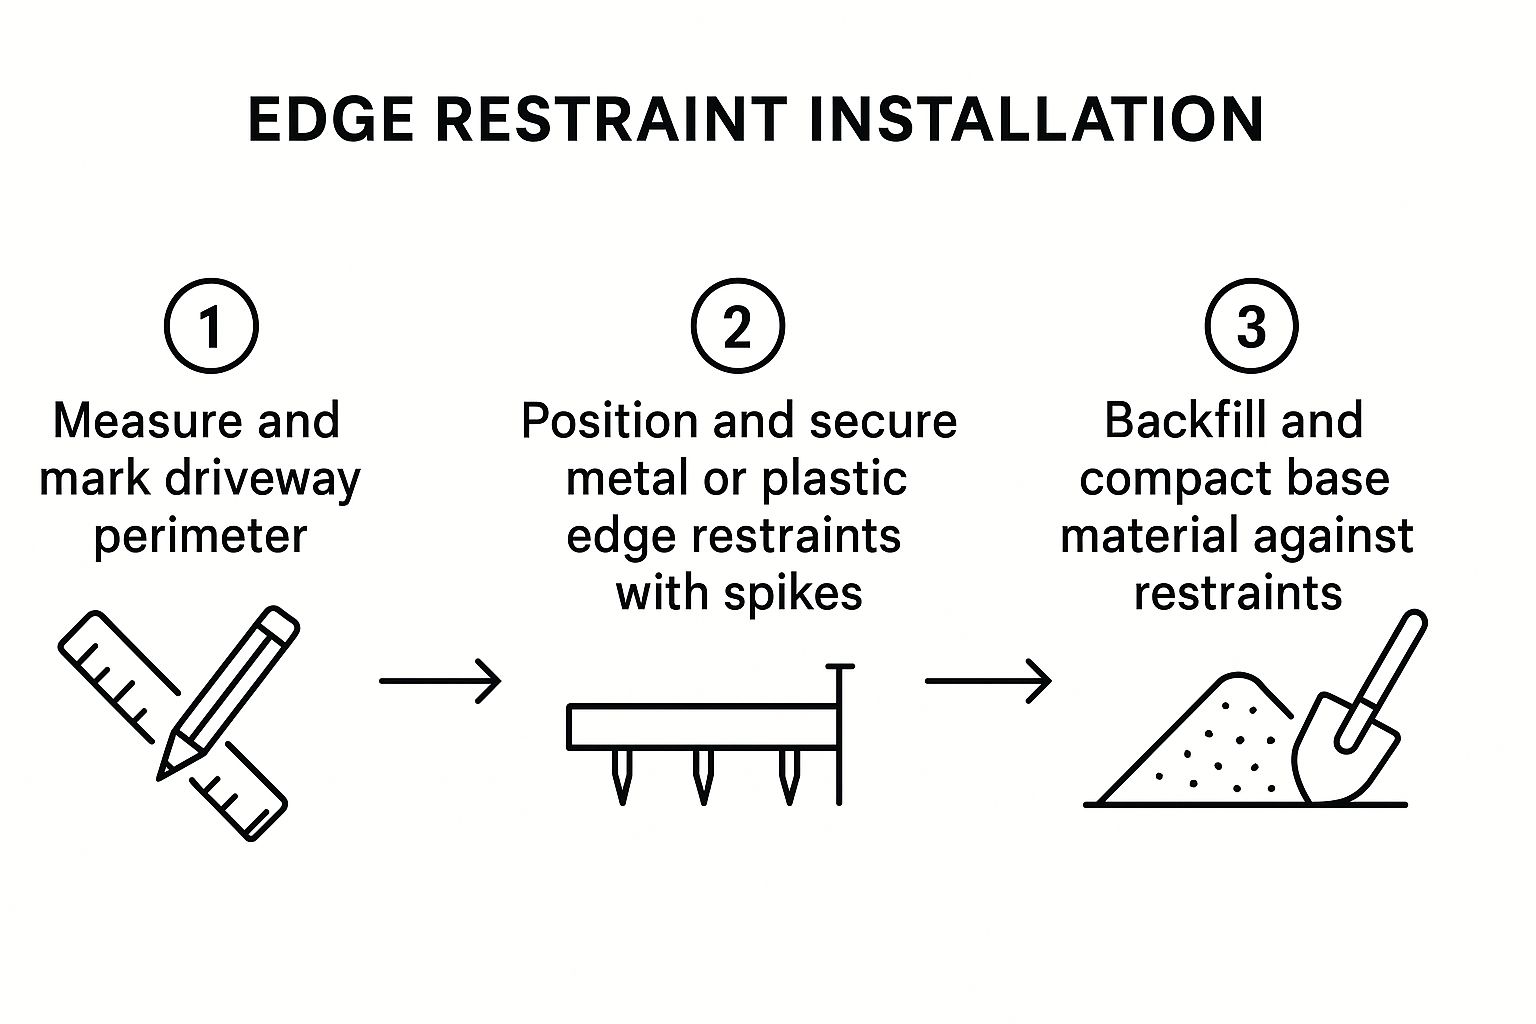
As the visual shows, you mark your perimeter, spike the restraints firmly into the base, and then backfill against the outside edge. This creates a solid frame that locks your pavers in permanently. A classic mistake is to install the restraints on the loose sand bedding layer instead of the solid base—this will always lead to failure. The restraint needs to be anchored directly to the compacted aggregate. Once they're in, you can add your final lift of base material, grading it perfectly and compacting it tight against the inside of the restraints to finish your foundation.
Installing Pavers Like a Professional: Patterns, Spacing, and Precision
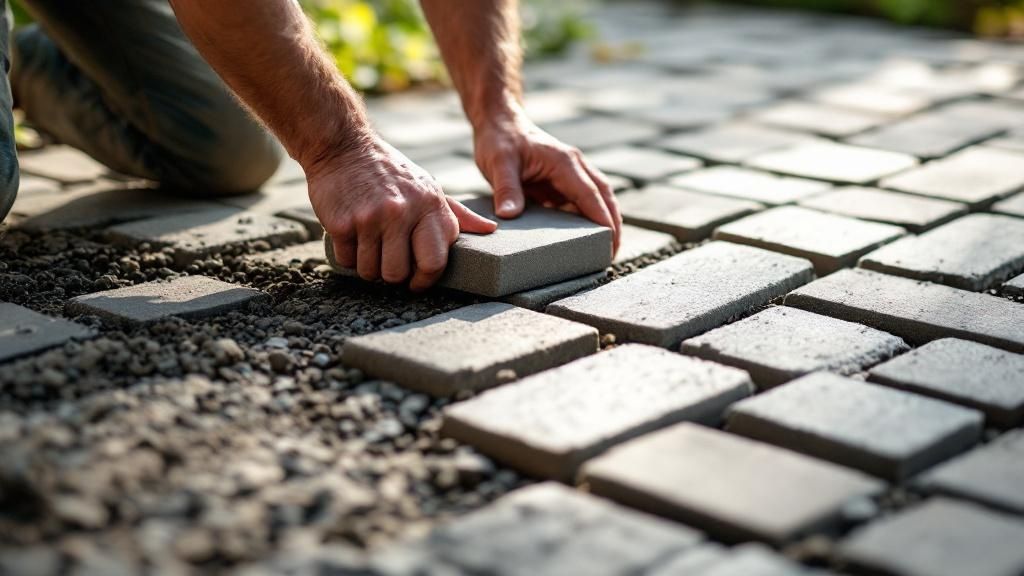
After all the digging and prep work, this is the moment your project starts to look like a real driveway. With a solid base and sturdy edge restraints in place, you get to lay the pavers. This is where patience really pays off. The secret to getting those perfectly straight, professional-looking lines isn't just about being careful; it's about using string lines. I don't just run them along the edges—I run multiple lines across the entire work area. These strings become my visual guide, making sure my pattern doesn't wander off course, especially over a long driveway.
Choosing a Starting Point and Laying Pattern
Where you begin laying pavers can make or break the final look. I always recommend starting against a solid, straight surface, like your garage slab or a walkway. This gives you a reliable reference to build from. From that point, you can work your way out across the driveway. A common mistake is starting in the middle and trying to work toward both edges. It sounds logical, but it almost always leads to skewed lines by the time you're done.
While a simple running bond pattern is a classic choice, don't be afraid to explore other designs that can add personality and even strength to your driveway.
- Herringbone Pattern: This is my go-to for driveways. The interlocking zigzag pattern is fantastic at handling the stress from turning car wheels, which makes it incredibly durable for high-traffic spots.
- Basket Weave: If you're going for a more traditional or cottage-like feel, the basket weave creates a beautiful, textured surface. It’s a great way to add visual interest to a large area.
- Random Laying Patterns: Using pavers of different sizes can give you a more natural, old-world look, much like you would see when installing a flagstone patio. The trick is to avoid creating unintentional "lines" or clusters of the same size, so a bit of planning is needed.
When you place each paver, just set it gently on the sand bed. You don't need to push or hammer it down at this stage. Most pavers have built-in spacer bars on their sides, which automatically create the perfect gap. Your goal is to lightly set them next to each other, letting those spacers create a consistent joint width, usually about 1/8 of an inch. That small gap is critical because it's what the jointing sand will fill to lock everything together.
Making Precise Cuts and Adjustments
Unless your driveway is a perfect rectangle, you're going to have to cut some pavers. You'll need to make cuts to fit around curves, drains, or along the final edges. A diamond-blade wet saw is your best friend here; it gives you clean cuts without chipping the paver. The old saying, "measure twice, cut once," is everything. For curves, a good technique is to lay your pavers over the curved edge, trace the cut line with a pencil, and then cut each one individually. This creates a smooth, flowing arc that looks custom-made.
The demand for these types of driveways is growing for a reason. The global market for interlocking concrete pavers, a key part of any lasting paver driveway installation, was valued at around USD 18 billion in 2024. This number shows that more and more homeowners are choosing beautiful, durable driveway materials. You can read more about the interlocking paver market trends to see how this investment can add real value to your home. The careful work you put into laying and cutting the pavers ensures your project measures up to that high standard.
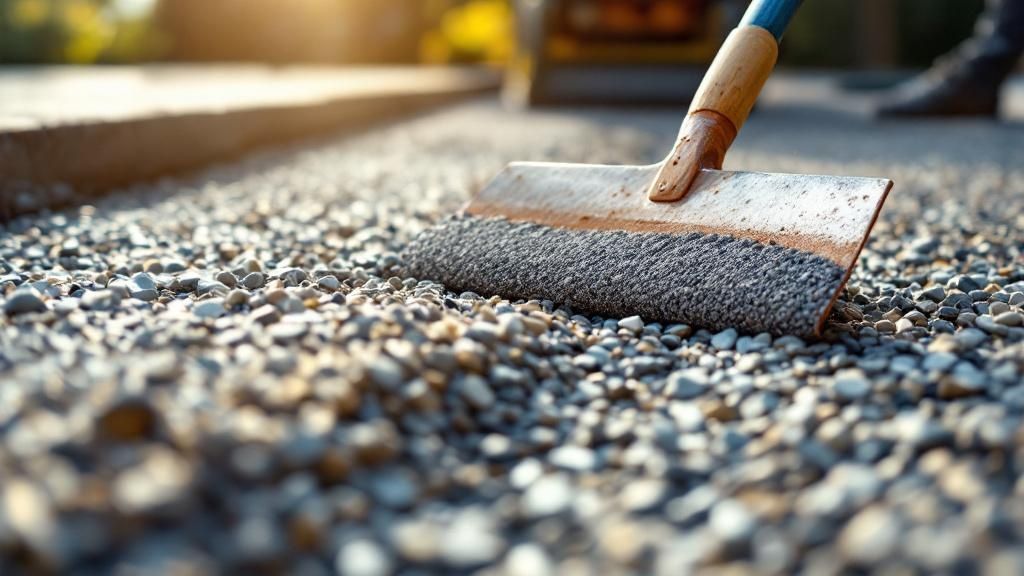
Joint Sand, Sealing, and Final Compaction: Locking Everything Together
The last few steps of your paver driveway installation are what really bring the whole project together. This is where a grid of individual stones becomes a single, incredibly tough surface. We’re talking about the process that creates that famous interlocking strength paver driveways are known for. It all comes down to the right sand, proper compaction, and the optional step of sealing—get this part right, and your driveway will stand the test of time.
Choosing the Right Joint Sand
The sand you sweep between your pavers does a lot more than just fill in the cracks. It’s the key ingredient that creates friction between the stones, locking them into a tight formation and helping to spread the weight of vehicles across the entire driveway. This makes your choice of sand a pretty big deal.
You’ve basically got two main options:
- Standard Jointing Sand: This is the classic choice—a fine, kiln-dried silica sand. It's affordable and super easy to sweep into the joints. The downside is that it can wash out over time, especially in areas with heavy rain, meaning you might need to top it off every few years. It also offers almost no resistance to weeds popping up.
- Polymeric Sand: For most driveway projects, this is what I personally recommend. Polymeric sand is a blend of fine sand and a special polymer binder that activates with water. Once it cures, it hardens into a firm, almost mortar-like joint. This is fantastic for preventing weeds, stopping ants from building nests, and resisting erosion from rain and washing. The trick is to apply it carefully—any residue left on the paver surface can create a permanent haze, so be meticulous with your cleanup.
To help you visualize the trade-offs, let's compare the two side-by-side.
Joint Sand Types and Applications
This table breaks down the different joint sand options, highlighting their performance, cost, and where they work best.
| Sand Type | Durability | Weed Prevention | Cost Range | Best Applications |
|---|---|---|---|---|
| Standard Silica Sand | Moderate | Low | Low | Best for budget-friendly projects, walkways, or patios in dry climates where weeds aren't a major concern. |
| Polymeric Sand | Very High | High | Moderate-High | Ideal for driveways, pool decks, and any area exposed to heavy rain or prone to weed growth. |
The main takeaway here is that while polymeric sand costs more upfront, it saves you a ton of maintenance headaches down the road.
Once you've made your choice, the application process is straightforward. You’ll want to sweep the sand across the completely dry paver surface, working it back and forth until every single joint is packed full. Next, you'll fire up a plate compactor and run it over the entire driveway. This vibration settles the pavers firmly into the sand bedding beneath them and helps the joint sand work its way deep into every crevice. You’ll notice the sand level drop, so you'll need to sweep in more sand and repeat the compaction until the joints are flush with the paver surface.
The Final Compaction and Sealing Debate
That last pass with the plate compactor is the moment of truth—it’s when your driveway officially becomes an "interlocked" surface. This is what gives the driveway its signature blend of strength and flexibility, allowing it to support heavy vehicles without cracking like a solid slab of concrete might. After your final compaction and making sure the joints are full, if you used polymeric sand, you'll finish by gently misting the driveway with water to activate the binders.
Now for the big question I get all the time: "Do I need to seal my pavers?"
Honestly, sealing is not always necessary, particularly if you've invested in high-quality concrete pavers. However, it does offer some nice perks. A good sealer can:
- Deepen and enrich the colors, giving the pavers a permanent "wet look."
- Add a protective barrier against oil drips and other stains.
- Make the surface easier to clean and add another layer of defense for your joint sand.
If you do decide to seal, my advice is to wait at least 30-60 days after the installation is complete. This waiting period allows any efflorescence—a natural, hazy white salt deposit that can appear on new concrete—to come to the surface. You can then clean it off before sealing. If you seal too early, you risk trapping that haze under the sealer forever. In the end, sealing is an aesthetic and protective choice, but it’s not essential for the structural health of a well-built paver driveway.
Maintenance and Long-Term Care: Protecting Your Investment
After the final paver is settled and the last bit of sand is swept into place, your **paver driveway installation** is officially done. But your job isn’t quite finished. To keep this beautiful, tough surface looking its best, a little ongoing care is needed. Think of it not as a chore but as a simple routine to protect your investment and ensure it looks great for years to come. A bit of proactive maintenance can stop small issues from turning into major headaches.
Seasonal Maintenance Routines
A great place to start is with a simple seasonal check-up. Every spring and fall, take a walk around your driveway. Keep an eye out for any pavers that might have settled or joints where sand has washed away. Re-sanding is an easy fix—just sweep more joint sand into the gaps until they’re full. This step is especially critical if you used standard sand instead of polymeric sand, as it’s what keeps the pavers locked together.
Regular cleaning is also essential. A gentle rinse with a garden hose and a stiff-bristled brush a few times a year will get rid of most dirt and grime. For stubborn organic stains from things like moss or algae, a special paver cleaner can work wonders without harming the surface. Try to avoid using a pressure washer on its highest setting, as it can blast the sand right out of the joints and may even etch the pavers themselves.
Addressing Common Issues
No driveway is completely safe from life's messes, but paver driveways are remarkably tough. Here’s a quick guide to handling common problems:
- Weed Growth: If you spot weeds popping through, it's a sign that your joint sand is running low. The best approach is to pull the weeds by hand, then top off the joints with polymeric sand. This creates a strong barrier that weeds have a tough time penetrating.
- Oil Stains: The key here is to act fast. The quicker you address an oil or grease stain, the better your chances of removing it completely. Blot up any extra oil, then apply a granular oil absorbent or a commercial-grade paver degreaser designed for the job.
- Winter Care: When the snow starts to fly, reach for a plastic shovel or use a snowblower that has a rubber-tipped blade. Metal shovels can easily scratch and chip your pavers. It's also best to avoid using rock salt or calcium chloride for deicing, as these chemicals can cause the paver surface to break down over time. Sand is a much safer bet for adding traction.
Proper care is a key part of your home's entire landscaping ecosystem. If you're thinking about how your driveway fits into the bigger picture, our insights on custom landscaping design and installation can help you create a unified and stunning outdoor space.
At Tamura Designs, we believe that a well-built project deserves to be well-maintained. If you’re ready to create an outdoor space that combines beauty with lasting quality, visit us at TamuraDesigns.com to see how our expertise can bring your vision to life.