Planning Your Flagstone Patio Without Breaking the Bank
Dreaming of a gorgeous flagstone patio is easy; actually building one? That takes a bit more work. Flipping through magazines, pinning inspiring designs, and picturing yourself lounging in your own outdoor haven is definitely fun, but the real success of your patio comes down to planning. The decisions you make before you even pick up a shovel will determine whether your patio becomes a cherished space or a neglected corner of your yard.
One crucial aspect is understanding your yard's quirks. Does it pool with water after a rain shower? Is there a stubbornly damp spot that never seems to dry out? Overlooking these details can lead to costly drainage problems later on. Think of your yard like a roommate – get to know its habits and adjust accordingly. This could mean tweaking the patio's location, adding French drains, or carefully sloping the surface.
Another common mistake is underestimating the time involved. Building a flagstone patio isn't a quick weekend project. Even seasoned DIYers often wish they had allowed more time for unexpected challenges like stubborn tree roots, buried utility lines, or simply the physical strain of hauling heavy stones. A realistic timeline reduces stress and allows for more thoughtful design decisions and careful installation.
And let's talk budget. Finding the right balance between your dream patio and your bank account is key. The cost of a flagstone patio can vary widely depending on the size, the materials you choose, and how complex the design is. On average, homeowners spend around $4,500 for a 300-square-foot patio, with costs typically falling between $750 and $8,400. This investment not only boosts your home's curb appeal but also adds value to your property. A more intricate design or using premium flagstone can increase the cost, while hiring a professional ensures durability and a long lifespan for your patio. Learn more about flagstone patio costs.
Breaking Down the Planning Phase
Now that we've covered the overall considerations, let's break down the planning process into smaller, more manageable pieces. This is where you set the stage for a patio that not only looks amazing but also functions perfectly for years to come.
-
Define your patio's purpose: Will it be primarily for dining, relaxing, or a mix of both? Knowing how you'll use the space helps determine its size, shape, and layout.
-
Assess your yard's drainage: Watch how water flows after it rains to spot potential drainage problems and plan solutions.
-
Choose your flagstone: Think about factors like durability, color, and texture to pick a stone that complements your home and landscaping.
-
Create a scaled drawing: A simple sketch helps you visualize the patio's size and location within your yard. You can even use free online tools like SketchUp to help with this.
-
Set a realistic budget: Include the cost of materials, tools, and any professional help you might need.
-
Develop a timeline: Break the project into smaller tasks and estimate how long each one will take.
To help you estimate costs, take a look at the table below:
Flagstone Patio Cost Breakdown by Size
| Patio Size (sq ft) | Basic Design Cost | Complex Design Cost | Professional Installation |
|---|---|---|---|
| 100 | $800 – $1,500 | $1,500 – $2,500 | $1,000 – $2,000 |
| 200 | $1,600 – $3,000 | $3,000 – $5,000 | $2,000 – $4,000 |
| 300 | $2,400 – $4,500 | $4,500 – $7,500 | $3,000 – $6,000 |
| 400 | $3,200 – $6,000 | $6,000 – $10,000 | $4,000 – $8,000 |
| 500 | $4,000 – $7,500 | $7,500 – $12,500 | $5,000 – $10,000 |
This table provides a general idea of costs. Remember, actual prices can vary based on your location, materials, and the complexity of the design.
By carefully addressing these key planning elements, you'll be well on your way to building a flagstone patio that not only looks stunning but also works perfectly and brings you joy for many years. A well-planned patio is a valuable investment in your home, your lifestyle, and your outdoor enjoyment.
Choosing Flagstone That Actually Lasts
Walking into a stone yard can be a bit like stepping into a candy store for grown-ups – exciting, but also a little overwhelming. So many textures, colors, and sizes! This section is your guide to navigating the flagstone selection process, focusing on what truly matters for a patio built to last. We'll share real-world experiences and practical tips to help you choose the perfect flagstone for your project.
Thickness: Why It's a Big Deal
While thinner flagstone might be easier on the wallet upfront, it's often more susceptible to cracking, especially if you live in an area with harsh winters. Think of it like this: a thicker piece of ice is harder to break than a thin one. The same principle applies to flagstone. A thicker stone provides greater stability and durability, particularly in high-traffic areas. I spoke with a homeowner in Pennsylvania who learned this the hard way. They opted for thinner flagstone to save money, only to find cracks spider-webbing across their patio after just two winters.
So, while budget is always a factor, remember that investing in thicker flagstone can save you money and headaches in the long run.
Matching Stone to Climate
Just like choosing the right plants for your garden, picking the right flagstone for your climate is crucial. Some stones, like sandstone, are porous and absorb water like a sponge. This can be a recipe for disaster in freezing temperatures. Denser stones, such as granite and slate, are much more resistant to freeze-thaw cycles.
Do your research and choose a stone that's well-suited to your local weather conditions. This simple step can dramatically extend the life of your patio.
Spotting Quality Flagstone
While a salesperson can offer helpful advice, it's always a good idea to arm yourself with some basic knowledge. When examining flagstone, look for consistent color and texture. Avoid stones with visible cracks or fissures – those are potential weak points just waiting to happen.
Here's a pro tip: tap the stone and listen to the sound. A clear, ringing sound indicates a dense, solid structure. A dull thud, on the other hand, might suggest internal flaws.
Calculating the Right Amount
Figuring out how much flagstone you need is a bit more involved than simply measuring your patio area. You also need to account for cuts, breakage, and those oddly shaped pieces that never seem to fit quite right. A good rule of thumb is to overestimate by 10-15%. This gives you a buffer for those inevitable surprises and allows for a bit of creative wiggle room during the installation process.
Before you start laying those stones, a little planning goes a long way, just like setting up Christmas lights. Check out this helpful guide on Planning Your Light Display for some pre-project planning inspiration.
The Foundation Matters: Supporting Materials
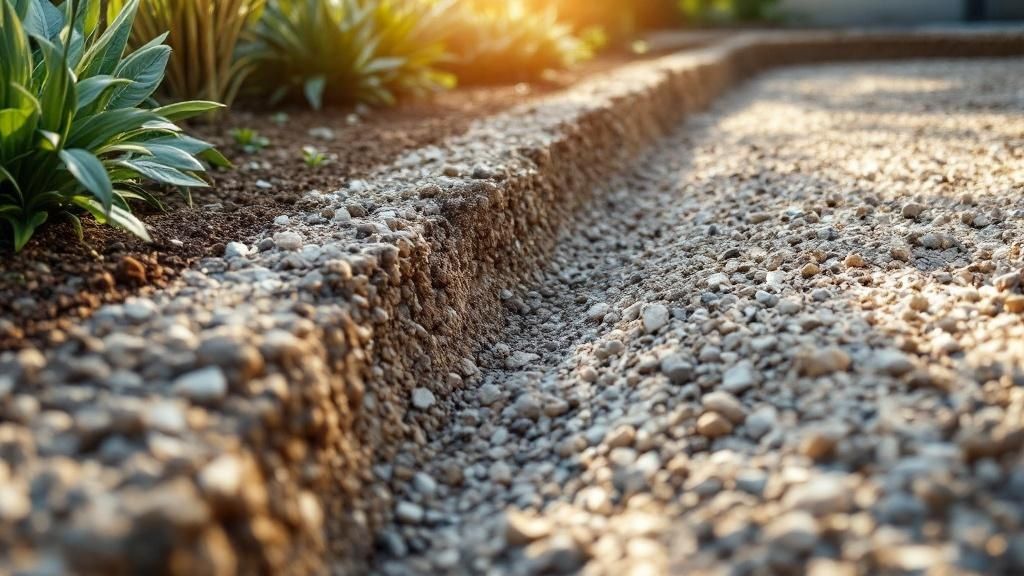
Think of your patio like a house: a solid foundation is essential. The materials beneath your flagstone are just as important as the stone itself. A properly compacted base of gravel, topped with a leveling layer of sand or crushed stone screenings, is crucial for drainage and stability. Skimping on these steps can lead to settling, cracking, and a much shorter lifespan for your beautiful new patio.
To help you choose the right flagstone for your project, take a look at the table below comparing various types of flagstone:
Flagstone Types and Characteristics
| Stone Type | Durability Rating | Cost Range | Best Climate | Maintenance Level |
|---|---|---|---|---|
| Sandstone | Moderate | $2-$5/sq ft | Warm, dry | Moderate |
| Slate | High | $5-$10/sq ft | Varies, generally good in colder climates | Low |
| Flagstone | High | $6-$12/sq ft | Varies, generally good in most climates | Low |
| Limestone | Moderate | $3-$7/sq ft | Warm, dry | Moderate |
| Bluestone | High | $8-$15/sq ft | Cold, wet | Low |
This table provides a general overview; always consider your specific local conditions and consult with a professional if needed. For more specialized stonework, exploring custom stone masonry services can be a great option.
Choosing the right flagstone is a crucial first step in creating a patio you'll love for years to come. By considering these factors, you can confidently select a stone that not only looks beautiful but also stands up to the test of time. A little upfront research will pay off big time, saving you from potential headaches and costly repairs down the road.
Tools That Actually Make a Difference
Picking the right tools for your flagstone patio project can dramatically impact not only how your patio turns out, but also how much you enjoy (or don't enjoy) the process. Forget those massive lists that make you feel like you're outfitting a construction site. We're focusing on practical, efficient tools that make the job easier.
The Essentials for Installing a Flagstone Patio
This isn't about buying every gadget under the sun. It's about selecting the tools that will truly transform your project from a grueling chore into a satisfying accomplishment. Here's what really matters:
-
A Sturdy Shovel and Wheelbarrow: There's no way around it; you'll be moving a lot of earth and stone. These are your workhorses. Invest in good quality—your back will thank you. A contractor friend of mine swears by a D-handle shovel for its ergonomics. He says it saved him during a huge patio project.
-
A Hand Tamper (or Plate Compactor for Larger Patios): Compacting the base is absolutely crucial for long-term stability. Think of it as the foundation of a house—it has to be rock solid. A hand tamper is usually enough for smaller patios, but for larger projects, renting a plate compactor will save you a ton of time and effort.
-
A Level (4-foot is Ideal): A level patio is key for proper drainage and a polished look. A quality level is worth the investment—those cheap ones can be surprisingly inaccurate.
-
A Rubber Mallet: This is your go-to tool for setting the stones without breaking them. Skip the metal hammer—you risk chipping or cracking your beautiful flagstone.
-
Safety Gear: Safety always comes first! Eye protection, gloves, and sturdy work boots are a must. And think beyond the basics—knee pads can be a real lifesaver, especially for bigger projects.
Smart Alternatives and Rental Strategies
You don’t need every specialized tool out there. Often, there are perfectly good alternatives. A heavy-duty landscaping rake, for instance, can often do the job of a dedicated stone rake. And speaking of alternatives, renting tools like a plate compactor or wet saw is a smart move financially, especially for a one-time project.
This screenshot from Home Depot's landscaping tools section shows the sheer variety of tools available. It's a good reminder to plan ahead, figure out what you need, and budget accordingly. Remember, renting certain tools can be a budget-friendly way to get your hands on specialized equipment without a huge upfront cost.
Maintaining Your Tools
Proper tool care is an investment in your future projects. Clean your tools after each use, especially after working with wet materials. A little bit of maintenance goes a long way. Regularly sharpening your shovel and other cutting tools makes a noticeable difference in how well they work.
By focusing on the truly essential tools and thinking strategically about renting versus buying, you can approach your flagstone patio project with confidence and efficiency. It's not about having the most tools; it's about having the right tools, and using them effectively.
Foundation Work That Prevents Future Headaches
Building a flagstone patio is exciting, but a solid foundation is key. It's the difference between a patio you love for years and one that constantly needs repairs. This groundwork may not be glamorous, but it's the backbone of your outdoor oasis.
Excavation: The Importance of Digging Deep
Digging the right depth isn't just about making a hole—it's about creating a stable base. This base supports the weight of the flagstone, furniture, and all those backyard barbecues. Digging too shallow is a common mistake, leading to settling and an uneven surface over time.
Most flagstone patios need a base 8-12 inches deep. This allows for layers of base material and proper compaction. But your soil type, local climate, and how you plan to use the patio also play a role. For example, clay soil, which expands and contracts, might need a deeper base than sandy soil.
Drainage: Keeping Your Patio Dry
Good drainage prevents water from pooling and damaging your patio. A slight slope, about 1/4 inch per foot, away from your house is crucial. It's subtle, but it makes a big difference in directing water flow.
If your yard already has drainage issues, a French drain could be a lifesaver. It redirects excess water away from the patio. I've seen firsthand how a French drain solved chronic pooling problems for a homeowner who wished they'd installed it sooner.
Base Materials: Building a Strong Core
The base material is essential for stability and drainage. A common method is layering compacted gravel, then topping it with sand or crushed stone screenings. The gravel provides support and drainage, while the sand or screenings create a level surface for the flagstone.
Your soil type influences your choice of base materials. Clay soils often need a thicker gravel base for better drainage, while sandy soils might need less. Analyzing your soil is a worthwhile step. Using the right tools can also make a big difference in the quality of your patio.
Compaction: Packing It In for Stability
Compaction is like building a sandcastle: the tighter the sand, the stronger the structure. Use a hand tamper or plate compactor to compress the base material in layers.
A hand tamper works well for smaller patios. For larger areas, renting a plate compactor from a local equipment rental company is often more efficient. It quickly and effectively compacts the base, creating a rock-solid foundation.
Troubleshooting and Timing: Planning for the Unexpected
Even with the best plans, you might hit a snag. Tree roots, buried utility lines, or unexpected soil conditions can pop up. Anticipating these challenges can save you headaches.
Large tree roots may need careful removal or a change in patio design. Always contact your local utility companies if you suspect buried lines—safety first!
Timing is also important. Avoid excavating during heavy rain or freezing weather. These conditions make the job harder and can compromise the base. Dry, moderate weather is ideal. For more helpful resources, check out Tamura Designs' Landscape and Construction Blogs. They offer a wealth of information on planning and executing landscaping projects.
By focusing on these foundation elements, you’re building a beautiful, durable flagstone patio that you’ll enjoy for years to come. This groundwork sets the stage for everything that comes next.
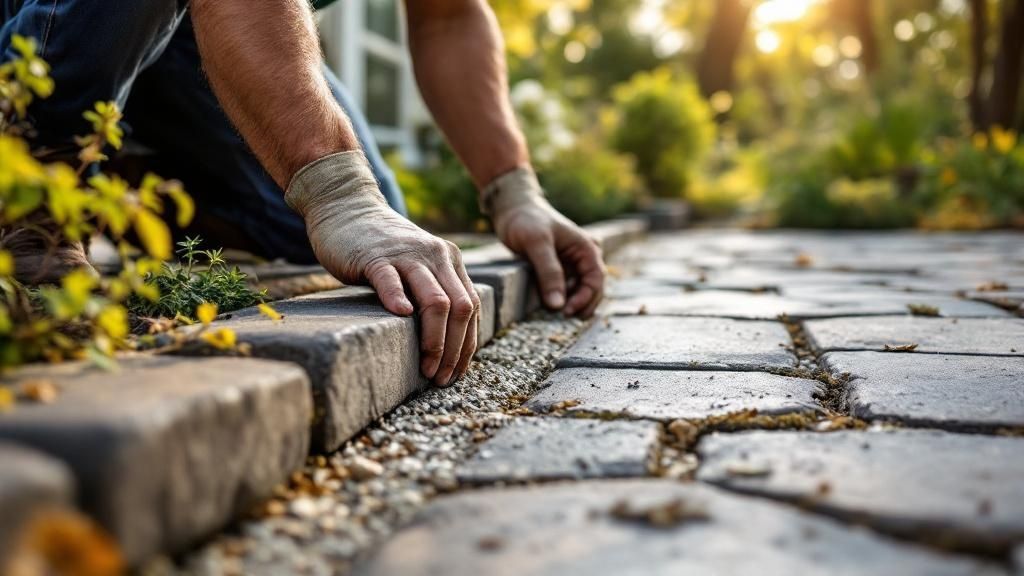
Laying Stones Like You Know What You're Doing
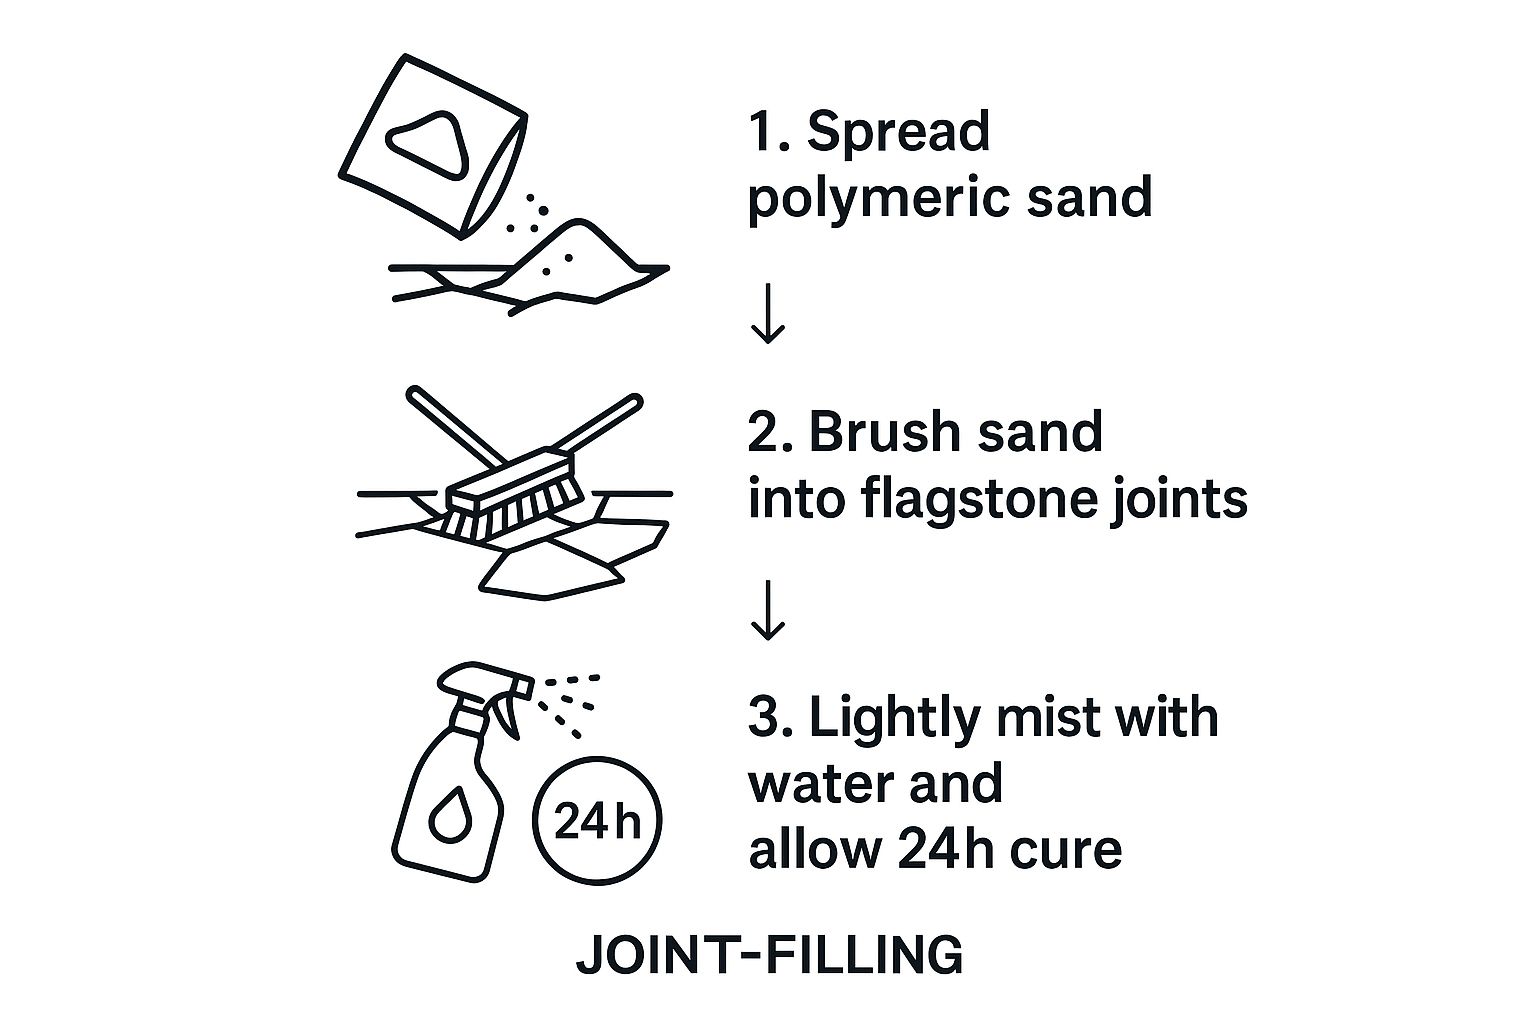
Now for the fun part: turning a pile of stones into a beautiful flagstone patio. This isn't just about putting stones down; it's about working with their unique shapes to create a natural, flowing design. We'll cover fitting these puzzle pieces together, leaving gaps that add to the aesthetic appeal. The infographic shows how filling those joints is key for a stable and long-lasting patio. The steps are straightforward: spread the polymeric sand, brush it into the joints, mist it with water, and let it cure for 24 hours. This keeps weeds out and ensures a smooth surface for years to come.
Fitting Stones: The Art of the Puzzle
Laying flagstone is like a jigsaw puzzle, but with heavier pieces and a lot more room for creativity. Begin by placing your largest stones. These will "anchor" your design and create a framework for the smaller stones. Don’t be afraid to play around with different arrangements. Sometimes, an odd-shaped stone can become the star of the show. I once had a client who almost rejected a large, unusually shaped stone. We ended up making it the centerpiece of the patio, and the smaller stones around it really highlighted its unique shape.
Gap Management: Intentional vs. Accidental
Gaps are a key part of a flagstone patio's charm. Aim for gaps between 1/2 inch and 2 inches wide. Wider gaps create a more rustic feel, while narrower gaps look more formal. Try to avoid gaps that are too big, as they can become tripping hazards. Imagine stepping onto your beautiful new patio in sandals and catching your heel – not the relaxing experience we're aiming for!
Cutting Flagstone: When Fitting Requires Precision
Sometimes, you'll need to make adjustments to your stones. A wet saw with a diamond blade is the ideal tool for cutting flagstone. It makes clean, accurate cuts, minimizes waste, and lets you get the most out of each stone. For small tweaks, a hammer and chisel might be all you need. Practice on a few spare stones before working on the stones you’ll be using in your patio. A little practice prevents costly mistakes.
Handling Heavy Stones: Protecting Your Back (and Your Enthusiasm)
Moving heavy stones is a workout! Use proper lifting techniques: bend your knees, keep your back straight, and lift with your legs. A wheelbarrow is essential for moving multiple stones at once and reducing strain. For really heavy pieces, consider a dolly. Protecting your back means you can finish the project and enjoy your new patio pain-free.
Leveling: Maintaining Consistency
A consistently level patio is essential for both looks and functionality. Use a 4-foot level to check frequently. Remember, you need a slight slope for drainage. I had a client who insisted on a perfectly level patio. After a rainstorm, water pooled everywhere, and we had to rework sections to add a slope. Learn from their experience!
Working Around Obstacles: Graceful Transitions
Trees, existing structures, and other landscaping features can create challenges. Plan for these during your design phase. Smaller stones can create smooth transitions and natural curves around obstacles. Think of them as chances to add character to your patio. A graceful curve around a tree can create a beautiful focal point.
Quality Control: Catching Mistakes Early
Step back regularly during the installation process to assess your work. Are the stones fitting well? Is the surface level? Are the gaps consistent? Catching mistakes early is much easier than fixing them later. Think of it like proofreading – a quick check can save you from major revisions down the line.
Maintaining Momentum: When the Project Feels Overwhelming
Installing a flagstone patio is a big job. Break the project into smaller, more manageable tasks. Celebrate your progress as you go. Even small wins can keep you motivated and prevent you from getting overwhelmed. Remember, you're building something beautiful and lasting. Relaxing on your finished patio will be well worth the effort.
Finishing Details That Make All the Difference
The difference between a good DIY flagstone patio and a truly great one often comes down to the finishing touches. These seemingly small details can elevate your project and give it that professional polish. Let's explore how joint filling, sealing, and edge treatments can make your patio shine.
Joint Filling: It's About More Than Just Looks
Filling the joints between your flagstone isn't just about aesthetics. It plays a crucial role in the patio's stability and helps keep weeds at bay. While traditional sand is an option, it can wash away over time, leaving gaps for unwanted growth.
I've found polymeric sand to be a game-changer. This modern alternative hardens when wet, creating a strong bond between the stones. It's much more resistant to erosion and weed growth than regular sand. I remember one project where a heavy rain washed out the sand joints, leaving the stones loose. The patio with polymeric sand, however, looked as good as new.
Sealing Considerations: Balancing Protection and Upkeep
Sealing your flagstone can shield it from stains and the elements, but it's important to weigh the pros and cons. Some sealers require regular reapplication, which can be a hassle. Plus, some can alter the stone's appearance, making it darker or giving it a glossy sheen.
Before sealing, think about the long-term maintenance. Consider your stone type and climate. A porous stone like sandstone might benefit from a sealer, while a denser stone like slate might not need it. It's all about finding the right balance.
Edge Treatments: Framing Your Masterpiece
The edges of your patio act like a frame, showcasing your hard work. A clean, defined edge gives a polished, professional look. You have several options here, from brick borders to metal edging. You could even dig a shallow trench and fill it with gravel.
Each option offers a different aesthetic. I once used reclaimed bricks to create a patio edge, and it added a touch of rustic charm that perfectly complemented the homeowner's style. Choose an edge treatment that reflects your overall design vision.
Maintenance Made Easy: Simple Steps for Long-Term Beauty
Keeping your flagstone patio looking its best doesn't have to be a chore. Regular sweeping keeps debris away and prevents staining. Occasionally cleaning with a mild detergent can also help freshen things up.
Addressing minor issues promptly, like resetting a loose stone or refilling a joint, can prevent bigger problems down the line. It's similar to regular car maintenance – small, consistent efforts can save you from major headaches later.
Seasonal Care: Protecting Your Patio From the Elements
Seasonal changes can take a toll on your patio. In colder climates, ensure proper drainage to prevent frost heave, which can cause damage. In the fall, clear away leaves and debris to avoid staining and mildew. Regularly inspect your patio for any signs of wear and tear, like cracks or settling. Catching these early on makes repairs much easier. For more outdoor living inspiration, check out: Custom Outdoor Living Spaces.
By paying attention to these finishing details and implementing a simple maintenance routine, you can ensure your flagstone patio remains a beautiful and enjoyable part of your home for years to come. It's an investment worth protecting.
When Things Don't Go According to Plan
Building a flagstone patio is incredibly satisfying, but sometimes, even with the best planning, things don't go smoothly. This section covers those unexpected hiccups, offering practical solutions and a bit of reassurance to help you navigate the bumps in the road. For some inspiration to complement your new patio, check out these Patio Door Design Ideas.
Settling Problems: Addressing Uneven Stones
Even with a well-compacted base, stones can sometimes settle unevenly. This is particularly common in areas with heavy clay soil or where the ground freezes and thaws frequently. If you see a stone dipping lower than the others, don't worry! It’s usually an easy fix.
-
Lifting the Stone: Carefully lift the settled stone and remove the material underneath. You'll probably need to add more base material, such as crushed stone screenings, to bring the area back to level. Compact the new material firmly.
-
Resetting the Stone: Place the stone back, making sure it's level with the surrounding stones. Check the level from several angles. Gently tap the stone into place using a rubber mallet. Then, refill the joints around the resettled stone.
Cracked Stones: Repair or Replace?
Finding a cracked stone can be frustrating, but it’s not always a major issue. Small cracks can often be repaired with epoxy or a special stone adhesive. For larger cracks, replacing the stone is usually the best solution.
-
Assessing the Damage: If the crack is small and doesn't affect the stone's overall strength, a repair might be enough. Clean the crack thoroughly before applying any epoxy or adhesive.
-
Replacing the Stone: If the crack is large, or the stone is badly damaged, it's best to replace it. Carefully remove the broken stone and find a replacement that fits the gap.
Gap Issues: Too Wide or Too Narrow
Gaps that are too wide can be a tripping hazard and look uneven. Gaps that are too narrow can block drainage and prevent the stones from settling naturally. Finding the right balance is key.
-
Adjusting Wide Gaps: If your gaps are too wide, try repositioning the stones next to them. If that doesn't work, you may need to add smaller stones or cut pieces to fill the space. Avoid really large gaps, as they can make the patio unstable.
-
Addressing Narrow Gaps: You can sometimes widen narrow gaps by carefully removing a little bit of the surrounding material. Just be careful not to loosen nearby stones.
Knowing When to Seek Professional Help
DIY projects are great, but sometimes it's best to call in the pros. If you run into serious problems like major settling or lots of cracked stones, a professional can save you time, money, and a lot of headaches. Don’t hesitate to get expert advice, especially if you’re feeling lost or unsure of the next steps.
Looking for expert help with your next landscaping project? Tamura Designs, an award-winning landscape design and construction firm in Morgan Hill, California, offers custom solutions and quality work. Transform your outdoor space with Tamura Designs.