A stunning and functional outdoor kitchen doesn't start with a shovel—it starts with a solid plan. I can't tell you how many times I've seen projects go sideways because of poor planning. This is the step that turns a backyard dream into a reality you can actually use, ensuring everything from the grill to the paver foundation works together seamlessly.
Get this part right, and you'll save yourself a ton of time, money, and future headaches.
Laying the Groundwork for Your Dream Outdoor Kitchen
Before you even think about laying a single paver, you need to live in the finished space in your mind. A well-thought-out outdoor kitchen is so much more than a spot to grill. It’s an extension of your home, a hub for entertaining friends and family, and a reflection of your lifestyle.
And you're not alone in wanting this. This isn't some niche project anymore. The global market for outdoor kitchens was valued at a whopping USD 19.64 billion in 2024 and is on track to hit over USD 40.32 billion by 2030. That explosion in popularity shows just how much homeowners are starting to value their outdoor spaces.
From Vision to Blueprint
Let's get practical. Grab some graph paper and start sketching. You don't need to be an architect—a simple drawing is perfect for figuring out a functional workflow. In the design world, we often talk about the "work triangle," which connects your three main activity zones:
- Hot Zone: This is for your grill, side burners, or that wood-fired pizza oven you've been dreaming of.
- Cold Zone: Home to your outdoor refrigerator and maybe an ice maker.
- Wet Zone: The area with your sink for all the prep and cleanup.
Arranging these zones logically is key to an efficient cooking experience. Think about how you cook inside—you don't want to be running laps around an island just to grab something. Your prep counter, for instance, should be right next to your grill and sink. It just makes sense.
Expert Tip: When you're deciding where to put the grill, pay attention to the prevailing wind direction. A little bit of foresight here will keep smoke from blowing into your seating area or straight back into your house. It’s a small detail that makes a huge difference.
Navigating Codes and Nailing Down the Budget
With a rough design in hand, your next stop should be your local municipal office (or their website). A quick check on building codes is absolutely essential. Some towns have specific rules about setbacks from property lines, where utility lines can run, and what kind of footings you need for heavy kitchen islands. Figuring this out now prevents very expensive changes down the road.
Once you know the rules, you can build a realistic budget. And I mean realistic. Don't just account for the big-ticket items. Your budget needs to cover everything:
- Pavers: Calculate your total square footage and then add an extra 10-15% to account for cuts, waste, and any mistakes.
- Base Materials: This includes your gravel, sand, and the edge restraints that hold it all together.
- Appliances: The grill, fridge, sink, and any other built-in goodies.
- Tools: Factor in costs for rentals (like a plate compactor) and any tools you need to buy.
As you start pulling all these ideas together, browsing a gallery of completed outdoor kitchen projects can be a huge help. Seeing what others have done with their layouts and paver choices is one of the best ways to get inspired and solidify your own vision.
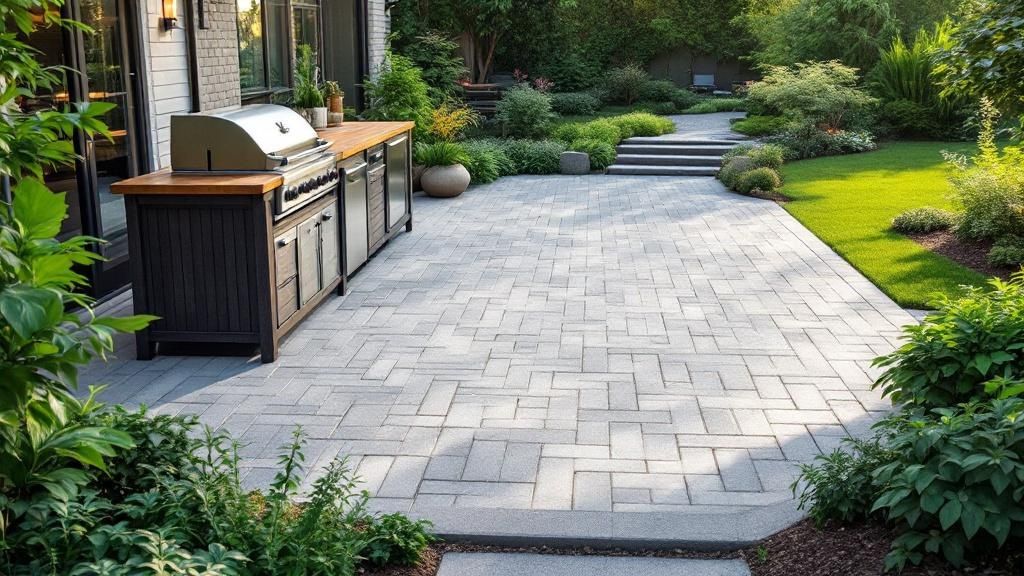
Choosing Pavers That Perform and Impress
The pavers you choose are the literal and stylistic foundation of your entire outdoor kitchen. It’s easy to get caught up in colors and patterns, but a high-traffic cooking area demands a surface that can handle the reality of heat, grease, and constant foot traffic. This is where we need to look past the aesthetics and really dig into performance.
You're generally looking at three main players: concrete, brick, and natural stone. Each one brings its own set of pros and cons to the table. Concrete pavers offer incredible versatility and are often budget-friendly. Brick gives you that classic, timeless look that never goes out of style. Then you have natural stone, like travertine or flagstone, which delivers a premium, one-of-a-kind feel but usually at a higher price point.
Material Matchup For Your Kitchen
When you're building a paver outdoor kitchen, durability and safety should be your top priorities. You have to think about how each material will hold up against the unique challenges of a cooking space.
- Concrete Pavers: These are engineered products, which means they're built for strength and consistency. They come in a dizzying array of styles and colors. Because their surface is so dense, they tend to be less porous than some natural stones, giving them decent stain resistance—especially if you have them sealed.
- Brick Pavers: Known for their deep, rich color and incredible durability, clay bricks are fired at extremely high temperatures. This process makes them naturally resistant to the heat coming off a nearby grill. Their one downside can be porosity; sealing them is a good idea to prevent ugly grease stains from setting in.
- Natural Stone: Materials like granite are absolute workhorses—they're tough, scratch-resistant, and can handle heat beautifully, making them a fantastic choice for areas right next to the grill. On the other hand, softer stones like travertine stay cooler underfoot but can be more vulnerable to stains from acidic spills like wine, lemon juice, or vinaigrette.
To get a better sense of how different options hold up and look in the real world, it's worth checking out some high-quality examples. You can explore a variety of hardscaping solutions and find great ideas by reviewing the 7 best patio pavers for durability and style.
To make the decision a bit easier, here’s a quick breakdown of how these materials compare for an outdoor kitchen setting.
Paver Material Comparison for Outdoor Kitchens
| Paver Material | Pros | Cons | Best For |
|---|---|---|---|
| Concrete Pavers | Wide variety of styles & colors, cost-effective, durable, consistent sizing. | Can fade over time, may require sealing to enhance stain resistance. | Homeowners seeking a versatile, budget-friendly option with modern and traditional looks. |
| Brick Pavers | Classic aesthetic, excellent heat resistance, color won't fade. | Porous and can absorb stains if not sealed, limited color palette. | Creating a timeless, traditional feel, especially in areas near high-heat cooking appliances. |
| Natural Stone | Unique, high-end look, extremely durable (granite), stays cool (travertine). | Most expensive option, can be prone to staining (softer stones), irregular shapes can make installation tricky. | Projects with a generous budget aiming for a luxurious, one-of-a-kind outdoor space. |
Ultimately, the right material is the one that best fits your budget, style, and how you plan to use your kitchen.
Calculating Your Needs Accurately
Once you've landed on the perfect paver, the next step is getting your numbers right. Trust me, there’s nothing more frustrating than running out of pavers halfway through a project, only to discover the new batch doesn't quite match the old one.
To prevent this headache, start by measuring the length and width of your patio area to calculate the total square footage. Then, always add an extra 10-15% for overage. This isn't optional. This buffer covers the material you’ll inevitably lose when making angled cuts around your kitchen island, along with any pavers that might get cracked or damaged during installation.
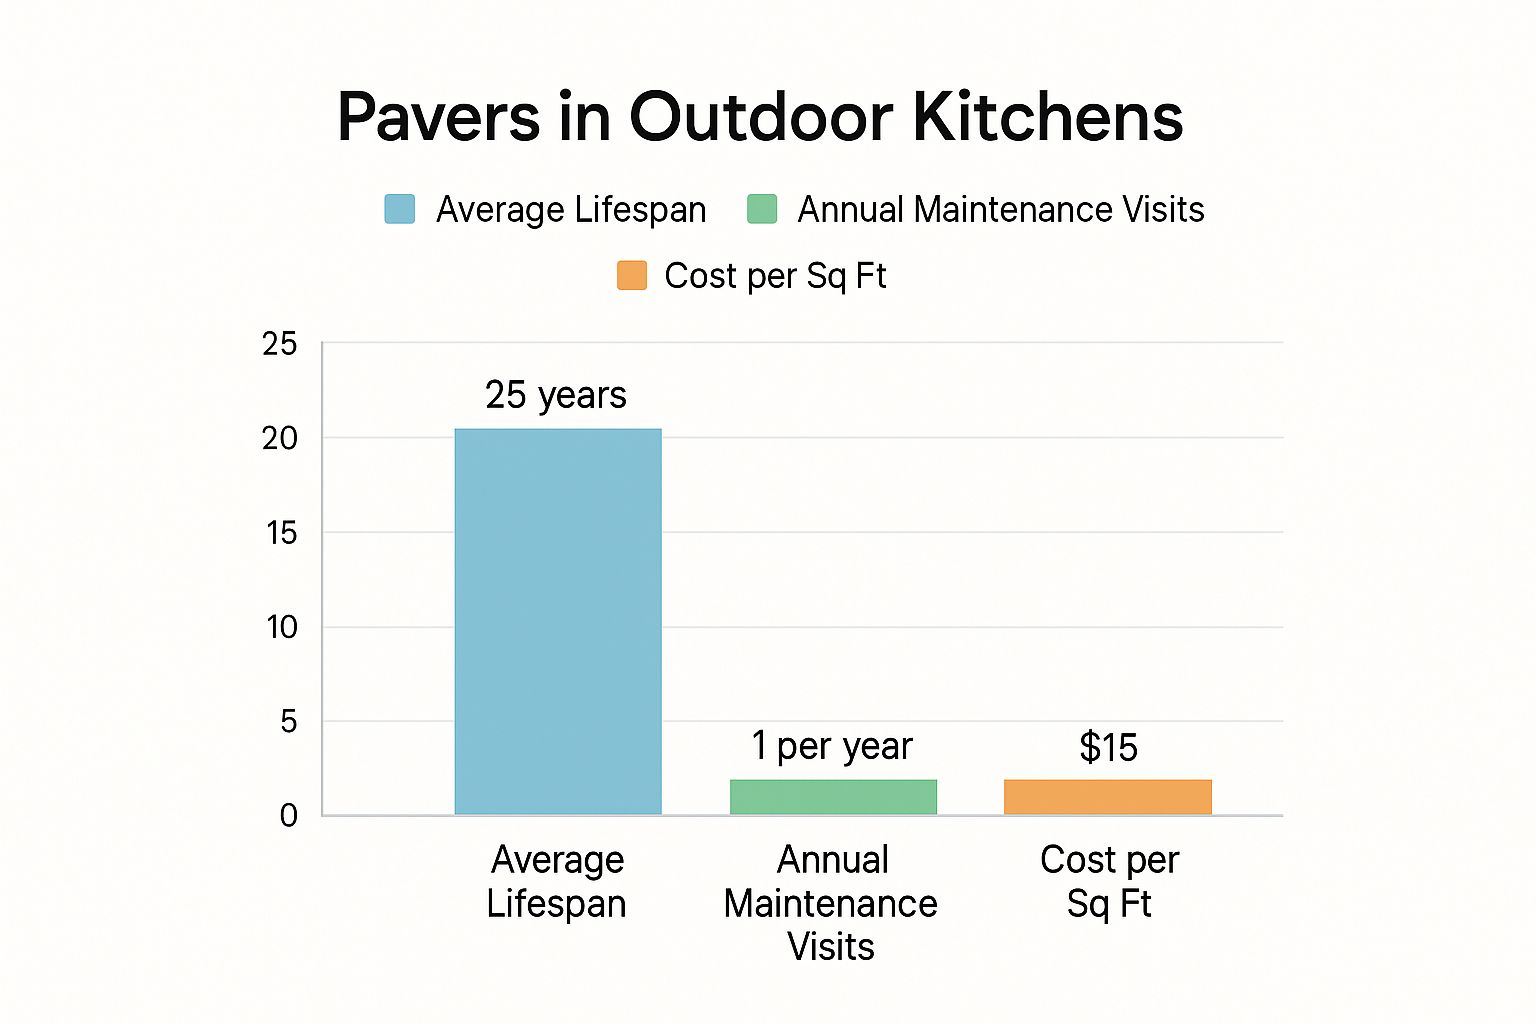
As these figures show, while there's an upfront cost, a well-built paver patio is a solid long-term investment that doesn't demand a lot of maintenance. The growing desire for these kinds of durable, beautiful outdoor spaces is part of a much larger trend. The global market for landscape paving materials was estimated at USD 20.5 billion in 2024 and is on track to hit USD 30.2 billion by 2033, with a clear shift toward more sustainable and eco-friendly choices.
A Note on Style: Your paver choice has to work with your home's exterior. Before you commit, grab a few samples and place them next to your house's siding or stone veneer. Check on them in the morning light, at midday, and in the evening. Colors can shift dramatically. This simple test can save you from a major design headache down the road.
Mastering Site Prep for a Lasting Foundation
A gorgeous outdoor kitchen built on pavers can fail in a hurry if the groundwork isn't solid. I’ve seen it happen. The real secret to a long-lasting, perfectly level surface isn't the fancy pavers you choose, but the unseen foundation you build beneath them. This is where your sweat equity pays off for decades to come.
Getting the excavation right is the first, and arguably most critical, part of the job. You’re not just scraping off the grass; you're creating the entire support system for your new outdoor living space. The depth you need to dig depends entirely on your local climate and soil, a detail that many DIYers unfortunately miss.
Calculating Your Dig Depth
If you live anywhere with cold winters, your biggest enemy is frost heave. This is what happens when moisture in the ground freezes, expands, and pushes everything—including your brand-new patio—upward. The result is an uneven, unstable mess. To stop this from happening, you have to dig deep enough for a serious gravel base.
Here’s a good rule of thumb for your total excavation depth, measured down from where the top of your pavers will be:
- Warm Climates (no frost): Aim for 6-8 inches. This gives you room for 4 inches of compacted gravel, 1 inch of sand, and the paver itself.
- Cold Climates (with frost): You'll need to go much deeper, usually 10-14 inches or more. This allows for a much thicker gravel base (6-10 inches) that sits below the frost line, giving you a stable foundation that won’t budge.
Don't just guess. It’s always smart to check with a local landscape supplier or your city’s building department to confirm the frost line depth in your specific area.
Engineering Proper Drainage
With the hole dug, your next mission is to engineer a slight slope. A perfectly flat patio is a recipe for disaster. It lets water pool, which leads to ugly stains, moss growth, and can even cause water damage to your house's foundation over time.
The professional standard is to create a slope of 1/4 inch for every foot of distance, making sure it angles away from your house. This slope is so subtle you'll never notice you're on it, but it's more than enough to guide every drop of rain away from your home.
The easiest way to set this grade is with batter boards and mason's lines stretched tight across the area. A simple line level helps you set the strings at the perfect pitch, giving you an exact visual guide for grading the soil and, later on, your base materials. Thinking through drainage now is a thousand times easier than trying to fix water problems later. As you're putting your plans together, checking out some 10 inspiring backyard patio ideas can be great for motivation and for seeing how these foundational steps lead to amazing results.
Compacting the Subgrade
Once the site is excavated and graded, it's time to compact the native soil, what we call the subgrade. Don't even think about skipping this. Rent a plate compactor and run it over the entire area until the ground is rock solid. Loose soil will inevitably settle under the immense weight of the gravel and pavers, causing your beautiful patio to sink and become a lumpy hazard.
The final touch before adding your base material is to lay down a sheet of geotextile fabric. This tough, permeable membrane acts as a separator. It stops your expensive gravel base from mixing into the soil below while also blocking weeds from growing up from underneath. It’s a cheap material that adds an incredible amount of long-term stability to your outdoor kitchen project.
Building the Unseen Layers of a Rock-Solid Patio
Everyone oohs and aahs over the finished pavers, but the real champion of a durable outdoor kitchen patio is what lies beneath. The layers of aggregate and sand are the unsung heroes, providing the unwavering support system that keeps your investment level and beautiful for years to come. This is the foundation that will carry the immense weight of your grill island, countertops, and appliances without shifting or sinking.
Trust me, building this base is more than just dumping some gravel in a hole. It's an engineered process, and getting it right means creating a solid, interlocking platform that can handle whatever you (and Mother Nature) throw at it.
Compacting the Aggregate Base in Lifts
Your aggregate base, usually made of ¾-inch crushed stone, is what gives the patio its muscle. For a pavers outdoor kitchen, you're supporting some serious weight, so a thicker base of at least 6-8 inches is non-negotiable. The trick is, you can't just fill the entire hole at once and expect it to compact correctly.
The pro method is to build the base in "lifts." This just means you add no more than 3-4 inches of gravel at a time. You spread it out evenly, then run a plate compactor over it until it's completely solid before adding the next layer. Repeat this until you reach your target depth. This ensures the entire base achieves maximum density, from the very bottom to the top.
Why Lifts Matter: If you try to compact an 8-inch layer of gravel all at once, you're only really solidifying the top few inches. The loose stone at the bottom will inevitably settle under the weight of your kitchen, and that's when you start seeing dips and an unstable patio. Building in lifts is a step you simply can't skip for a lasting installation.
Screeding for a Perfectly Flat Sand Bed
Once your base is rock-solid, you'll add a layer of coarse sand about 1 inch deep. This is the bedding layer your pavers will actually sit in. Its job is to create a perfectly flat plane and allow for tiny adjustments as you lay each paver.
This is where a technique called screeding is essential. Lay two parallel pipes (1-inch outside diameter PVC pipes work great) right on your compacted gravel. Shovel sand between them, and then pull a straight 2×4 board across the tops of the pipes. The board will scrape off the excess sand, leaving you with a flawlessly smooth and level surface.
- Carefully remove the pipes after you've screeded a section.
- Gently fill the small channels left by the pipes with more sand.
- Smooth out these filled areas with a trowel. Be careful not to step on your freshly screeded sand!
Locking It All Together with Edge Restraints
The final piece of this foundational puzzle is installing edge restraints. These are sturdy plastic or metal strips that you spike into the ground around the perimeter of your patio before you start laying pavers.
Their job is simple but absolutely critical: they stop the pavers from creeping outward and spreading apart over time. Without edge restraints, foot traffic and freeze-thaw cycles would slowly push the outer pavers away, creating ugly, widening gaps. This small component locks the entire system together, preserving the structural integrity of all your hard work. As you plan, looking at some inspiring landscape ideas with pavers for 2025 can really help you see how these foundational steps support incredible final designs.
Laying Pavers and Applying the Finishing Touches
You’ve built a rock-solid base, and now comes the best part—the moment your pavers outdoor kitchen really starts to take shape. This is where all that prep work pays off, transforming a patch of dirt and gravel into a gorgeous outdoor living space. Getting these next steps right ensures your paver patio looks professionally done and stays put for decades.
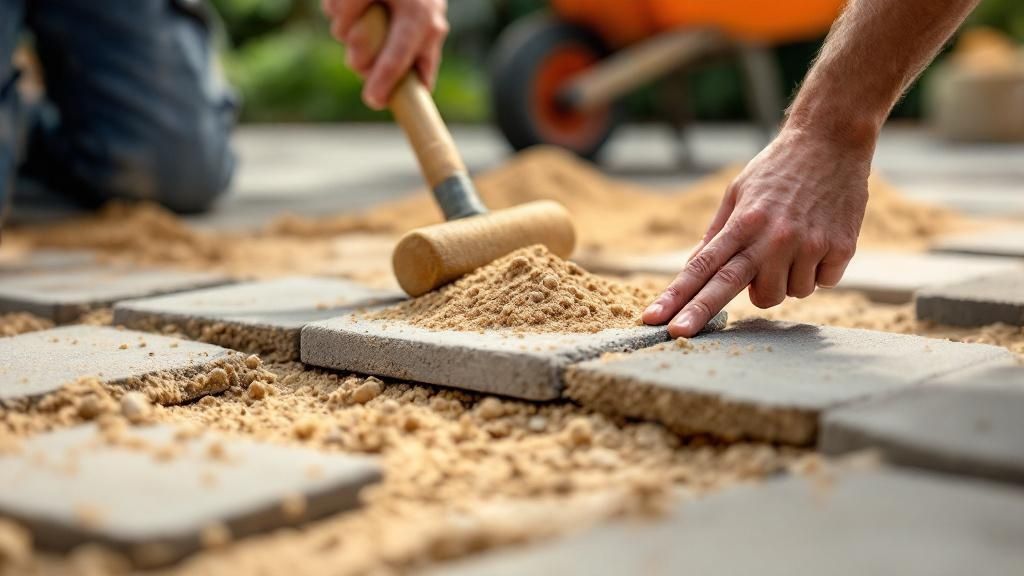
First things first, you need a starting point. I always tell my clients and crew to begin along a fixed, straight edge, like the foundation of your house or a retaining wall. It gives you a reliable line to work from.
Place your first paver down, give it a gentle but firm tap with a rubber mallet to set it into the sand, and work your way out from there.
Crucial Tip: Whatever you do, don't slide the pavers across the sand to get them into position. That just pushes sand up into the joints and messes up the locking process later. Place each paver straight down, leaving a consistent gap of about 1/8 inch between them.
Making Precise Cuts Like a Pro
Sooner or later, you're going to have to cut some pavers. It's unavoidable when you're fitting them around the edges of the patio or snugging them up against your kitchen island. A wet saw with a diamond blade is your best friend here. It makes clean, sharp cuts with almost no dust, which is the key to a polished look.
Here’s how to get it right:
- Measure Twice, Cut Once: It’s an old saying for a reason. Place a full paver where it needs to go, overlapping the one next to it. Mark your exact cut line with a pencil.
- Gear Up for Safety: Put on your safety glasses and gloves. Make sure the wet saw has a steady stream of water flowing. This cools the blade and keeps the dust down.
- Make the Cut: Guide the paver through the saw slowly and steadily. Don't try to force it—let the blade do the work.
Making these cuts can feel a little intimidating at first, but with some patience, you’ll be making seamless fits around every corner and curve.
The Final Lock with Polymeric Sand
With every paver perfectly placed, it's time to lock it all together. The magic ingredient for this is polymeric sand. It’s a special blend of fine sand with a polymer binder that hardens when you add water.
Start by pouring the dry sand all over your new patio. Then, grab a push broom and sweep it back and forth, working the grains down into every single joint until they're packed full.
It’s funny—while grilling gear might dominate the outdoor kitchen market with a 42.3% share, it’s the hands-on elements like pavers that really matter to homeowners. In fact, offline sales accounted for about 84.3% of the market in 2023, which just goes to show how much people want to see and feel these materials in person. You can see more details in this outdoor kitchen market trends report from market.us.
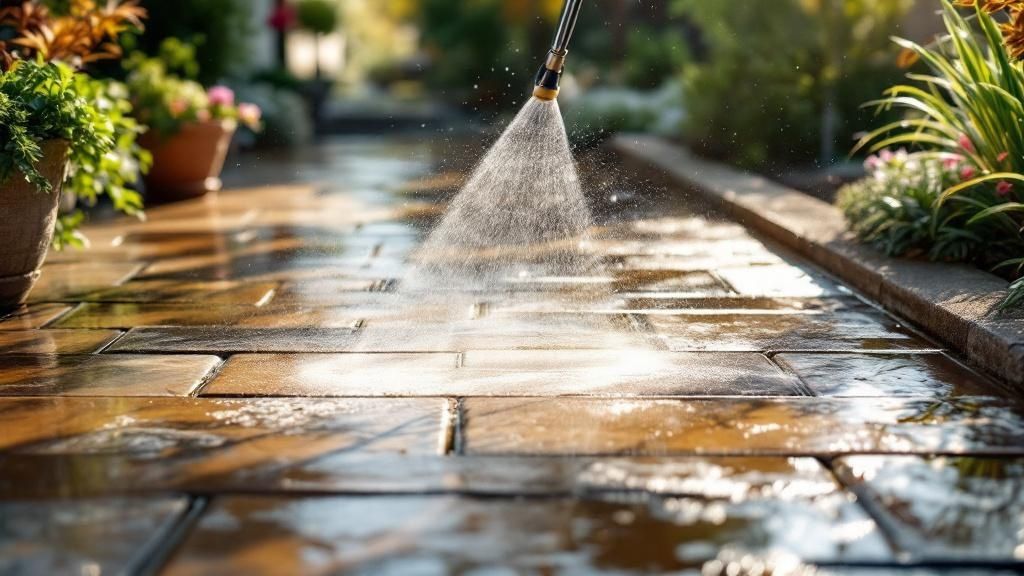
Once the joints are full, grab a leaf blower on its lowest setting and gently blow all the excess sand off the tops of the pavers. Any sand left on the surface will harden and leave a hazy film you don't want.
Finally, give the whole area a light misting with a garden hose to activate the sand. Follow the manufacturer's directions, but this usually involves a couple of light passes. The water sets off a reaction that turns the sand into a firm yet flexible mortar, locking your pavers tight and keeping weeds from ever popping through.
And that's it. Your pavers outdoor kitchen is officially complete and ready for years of backyard barbecues.
Common Questions We Hear About Paver Outdoor Kitchens
Even with the most detailed plan, questions always pop up during a big project. After building countless paver outdoor kitchens over the years, we’ve found a few common uncertainties that can stall progress.
Let’s clear those up right now so you can move forward with total confidence.
Can I Build My Kitchen Island Directly on Top of Pavers?
This is a big one, and we get it all the time. The answer from any seasoned pro is a firm no.
While it might seem like a shortcut, plopping a heavy, permanent structure like a masonry island with stone countertops directly on pavers is a recipe for disaster. That concentrated weight will inevitably cause the pavers underneath to sink, shift, and settle. Before you know it, your beautiful, level surface is ruined.
The right way to do it is to build the island’s foundation first. You need to pour a dedicated concrete footer for the island before you even think about laying pavers. This gives the heavy structure its own stable, independent base that won’t budge. Once the island is built, you can then lay your pavers neatly around it for a seamless, professional, and incredibly durable finish.
A separate footing for your island is the single best insurance policy against future sinking and shifting. It isolates the heavy structural load from the floating paver system, ensuring both last for decades.
What Is the Best Way to Clean Grease Stains off Pavers?
Grease is just part of the deal with any kitchen, inside or out. The real trick to handling spills on pavers is acting fast.
For a fresh grease or oil spill, immediately smother it with an absorbent material. We've used everything from kitty litter and sawdust to plain old cornstarch. Just pour it on thick, let it sit for a few hours to draw as much of the oil out as possible, and then sweep it all away.
If you’re dealing with older, stubborn stains that have already set in, you’ll need to bring in the heavy hitters. Your best bet is a commercial-grade paver degreaser made specifically for your type of paver—whether it's concrete, brick, or natural stone. Always, always test any cleaner on a spare or hidden paver first to make sure it doesn’t cause any discoloration.
Do I Really Need to Seal the Pavers in My Outdoor Kitchen?
Absolutely, yes. Sealing the pavers around an outdoor kitchen isn't just a suggestion; we consider it a critical final step. Think of a high-quality sealer as a protective shield for your investment. It’s essential for guarding against stains from common culprits like grease, red wine, and marinades, which makes cleanup so much easier.
But sealing does more than just stop stains. It also provides a few other key benefits:
- Color Enhancement: It deepens and enriches the natural color of your pavers, making them pop.
- UV Protection: It acts like sunscreen for your patio, helping prevent the sun from fading the color over time.
- Joint Stabilization: A good sealer helps lock the polymeric sand in the joints, which is a huge help in reducing weed growth and ant hills.
As a rule of thumb, plan to reseal your patio every 3-5 years. The exact timing depends on the sealer you use, how much direct sun it gets, and the amount of foot traffic.
Ready to transform your backyard with a professionally designed and built outdoor living space? The team at Tamura Designs Landscape and Construction has over 30 years of experience creating stunning, functional outdoor kitchens and paver patios across Silicon Valley. Schedule your design consultation today.