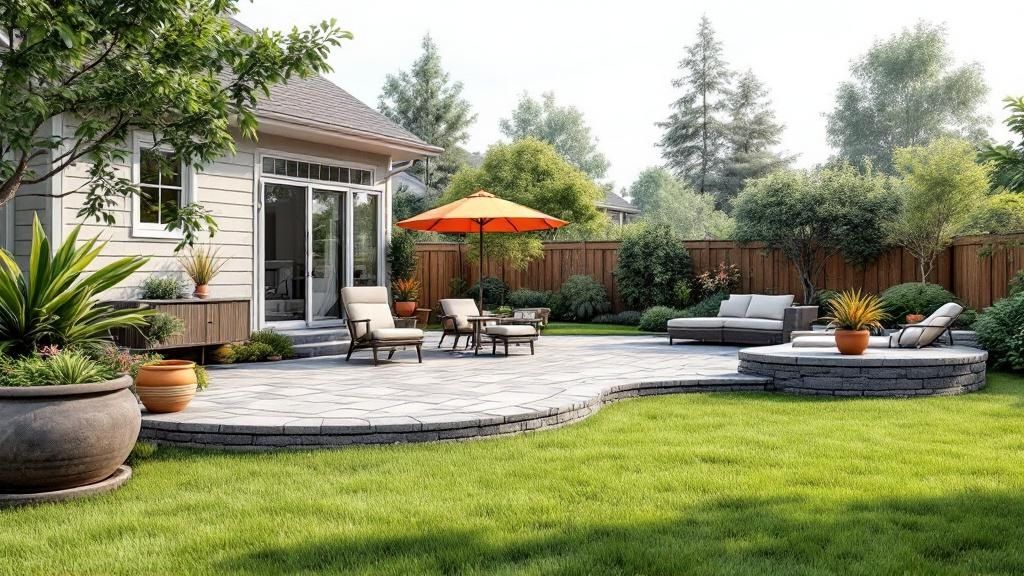
A stone paver patio isn't just a surface—it's a premium outdoor living space built from natural stone, offering a kind of durability and timeless beauty you just can't get from other materials. Think of it as a smart upgrade that boosts your property's value while creating a functional, elegant spot for relaxing and entertaining.
Why a Stone Paver Patio Is a Lasting Investment
A stone paver patio is so much more than a simple backyard feature; it becomes a genuine extension of your home. It’s an investment not just in your property, but in your lifestyle. This isn't about slapping down a surface for a grill and some chairs. It’s about creating the heart of your outdoor world—a place for quiet morning coffees, lively family get-togethers, and peaceful evenings under the stars.
A well-planned patio offers real, tangible returns that you can see and feel every single day. Let’s get into the real-world value natural stone delivers.
Unmatched Durability and Timeless Aesthetics
Forget about concrete slabs that can develop huge, systemic cracks or wood decks that demand constant staining and sealing. A natural stone paver patio is built for the long haul. Each stone has its own unique character, color, and texture, which guarantees your patio will be completely one-of-a-kind.
- Weather Resistance: Natural stone holds up incredibly well against freeze-thaw cycles, scorching sun, and heavy rain without fading or falling apart.
- Unique Beauty: From the rustic charm of flagstone to the sleek elegance of bluestone, the look is authentic and impossible for manufactured materials to replicate.
- Low Maintenance: When installed correctly, keeping it up is a breeze. It usually just means occasional cleaning and topping off the joint sand now and then.
This powerful combination of strength and beauty is why the demand for these materials keeps climbing. The global market for paving stones was valued at around $40.3 billion in 2021 and is on track to more than double by 2031. If you're curious, you can read the full market research about paving stone growth to see just how strong this trend is.
Expert Insight: The true value of a stone paver patio lies in its permanence. While other materials break down over time, natural stone just weathers gracefully, gaining even more character over the years. It's one of the few home improvements that can actually look better a decade after it’s installed.
Quick Comparison of Popular Paver Materials
To help you get a feel for your options at a glance, here’s a look at how natural stone stacks up against other common choices. This table breaks down the main differences to help you decide what's right for you.
| Material | Aesthetic | Typical Cost | Durability | Best For |
|---|---|---|---|---|
| Natural Stone | Unique, timeless, high-end | High | Excellent | Homeowners seeking authentic beauty and long-term value. |
| Concrete Pavers | Uniform, versatile styles | Moderate | Good | Those wanting a wide variety of colors and shapes on a budget. |
| Brick Pavers | Classic, traditional, warm | Moderate | Very Good | Achieving a historic or colonial look with consistent color. |
As you can see, while natural stone comes with a higher initial cost, its longevity and stunning appearance often make it the best long-term investment.
Boosting Property Value and Curb Appeal
A professionally installed stone paver patio is a serious financial asset. It consistently shows up as one of the home improvements with the highest return on investment. Why? Because potential buyers see it not as a future maintenance headache but as a ready-to-use luxury feature.
The immediate impact on your home's curb appeal (or maybe we should call it "backyard appeal") is undeniable. It transforms an underused patch of grass into a structured, inviting living space, making your entire property feel more expansive and thoughtfully designed. This is more than just an expense—it’s a strategic upgrade that pays for itself in both daily enjoyment and future equity.
Designing a Patio That Fits Your Lifestyle
A truly great stone paver patio isn't just something you plop down in the backyard; it’s a space that's carefully planned with your life in mind. This is the fun part, where your vision starts to become a real, workable blueprint. Before you even get to picking out paver styles or colors, you have to get to know the canvas you’re working with—your own yard.
The first step is simply to watch and listen to your property. Spend a few days noticing how the sun travels across your yard. Where does that warm morning light hit, making it the perfect spot for a coffee nook? Where does the intense afternoon sun beat down, telling you that a pergola or shade sail might be a good idea? Understanding these daily patterns is the key to creating a comfortable space you'll actually want to spend time in.
Then, take a good look at the existing landscape. Pay attention to any gentle slopes, low spots where water might collect after a rain, and the location of your big, mature trees. A slight grade is actually a good thing—it helps with drainage—but a steep slope is going to mean you need a retaining wall, which adds a whole new layer of complexity and cost to the project. Trust me, ignoring these natural features is a classic mistake that almost always leads to headaches later on.
Defining Your Patio's Primary Purpose
Once you've got the lay of the land, it’s time to think about how you want to live on your patio. A design that doesn't have a clear function is one that often feels awkward and ends up going unused. So, ask yourself: what’s the number one reason I want this space?
- An Alfresco Dining Hub: If you dream of eating outdoors, your patio needs to be big enough for a dining set with plenty of room for people to walk around easily. It should also have a straight, clear path to your kitchen—nobody wants to navigate an obstacle course with a hot plate of food.
- A Cozy Fire Pit Lounge: This kind of space calls for a more intimate layout, maybe a circle or a square focused on a central fire pit. I'm a huge fan of built-in seating walls for these areas; they offer permanent, no-fuss spots for everyone to gather.
- A Multi-Zone Entertainment Area: For the host with the most, you might want to create distinct "rooms." Think a dedicated grilling station, a separate dining spot, and another corner just for conversation. You can use different paver patterns or even subtle changes in level to define these zones visually.
Thinking through these scenarios helps you get specific. You move from a fuzzy idea of a "patio" to a clear vision of a functional outdoor room. A patio built for big parties has totally different needs for size and flow than one designed for quiet morning coffee.
A common regret I see is underestimating scale. People often picture their furniture on the new patio but forget about the space needed to actually move around. You have to account for foot traffic and pulling out chairs. A good rule of thumb is to add at least three feet of clearance around all your furniture.
Sketching a Layout and Navigating Rules
You don't need to be a professional architect to map out a solid plan. Grab some graph paper and start with a simple sketch. Measure your house, your property lines, and any existing features like trees or sheds you plan to keep. Then, draw your patio shape to scale. It’s a simple exercise, but it’s incredibly helpful for visualizing how people will move through the space and how it connects to your home.
Does it feel like a natural extension of your indoor living room? Is the path from the back door obvious? A well-designed paver patio should feel connected, not like some random island floating in your yard.
Now, before you get too attached to that beautiful sketch, you need to do your homework. Check with your local city or homeowner’s association (HOA). Many places have specific rules about:
- Setbacks: How far a structure needs to be from your property lines.
- Impervious Surface Limits: The total percentage of your lot that can be covered by things like patios that don't absorb water.
- Permit Requirements: Patios over a certain size almost always require a building permit.
A quick phone call to your local planning department can save you from a world of hurt. There's nothing worse than getting a stop-work order or, even worse, having to tear out your brand-new patio because it violates a local rule. Taking a little time to understand the regulations upfront ensures your project goes smoothly from a great design to a beautiful, functional reality.
Choosing the Right Stone Pavers and Materials
The material you choose is the very soul of your stone paver patio. It sets the tone, the feel, and even the sound of your outdoor space. This decision is so much more than just picking a color—it's about giving your backyard a personality.
I want to walk you through the unique character of different natural stones and also highlight the unsung heroes—the materials underneath—that ensure your patio stands the test of time. My goal is to help you pick materials that are a perfect match for your style, your climate, and the level of upkeep you're prepared for.
Understanding Natural Stone Personalities
Every type of natural stone brings a completely different vibe to the table. I find it helpful to think of them in terms of personality; it makes finding the right fit for your home that much easier.
- Flagstone: The free-spirited rustic. With its wonderfully irregular shapes and earthy tones, flagstone creates a relaxed, natural look. It’s absolutely perfect for casual patios or meandering garden paths that feel like they've always been there.
- Bluestone: The sophisticated classic. Known for its dense makeup and iconic blue-gray hue, bluestone offers a sleek, almost formal surface. It’s a go-to for more contemporary, clean-lined designs.
- Travertine: The warm, Mediterranean cousin. This stone, with its creamy whites, tans, and rusty colors, stays remarkably cool underfoot. That makes it a top contender for poolside patios and homes in hot, sunny climates.
- Granite: The unyielding powerhouse. As one of the toughest stones out there, granite delivers incredible durability and stain resistance. It's the ideal choice for high-traffic areas or outdoor kitchens where spills are a fact of life.
Exploring various natural stone flooring options can give you an even better sense of the textures and colors available.
The Foundation’s Unsung Heroes
While the stone pavers get all the glory, the materials underneath are what will make or break your project. Trust me, skimping on the base is a surefire way to end up with a wavy, unstable mess in just a few years.
These are the three components you simply can't skip for a rock-solid patio.
Base Gravel: This is the structural backbone. You need a layer of 4 to 6 inches of compacted ¾-inch clean crushed stone. This creates a stable, frost-proof foundation and allows for fantastic drainage.
Leveling Sand: Not just any sand will do. You need a 1-inch layer of coarse concrete sand to create a bed for setting each paver. It allows for the tiny adjustments needed to get every stone perfectly level with its neighbors.
Polymeric Sand: This stuff is the magic that locks everything together. It’s a fine sand mixed with a polymer adhesive that hardens when you wet it down, forming a firm yet flexible joint. This is your best defense against weeds, ant hills, and washout from heavy rain.
Pro Tip: Whatever you do, don't use fine play sand for your leveling bed. It holds way too much moisture and will eventually wash out, leading to sunken, wobbly pavers. The coarse, angular particles in concrete sand interlock much more effectively.
Comparing Stone Paver Characteristics
Choosing the right stone means balancing aesthetics, cost, and practicality for where you live. To make it easier, I've put together a table breaking down the key characteristics of the most common options.
Natural Stone Paver Characteristics
| Stone Type | Average Cost (per sq. ft.) | Pros | Cons | Ideal Climate |
|---|---|---|---|---|
| Flagstone | $15 – $35 | Natural, rustic look; good slip resistance. | Irregular thickness can make installation tricky; can flake. | Temperate to arid climates. |
| Bluestone | $20 – $40 | Elegant, uniform appearance; very durable. | Can get very hot in direct sun; can be slippery when wet. | Cooler, northern climates. |
| Travertine | $18 – $40 | Stays cool; porous for good drainage. | Can be prone to staining; requires sealing. | Hot, sunny climates. |
| Granite | $25 – $50 | Extremely durable; resists stains and scratches. | Higher cost; can be difficult to cut and work with. | All climates, especially freeze-thaw. |
This table should give you a solid starting point for weighing your options. For an even deeper dive, you might find our guide on the best patio pavers for different needs helpful.
The Complete Paver Installation Process
This is where the real fun begins.All your planning, dreaming, and material choices are about to come together. We're moving from paper to packed earth, and I'm going to walk you through how the pros get it done, focusing on the techniques that guarantee a patio that’s not just beautiful, but built to last.
The success of your entire project is quite literally built on its foundation. I can't stress this enough: cutting corners here is a recipe for disaster. It leads to shifting pavers, sunken spots, and endless frustration down the line. We’ll cover everything from the first shovel of dirt to locking in that final paver.
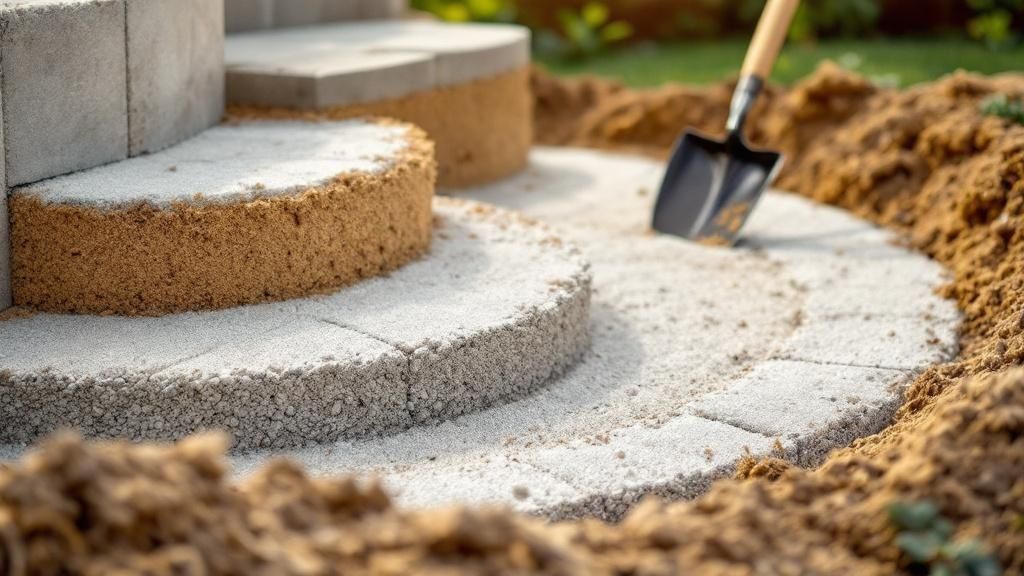
Proper Excavation and Base Preparation
The first real workout of your project is the excavation. For most residential patios, you'll need to dig down about 7 inches from where you want the final surface of your patio to be. This depth is critical; it makes room for the layers that provide the structure and drainage your patio needs to survive.
So, why 7 inches? Here’s the breakdown:
- A solid 4-inch layer of compacted base gravel.
- A 1-inch layer of leveling sand.
- The thickness of the paver itself, which is typically around 2 inches.
Once you've dug out the area, it’s time to build that foundation. Start by spreading your base gravel—a ¾-inch clean crushed stone works best—evenly across the excavated site. Now for the most important step of the whole job: compaction. To properly prep the base and set the pavers, you need equipment like vibration plate compactors. You have to compact the gravel in 2-inch "lifts" (or layers) until you've built up a rock-solid 4-inch base.
A Note on DIY Reality: This is, without a doubt, the most physically demanding part of the job. For any patio bigger than a tiny landing, renting a plate compactor is non-negotiable. Trying to hand-tamp a large area will only lead to exhaustion and a weak base that's guaranteed to fail.
This simple graphic shows you exactly how these layers come together.
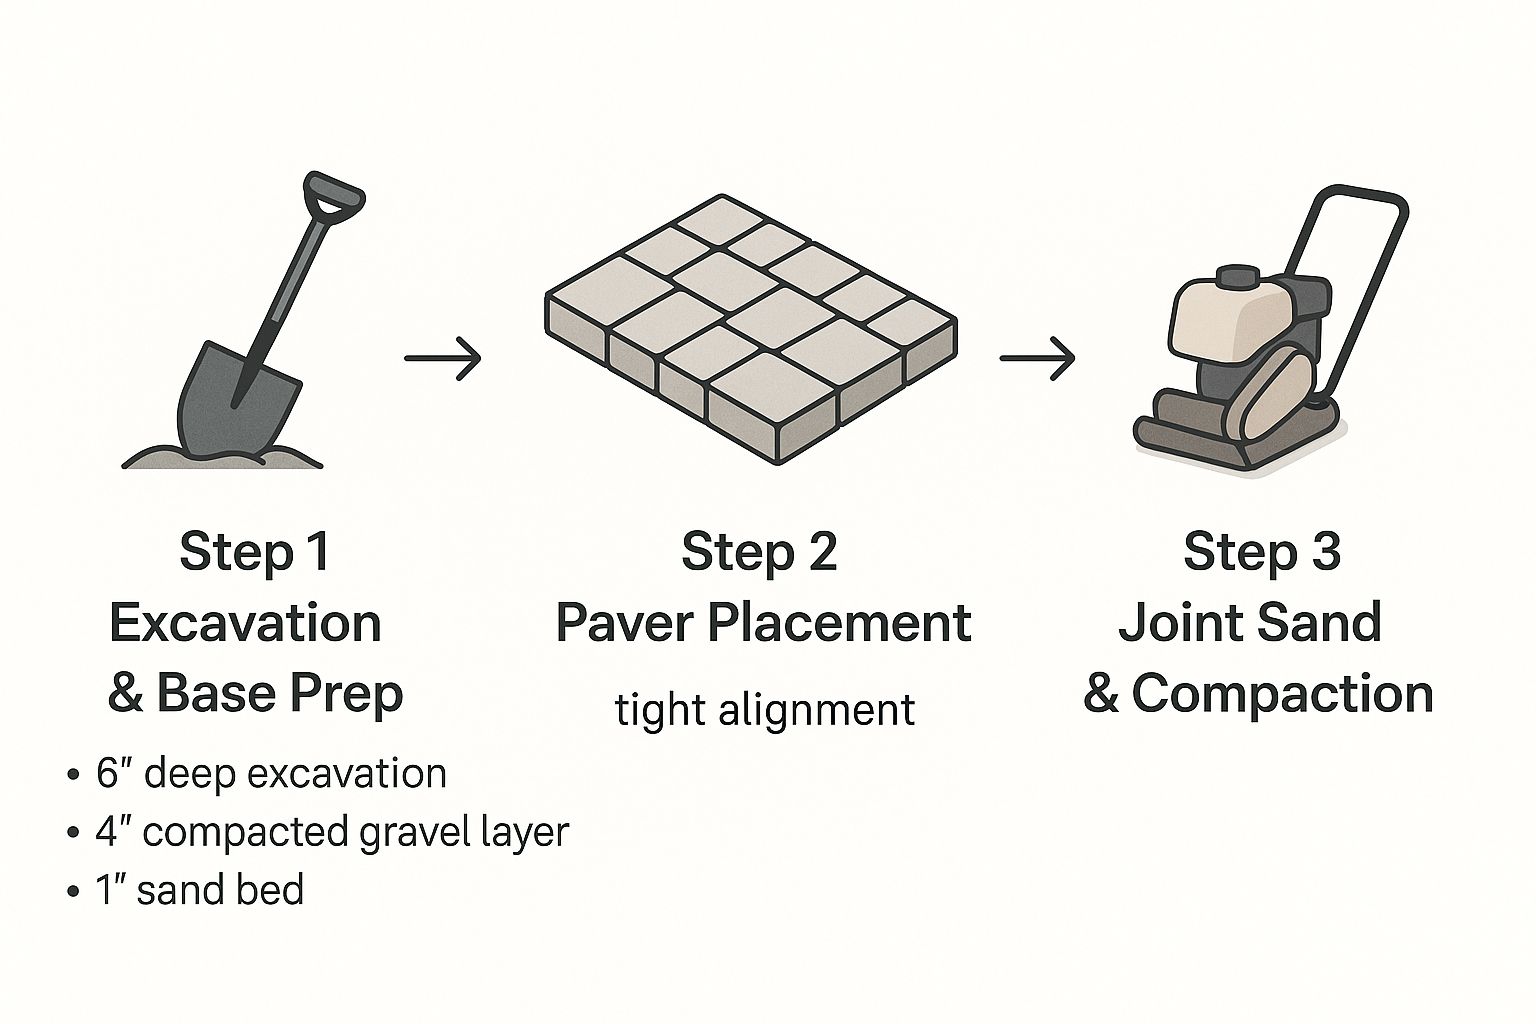
You can see how the compacted gravel base makes up the bulk of the foundation—it’s doing all the heavy lifting.
Screeding the Sand and Laying the Pavers
With your gravel base solid and graded, you can lay down your screeding rails. These are just 1-inch outer-diameter metal pipes laid directly on the gravel. Pour coarse concrete sand between them, then pull a perfectly straight 2×4 across the tops of the rails. This "screeds" the sand, creating a perfectly flat, 1-inch-deep bed for your pavers.
Now you can start laying the pavers. Always start from a hard edge, like the foundation wall of your house, and work your way out into the field.
- Place each paver straight down onto the sand bed.
- Do not slide them into place—this will mess up your perfectly level sand.
- Set them gently, then give them a little tap with a rubber mallet to seat them.
- Keep your joint lines consistent. I aim for about a ⅛ to ¼-inch gap between stones.
Making cuts is just part of the process. A wet saw with a diamond blade is your best friend for getting clean, precise cuts around the edges or any obstacles. And please, always wear your safety gear—glasses and hearing protection are a must when that saw is running.
Installing Edge Restraints and Finishing with Polymeric Sand
Your patio needs a frame to hold it all together. That’s where edge restraints come in. These are tough plastic or metal strips that you install along the entire perimeter of the patio, securing them into the gravel base with long metal spikes. This is what stops the pavers from shifting outward over the years.
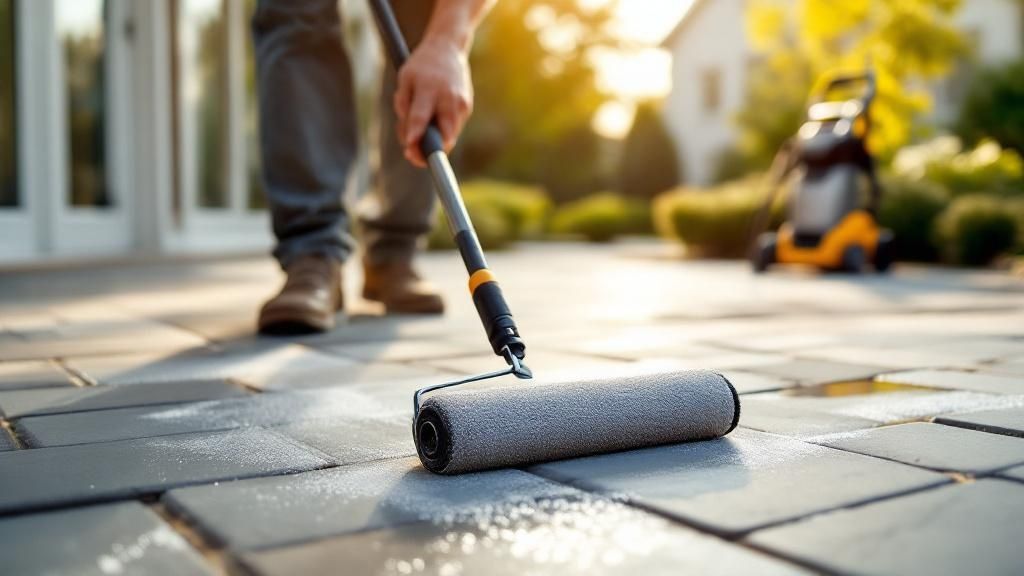
Once every paver is laid and the edge restraints are secure, it's time to lock it all in with polymeric sand. This isn't just regular sand; it has additives that harden when you wet them, creating a firm yet flexible joint.
- Sweep It In: Pour the dry sand over the patio and use a push broom to sweep it into every single joint until they are completely full.
- Compact Again: Run the plate compactor over the finished pavers one last time. This settles the stones perfectly into the sand bed and vibrates the polymeric sand deep down into the joints.
- Clean the Surface: Get a leaf blower and, on its lowest setting, gently blow every bit of excess sand and dust off the paver surfaces. This is critical for preventing a hazy stain later.
- Activate with Water: Using a hose nozzle on a "shower" or fine mist setting, gently water the patio. You want to saturate the joints until they can't absorb any more water.
This hardened sand is your number one defense against weeds and ants. If your site has unique drainage challenges, you might consider a different approach. You can check out our guide on what permeable pavers are to see how they manage water right through the surface.
This methodical process—from deep excavation to the final watering—is what separates a wobbly, amateur-looking patio from a professional, durable masterpiece. If you take your time with each stage, your new stone paver patio will be a source of pride and enjoyment for decades to come.
Maintaining Your Patio for Decades of Use
Your beautiful new stone paver patio is finished—congratulations! But the real secret to enjoying that investment for years to come is knowing how to protect it. Proper maintenance isn't about spending your weekends on tedious chores. It's about creating a simple, realistic routine to keep your patio looking incredible and stopping small issues before they snowball.
This just means knowing how to pull the odd weed, tackle stains from a summer barbecue, and handle minor fixes. A little bit of proactive care makes all the difference and ensures you’ll be making memories out there for decades.
Your Essential Maintenance Routine
When it comes to patio care, consistency beats intensity every time. A few simple tasks done regularly are far more effective than one massive cleanup project once a year. Think of it as light housekeeping for your outdoor living room.
Start with a good sweep. Using a stiff-bristle broom to regularly clear away leaves, dirt, and other debris is your first line of defense. It prevents organic matter from breaking down, staining the stone, and clogging the paver joints. After sweeping, a quick rinse with a garden hose washes away any leftover dust and grime, helping the natural color of your stone paver patio pop.
For anything more stubborn, a pH-neutral stone cleaner and a soft brush will get the job done without harming the paver surface.
The most common patio problems—stains, weeds, and moss—all start with debris being left on the surface too long. A simple weekly sweep is your number one defense.
Handling Weeds and Stains
Even with the best polymeric sand, a determined weed will occasionally find its way through a joint. The trick is to act fast. Just pull them by hand as soon as you spot them. If you’re dealing with a more widespread problem, a non-selective herbicide applied carefully into the joints can work, but always double-check that it’s safe for your specific type of natural stone.
Stains are an inevitable part of a well-loved patio. From grill grease to rust from patio furniture, different marks need different approaches.
- Grease and Oil: Move quickly on these. Blot any excess oil, then pour a generous amount of kitty litter or cornstarch over the stain to draw it out. Let it sit for several hours before sweeping it up.
- Rust Stains: These can be tricky. Your best bet is usually a specialized rust remover made specifically for natural stone. Steer clear of harsh acids, which can etch and permanently damage the stone’s finish.
- Organic Stains (Leaves, Berries): A simple mix of water and a mild, pH-neutral detergent is often all you need to lift these types of stains.
Keeping your stone paver patio pristine is all about proper care. You can dive deeper with these expert tips for natural stone floor cleaning, which offer great insights for outdoor surfaces, too.
The Great Sealing Debate
So, should you seal your stone paver patio? Honestly, it depends. A sealer adds a protective layer that can make cleaning up spills much easier and really enhance the stone’s natural color. But it's not always necessary, and it does introduce a recurring maintenance task.
More porous stones like travertine and sandstone get the most benefit from sealing, as it helps prevent stains and moisture damage. Denser stones like granite are already quite stain-resistant and might not need it at all. If you go for it, use a high-quality, breathable sealer formulated for natural stone. You should plan on reapplying it every 3-5 years, depending on how much foot traffic your patio gets and the weather in your area.
Making Minor Paver Repairs
Down the road, you might find a single paver has settled a bit or started to wobble. Don’t worry—this is an easy fix you can absolutely handle yourself. Grab a pair of paver extractors or two flathead screwdrivers and carefully pry the paver out.
Add a small amount of coarse leveling sand to the base, overfilling it just slightly. Put the paver back into place and use a rubber mallet to gently tap it down until it’s perfectly level with the surrounding stones. To finish, just sweep some fresh polymeric sand into the joints to lock it all back together.
It's also worth noting that proper water runoff is crucial for preventing paver settlement in the first place. You can explore these 8 effective patio drainage solutions to tackle any underlying water issues.
Answering Your Top Stone Paver Patio Questions
Even the most meticulously planned project can leave you with a few questions. That's completely normal. Building a stone paver patio is a big job, and it’s smart to want to get every detail right.
I get asked about these things all the time, so I've put together some straight-to-the-point answers. Think of this as that last bit of expert advice to help you troubleshoot common hiccups and move forward with confidence.
Can I Fix a Wobbly Paver Myself?
Yes, you absolutely can! This is probably the most common (and easiest) repair you'll ever have to do. A wobbly paver almost always means the sand bed underneath has settled or washed away a bit.
Fixing it is straightforward. Grab a couple of flathead screwdrivers and gently pry the wobbly stone out. Then, toss a handful of coarse leveling sand into the empty spot—you’ll want to overfill it just slightly. Set the paver back in place and give it a few taps with a rubber mallet until it’s perfectly level with the surrounding stones. To finish, just sweep some new polymeric sand into the joints to lock it all back together.
Don't let a single wobbly paver intimidate you. The real beauty of a paver system is that you can adjust or replace individual stones without tearing everything up. That's a huge advantage over a cracked concrete slab.
Do I Really Need to Use Polymeric Sand?
In my experience, using polymeric sand is non-negotiable if you want a patio that lasts and doesn't create a ton of extra work for you down the road. It might be tempting to save a little cash with regular sand, but trust me, it’s a classic case of being penny-wise and pound-foolish.
Regular sand will wash out after the first few heavy rains. When that happens, you’ve basically rolled out the welcome mat for weeds and ants. Polymeric sand, on the other hand, is a mix of fine sand and a polymer adhesive. When you wet it, it hardens into a firm yet flexible joint that does three critical things:
- Blocks Weeds: It creates a tough barrier that keeps weeds from sprouting up.
- Deters Pests: It stops ants from building their little empires between your pavers.
- Prevents Erosion: It locks the pavers together, so they don’t shift and the sand doesn't wash away.
This one small material upgrade makes an enormous difference in the long-term stability and look of your patio.
Is Sealing My Stone Paver Patio Necessary?
That's a great question, and the honest answer is: it depends. The type of stone you chose and your personal preference are the deciding factors. Sealing isn’t always mandatory, but it often provides some major benefits.
A good sealer adds a protective shield that makes cleaning up spills a breeze and really deepens the natural color of the stone. For more porous stones like sandstone or certain limestones, I strongly recommend sealing to prevent stains and moisture damage. For dense stones like granite, it’s less critical, but it still adds a nice layer of protection.
If you decide to seal, make sure you pick a breathable, penetrating sealer made specifically for natural stone. You’ll want to plan on reapplying it every 3 to 5 years to keep your patio looking its best.
Ready to transform your outdoor space with a stunning, professionally crafted stone paver patio? At Tamura Designs Landscape and Construction, we bring over 30 years of award-winning expertise to homes across Silicon Valley. Let's discuss your vision and create the backyard of your dreams.