Before you even think about picking up a shovel, let's talk about the single most important part of this whole project: the plan. I can't stress this enough. An afternoon spent mapping everything out now will save you a ton of grief and extra work down the road. This is where you iron out the kinks and turn that idea in your head into a solid, buildable blueprint.
Getting this initial stage right is the difference between a smooth, enjoyable build and a frustrating one. It’s where your vision for a cozy fire pit meets the real world of safety, materials, and construction. Let's get it right.
First, Check the Rules
Before you fall in love with a specific design or location, you absolutely have to check with your local authorities. It’s a boring step, I know, but it’s non-negotiable. Ignoring local codes can get you fined or, even worse, forced to tear down all your hard work.
Most towns and cities have specific rules about fire features, covering things like:
- Setback Distances: This is how far your pit needs to be from your house, fence, shed, or property line. A common range is a minimum of 10 to 25 feet from any structure.
- Permits: Will you need one? A quick call to your city’s planning or building department (or a check on their website) will give you the answer.
- Burn Bans: Be aware of any local restrictions, like seasonal burn bans during dry periods or rules about what you can legally burn.
Do this first. Seriously. It’s a five-minute check that buys you complete peace of mind.
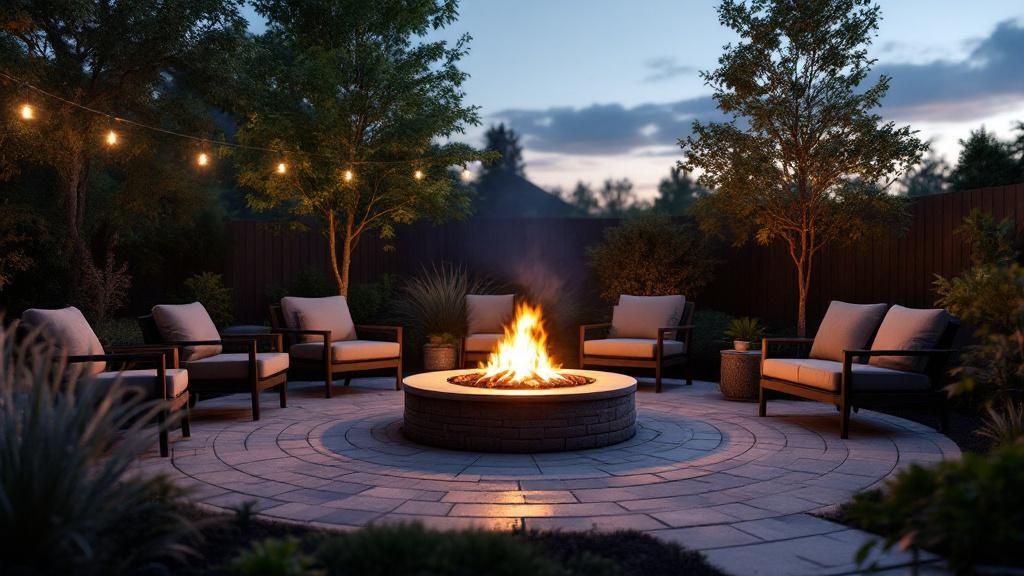
Picking the Perfect Spot
Once you know the rules, you can scout for the perfect location. You're looking for a spot that feels like a natural gathering place. It should be on level ground and clear of any overhead hazards.
Think about the prevailing wind. You don’t want smoke constantly blowing back at your house or into your neighbor’s yard. And definitely look up! Make sure there are no low-hanging tree branches, power lines, or anything else directly above your chosen spot. Safety first.
If you’re thinking about how the fire pit will fit into your bigger backyard vision, checking out other landscape ideas with pavers can spark some great inspiration for a cohesive design.
My Favorite Trick: Grab a garden hose or some marking paint and lay out the circle or square on the ground where you plan to build. This gives you a fantastic real-world sense of the scale and how much room you'll have for chairs.
Nailing the Shape and Size
The shape and size of your fire pit really set the vibe. A classic round pit is fantastic for conversation because everyone can see each other. A square or rectangular design gives off a more modern feel and often ties in nicely with the straight lines of a patio or seating wall.
Your decision should really come down to how you'll use it.
- For cozy get-togethers with 2-4 people, an interior diameter of about 36 inches is just about perfect.
- If you plan on hosting bigger crowds, you’ll want to go larger, maybe 44 inches or more, so everyone can feel the warmth.
It's no surprise that these backyard features are getting more popular. The fire pit market is booming, expected to grow from $7.0 billion in 2023 to $9.6 billion by 2030. It just shows how much we all value having these awesome gathering spots at home. If you're a fan of rewarding DIY projects, our guide on building a chicken coop has that same satisfying, hands-on feel.
Gathering Your Materials and Tools
Alright, with a solid plan mapped out, it's time to get into the really satisfying part: gathering all the pieces that will soon become your new backyard centerpiece. Picking the right materials for a paver fire pit is about much more than just aesthetics—it's a careful balance of looks, safety, and durability. This isn't just about grabbing a color you like; it’s about knowing how certain materials stand up to intense heat, season after season.
Think of this phase as your mission prep. Having every paver, every bag of gravel, and every tool lined up and ready before you dig that first shovelful of dirt will make the entire build feel smoother and way more enjoyable.
Let's break down exactly what you'll need.
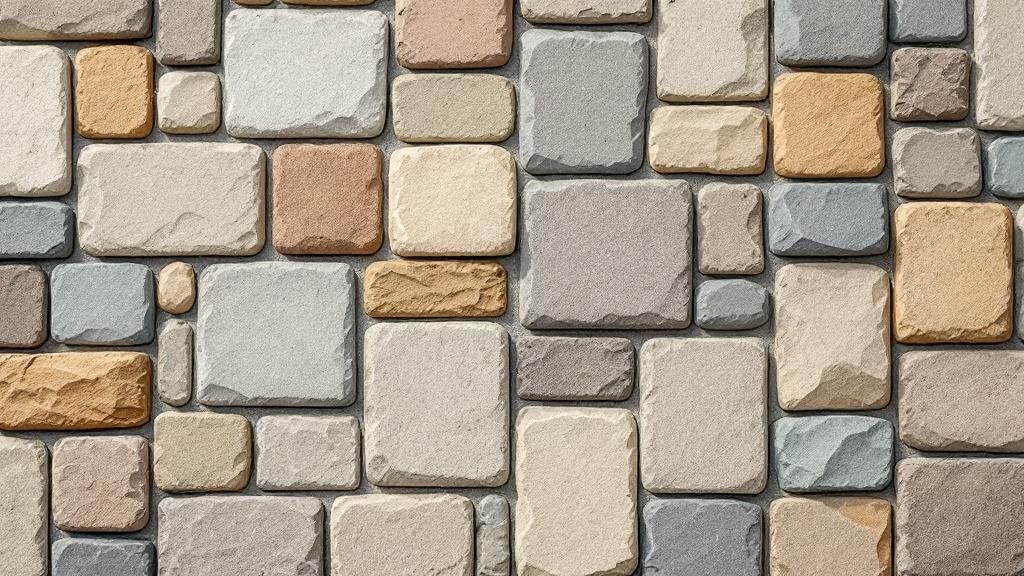
Selecting the Right Paver Stones
The star of the show is, without a doubt, the paver stones. But here’s the thing: not all pavers are created equal, especially when you're playing with fire. Using the wrong kind of stone is a serious safety risk. Trapped moisture inside certain materials can cause them to crack violently or even explode when hit with high temperatures.
For a fire pit, you absolutely must use stones that are either fire-rated or naturally dense and heat-resistant. Your best bets are usually:
- Concrete Wall Blocks: These are made for landscaping walls and are a great, affordable, and safe choice. They come in tons of different shapes, sizes, and colors, so you can easily match the look you're going for.
- Natural Stone: If you want a more high-end, organic look, dense stones like granite, slate, or travertine are fantastic options. They are naturally tough against heat, but they do come with a higher price tag and can be trickier to work with because of their irregular shapes.
Steer clear of standard concrete pavers meant for patios, river rocks, or any other porous stone. They soak up water like a sponge, which makes them a genuine hazard. If you're comparing styles, our guide on the best patio pavers has some great insights that apply just as well to fire pit projects.
The demand for these backyard features is exploding. The global outdoor fire pits market, where paver designs are a huge player, was valued at $190.48 million in 2022 and is expected to rocket past $250.83 million by 2030. This just goes to show how much people value these durable, custom additions to their homes. You can dig into more of this data over at Introspective Market Research.
Paver Stone Material Comparison
To help you visualize the trade-offs, here's a quick comparison of the most common materials you'll be looking at for your fire pit walls. Each has its own distinct personality in terms of cost, look, and ease of installation.
| Material Type | Pros | Cons | Average Cost |
|---|---|---|---|
| Concrete Blocks | Affordable, uniform shapes, easy to stack, variety of colors and styles | Can look manufactured, may discolor over time without a steel ring | $3 – $7 per block |
| Granite | Extremely durable, heat-resistant, high-end appearance, many colors | Expensive, heavy, difficult to cut or shape | $10 – $30 per block |
| Slate | Unique layered look, good heat resistance, natural non-slip surface | Can be brittle and chip, requires sealing, variable thickness | $8 – $20 per block |
| Travertine | Porous but heat-resistant, stays cool to the touch, classic look | Can be stained easily, requires sealing, higher cost | $9 – $25 per block |
Choosing the right stone is the most significant decision you'll make for the project's final look and feel, so take your time and weigh what matters most to you—budget, style, or long-term maintenance.
The Non-Negotiable Steel Ring
Listen up, because this is important. If there is one component you absolutely cannot skip, it’s the fire ring insert. This heavy-gauge steel or cast iron ring sits inside your paver structure, and it does two critical jobs.
First, it shields your paver stones from direct, intense flames. This simple barrier will dramatically extend the life of your fire pit, preventing the blocks from cracking, spalling, or discoloring over the years.
Second, it provides a huge boost in structural integrity. The ring acts as a rigid skeleton that locks in the circular or square shape of your pit. It keeps the blocks from shifting or collapsing inward. Trust me, it's the key to long-term stability.
Pro Tip: The diameter of the fire ring you buy will set the interior dimension of your pit. When you lay your first course of pavers, build it directly around the ring to get a nice, snug fit, but leave about a one-inch gap all the way around for air to circulate.
Foundation and Bonding Essentials
A beautiful fire pit that starts to sink or wobble after a year isn't a success—it's a headache. The secret to a perfectly level and long-lasting structure is all in the foundation and how you stick the blocks together.
- Base Materials: You’ll need a few bags of all-purpose gravel or crushed stone for the foundation. This creates a stable footing that allows for drainage and helps fight against frost heave in colder climates. On top of that gravel, you'll add a layer of paver sand, which gives you a soft, forgiving surface to perfectly level that crucial first course of stones.
- Masonry Adhesive: To bond the layers of pavers together, you have to use a high-heat construction adhesive. Standard landscape glue isn't built for these temperatures and will fail, period. Look for a product specifically rated for fire pits, fireplaces, or chimney construction.
Your Complete Tool Checklist
Having the right tools ready to go makes all the difference between a frustrating weekend and a fun, rewarding project. Before you start slinging dirt, run through this list and make sure you have everything assembled.
- Digging & Measuring Tools:
- Shovel (both a round and a flat-head will be useful)
- Tape measure
- Marking paint or stakes and string
- A good 4-foot level
- Base Preparation Tools:
- Wheelbarrow
- Hand tamper (for compacting the gravel base)
- Work gloves
- Construction Tools:
- Rubber mallet (for gently tapping pavers into place)
- Caulking gun (for applying the adhesive)
- Trowel
- Safety glasses
Preparing a Rock-Solid Foundation
The real secret to a paver fire pit that looks professional and lasts for decades isn't what you see on the surface. It’s the meticulous work you do underground. An unshakeable foundation is the unsung hero of any hardscaping project, and rushing this stage is the number one mistake I see that leads to a fire pit that shifts, settles, or becomes uneven over time.
Think of it like building a house. You wouldn't pour a concrete slab on soft, unprepared soil, and the same exact principle applies here. This groundwork is what allows your fire pit to withstand seasonal freeze-thaw cycles, subtle soil movement, and the sheer weight of the blocks themselves.
Marking and Excavating Your Footprint
First things first, you need to mark out your territory. Grab your tape measure and some marking paint. Let’s say your fire pit will have a 36-inch inside diameter and you're using blocks that are 8 inches deep. Your total diameter will be 52 inches (36 + 8 + 8). I always recommend adding an extra 6 inches of clearance on all sides for a stable base, which means you’ll be marking a circle that’s 64 inches across.
With your circle clearly marked on the grass, it’s time to start digging. You're aiming for a depth of about 6 to 7 inches below grade. This depth makes room for the crucial layers of gravel and sand that will form your foundation. Use a flat-head shovel here—it really helps in keeping the bottom of your trench as level as possible from the get-go.
This visual breaks down the key steps perfectly.
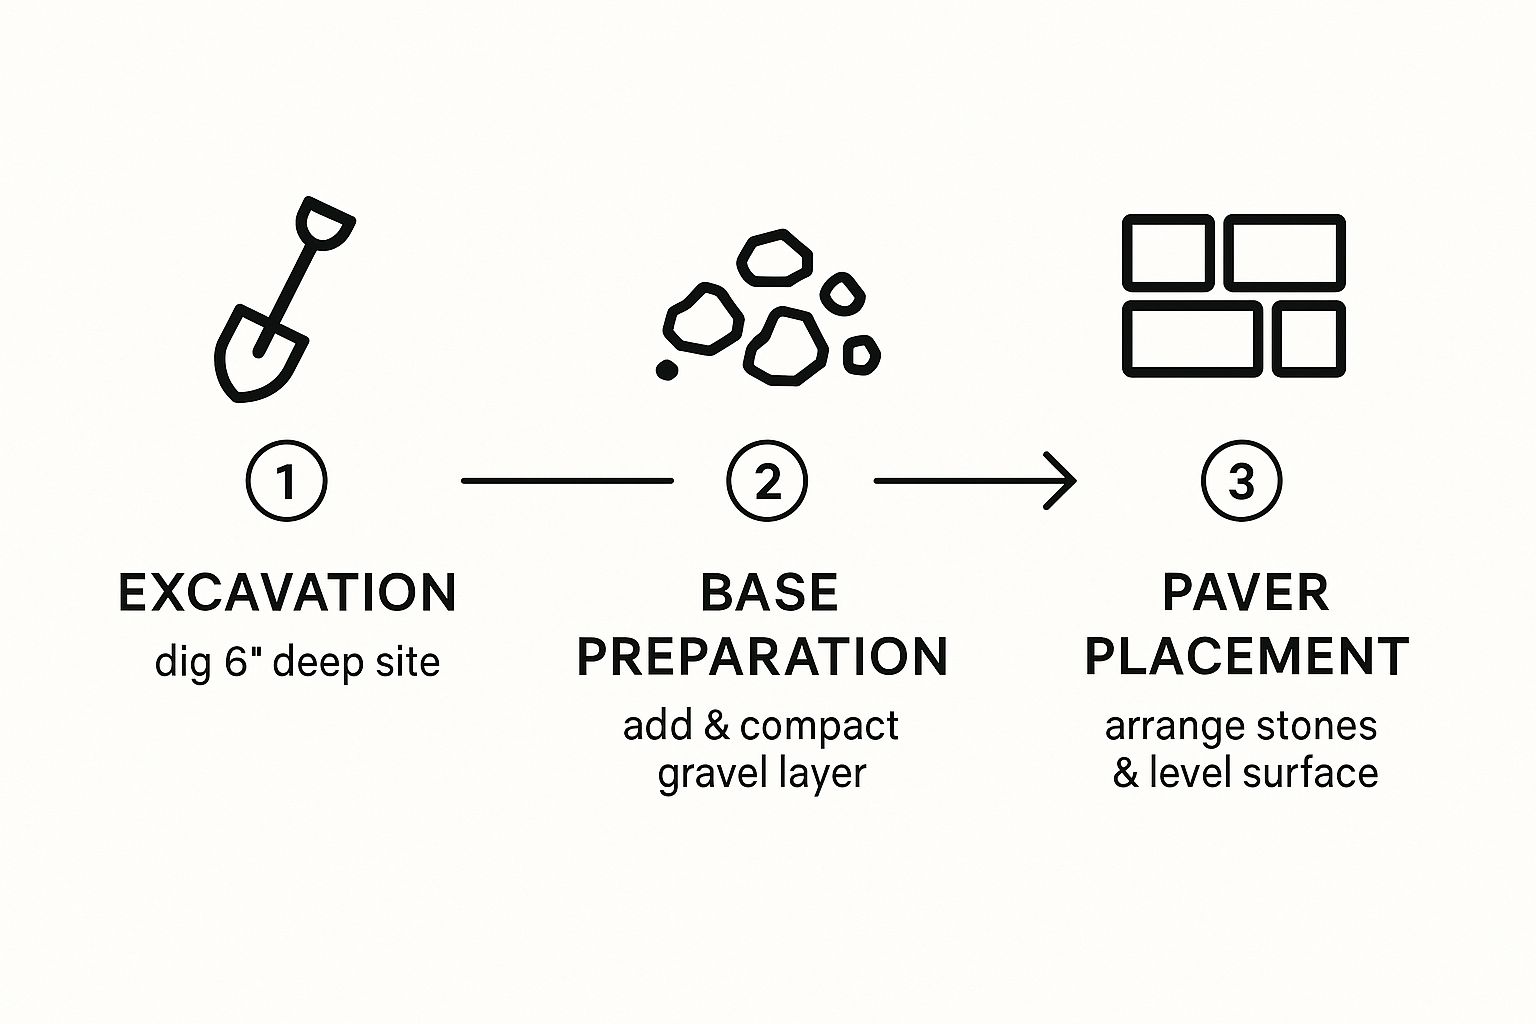
As you can see, the process is straightforward: dig the site, add the gravel base, and then place the pavers. Each step literally builds upon the last to create a stable final product.
Building the Compacted Gravel Base
Once you've cleared out the soil, it's time to bring in the base material. This is typically an all-purpose gravel or a crushed stone aggregate. The key here isn't just to dump it all in at once. You need to add the gravel in 2-inch layers.
Spread the first layer evenly, then grab a hand tamper and compact it down firmly. Why the layers? Trying to tamp a thick, 4-inch layer of loose gravel is a waste of effort. You'll only compact the top inch or two, leaving the bottom loose and ready to settle later. By compacting in thinner "lifts," you ensure the entire base is rock-solid from the bottom up.
Key Takeaway: The gravel base does two critical things. It provides a stable, load-bearing footing, but just as importantly, it creates a drainage field. This prevents water from pooling and freezing under your fire pit, which is what causes the destructive frost heave that can ruin a project.
Keep adding and tamping 2-inch layers until you have a compacted gravel base that is at least 4 inches thick. Check it with your level frequently as you go. A solid foundation is just as critical for a fire pit as it is for bigger projects like a retaining wall installation, where stability is everything.
The Final Sand Layer for Leveling
With your compacted gravel base in place, the last step before the fun part begins is adding a leveling bed of sand. You'll need about 1 to 2 inches of paver sand spread evenly over the entire gravel surface.
This thin layer isn't for structural support—its only job is to provide a soft, forgiving surface that makes it easy to set that first course of paver stones perfectly level.
Use a short, straight 2×4 to "screed" the sand, dragging it across the surface to create a perfectly flat plane. Take your time with this. A flawlessly level first course is the key to a straight and stable fire pit. Any little imperfection here will only get magnified with each row of blocks you add. Once the sand is smooth and level, you are officially ready to start building.
Constructing the Fire Pit Walls
Alright, this is where the magic happens. Your foundation is perfectly level and compacted, and now you get to see your fire pit actually take shape. Every course of stones you lay brings that vision of cozy backyard evenings one step closer to reality.
This part of the project is all about precision and patience. It’s less about muscle and more about getting the details right—perfect placement, staggered joints, and a solid bond. Let’s get these walls up.
Laying the Critical First Course
Honestly, the success of your entire fire pit hinges on this first ring of pavers. Everything else stacks on top of this layer, so take your time and don't rush it. Get this right, and the rest is smooth sailing.
First, place your steel fire ring insert right in the middle of your sand base. Now, start arranging the first course of paver stones around it. You’ll want to leave a small gap, about 1 inch, between the back of the pavers and the steel ring itself. This space is crucial for air circulation and prevents the intense heat from cracking your blocks over time.
As you set each stone, give it a firm tap with a rubber mallet to nestle it into the sand. After you have a few in place, grab your level and lay it across the tops. Is it perfectly level? If not, make tiny adjustments by adding or scooping out a bit of sand underneath until the whole ring sits flawlessly flat.
A Note from Experience: Don't just check for level across the tops of the stones. Check each individual stone from front to back, too. If this first course has even a slight inward or outward tilt, you'll end up with a wobbly, cone-shaped wall. This layer needs to be perfect.
Building Up with Staggered Joints
With that first course locked in and perfectly level, you can start building upward. The key to a strong, stable wall is staggering the joints on each new layer. You never want the seams between blocks to line up vertically.
This classic technique, often called a running bond, distributes the weight and stress across the entire structure. It's what makes the wall strong and interlocked. If you're using simple rectangular blocks, you can achieve this just by starting the second course with a half-block. For the wedge-shaped trapezoidal blocks made for circles, you just rotate where you start the second course.
Before setting any new paver, run a generous bead of high-heat construction adhesive on the blocks below. This is what transforms a simple stack of stones into a permanent, rock-solid structure.
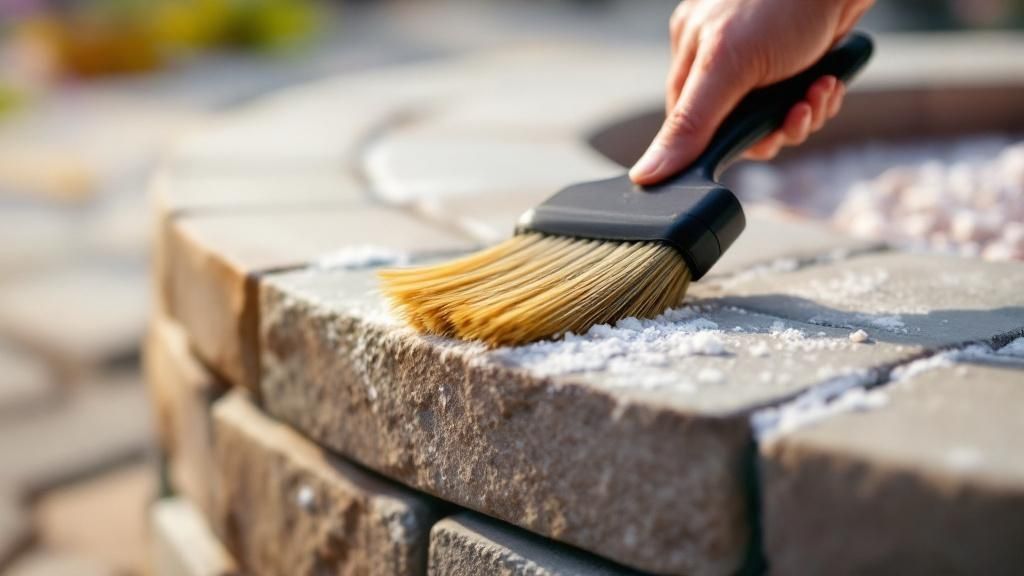
Securing Each Layer with Adhesive
Applying the adhesive correctly is non-negotiable for the long-term durability of your fire pit. You want to use enough, but you also want to be neat about it.
- Application: Run a thick, quarter-inch bead in a zigzag or "S" pattern on the pavers you're about to cover.
- Placement: Set the next paver on top, press down firmly, and give it a small wiggle to help spread the adhesive for a solid bond.
- Cleanup: Keep a rag and some mineral spirits handy. You want to wipe away any adhesive that squeezes out immediately. Once this stuff cures, it's a real pain to get off.
Repeat this process for every stone and every course—adhesive, place, check level—until your fire pit reaches the height you want. Most backyard fire pits are 3 to 4 courses high, which gives you a comfortable seating height of around 12 to 16 inches.
Finishing with Polished Capstones
The final touch is adding the capstones, which are the flat, smooth stones that create a finished ledge around the top. They give the fire pit a polished, professional look and provide a wider, safer surface.
Just like the other courses, you’ll secure these with plenty of high-heat construction adhesive. Capstones typically have a slight overhang on both the inside and outside of the wall, which is a nice architectural detail that really finishes the look.
Make sure the capstones are perfectly level and evenly spaced. Once they’re all in place, your build is pretty much done! Now for the hard part: stepping back and letting it all cure. Check the adhesive's instructions, but you'll typically need to wait 48 to 72 hours before you can safely light that glorious first fire.
Finishing Touches and Essential Safety
You've done the heavy lifting, and the structure of your paver fire pit is standing strong. Nicely done! But don't kick back just yet. The final details and safety prep are what transform your hard work from a simple stack of blocks into a beautiful, functional, and safe centerpiece for your backyard.
These last few steps are more than just cosmetic—they're crucial for performance and peace of mind. Getting the inside of the pit set up correctly and preparing for that very first fire will ensure you get years of enjoyment out of it.
Dressing Up the Interior with Fire Media
That steel ring in the middle is functional, but it shouldn't be bare. Filling it with the right media is key for both looks and better heat distribution. Your two main options create very different vibes.
- Lava Rock: This is the go-to for a classic, rustic feel. Lava rock is fantastic at absorbing and radiating heat evenly, which means more consistent warmth for everyone sitting around the pit. It's tough, affordable, and gives off a natural, earthy look.
- Fire Glass: If you're aiming for a more modern, eye-catching style, fire glass is a brilliant choice. These tempered glass pebbles come in a wild array of colors, letting you add a custom pop of personality. They reflect the flames beautifully, creating a mesmerizing, shimmering effect after dark.
Whichever you pick, you'll want to pour in enough to cover the bottom of the steel ring by about 2 to 3 inches. This layer does double duty: it protects the steel from direct, intense heat and improves airflow, which means a healthier fire with less smoke.
Putting Fire Pit Safety First
A new fire pit is all about good times, but that can only happen when safety is the top priority. Before you even think about striking a match, make sure you have a few non-negotiable safety items ready to go.
A spark screen is an absolute must-have. It’s a simple metal mesh lid that sits on top of your pit, catching stray sparks and embers before they can land on dry grass, patio furniture, or anything else flammable. It's a cheap and incredibly effective piece of insurance.
You also need a reliable way to put the fire out in a hurry. Always keep a Class A fire extinguisher, a garden hose with a nozzle, or a big bucket of sand or water nearby. And the golden rule: never, ever leave a fire unattended, not even for a minute.
A Quick Safety Gut-Check: Always scan your surroundings before you light up. Check for local burn bans, and if it's a windy day, just skip it. Make sure the area is clear of flammable stuff like fallen leaves, dry pine needles, or overhanging branches.
Your First Burn: Curing the Adhesive
That first fire is a big moment, but it's not just for show. It has a practical job: curing the high-heat construction adhesive you used to glue the pavers together. The heat from this initial burn is what fully hardens that bond, making your fire pit rock-solid.
For this first time, think small. You're not trying to build a bonfire. A modest, controlled fire will generate plenty of heat to cure the adhesive without putting too much thermal stress on the brand-new structure. Let it burn for at least an hour or two, then just let it die down and cool off completely on its own.
Think of it as the final step in the construction process—a one-time burn-in that locks all your hard work into place.
Long-Term Care and Upkeep
Your paver fire pit is built to last, but a little routine care will keep it looking and performing its best for years. The popularity of backyard fire pits is soaring—the market is projected to jump from $7.36 billion in 2023 to $13.07 billion by 2032, which shows just how much people value these long-term additions to their homes. You can see more data on the fire pit market at skyquestt.com.
Here are a few simple habits to protect your investment:
- Clean Out the Ash: Don't let ash pile up. A thick layer can trap moisture, which can lead to staining or even rust on the steel ring.
- Cover It Up: When you’re not using it, especially during the off-season, throw a waterproof cover over it. This keeps rain and snow out and protects the pavers from the elements.
- Give It a Once-Over: Every now and then, check the paver stones and capstones for any signs of shifting or cracking. Catching small issues early is the best way to prevent bigger headaches down the road.
A few minutes of upkeep here and there will ensure your fire pit remains the stunning, safe hub of your outdoor space. And if you're already thinking about what's next, check out our guide to other backyard fire pit ideas for more inspiration.
Got Questions? We've Got Answers
Even with the best plans, a few questions always pop up when you're building a fire pit. Getting the right answers is what turns a good project into a great one. Let’s tackle some of the most common things people ask when they're getting ready to build.
Can I Just Use Any Pavers for a Fire Pit?
Absolutely not, and this is probably the single most important safety detail to get right. You have to use pavers specifically rated for high heat. Think dense, solid concrete retaining wall blocks or certain types of natural stone like granite or slate.
Regular concrete patio pavers, river rocks, or any porous stones are a huge no-go. Why? They can trap moisture deep inside. When that hidden moisture gets heated up fast, it turns to steam and expands with incredible force. This can cause the paver to crack violently or, in a worst-case scenario, even explode.
Always, always double-check the manufacturer's specs to confirm your blocks are safe for a fire pit.
Do I Really Need a Steel Ring Insert?
Technically, you could build a fire pit without one, but I strongly advise against it. A steel ring insert is a game-changer for two big reasons.
First, it’s a protective shield. The ring takes the brunt of the intense, direct heat from the fire, protecting your pavers from damage. This single component dramatically extends the life of your fire pit, preventing ugly discoloration and cracking down the road.
Second, it provides serious structural integrity. The ring acts as a solid inner wall, keeping the pavers from shifting or caving in over time. Think of it as the skeleton of your fire pit—a small investment that pays huge dividends in safety and longevity.
Our Takeaway: A steel ring isn't just a nice add-on; it's a critical part of a safe, durable fire pit. It protects your investment and keeps the structure solid for years of enjoyment.
How Do I Keep My Fire Pit from Sinking?
A sinking or lopsided fire pit is almost always the result of a rushed or poorly built foundation. The secret to a structure that stays perfectly level for years is all in the prep work you do underground.
To get it right, you need to excavate the site properly and build up a multi-layered base. Here’s what that looks like:
- Dig Down: Start by excavating at least 6 to 7 inches below the surrounding ground level.
- Build a Gravel Base: Add and compact a layer of gravel that’s at least 4 inches thick. This creates a rock-solid footing that can handle the weight and also helps with drainage—a must for preventing frost heave in colder climates.
- Add Leveling Sand: A final 1-inch layer of sand on top gives you the perfect surface to set and level that crucial first course of paver blocks.
This sturdy foundation is what does all the heavy lifting, supporting the fire pit's weight and resisting ground movement.
What’s the Right Adhesive to Use on the Blocks?
Don't even think about grabbing standard construction adhesive or an all-purpose landscape glue. Those products simply can't handle high temperatures. They will fail, and when they do, the structural integrity of your entire fire pit is compromised.
You need to use a high-heat construction adhesive, sometimes called a masonry adhesive, that's specifically made for building fire pits, fireplaces, or chimneys. You'll find it at any big-box home improvement store or a local masonry supplier. A solid bead of this stuff between each layer is what locks the blocks together into one solid, durable unit.
Ready to turn your backyard dreams into a stunning reality without the DIY hassle? The expert team at Tamura Designs Landscape and Construction has over 30 years of experience creating award-winning outdoor living spaces. From elegant paver fire pits to complete landscape transformations, we bring quality craftsmanship to every project. Contact us today to start designing the outdoor space you deserve. Find out more at https://tamuradesigns.com.