Grading your yard for drainage means shaping the land to create a small slope. This makes sure rainwater flows away from your house instead of toward it. It might sound like a big job, but it's one of the best ways to prevent water damage, soggy lawns, and wet basements. It is the best way to protect your property from the costly problems caused by standing water.
Why a Gentle Slope Is Your Home's Best Friend
Have you ever seen a soggy patch in your lawn that never dries up, or smelled a musty scent in your basement? These are not just small problems—they're warning signs. The cause is almost always poor yard grading. Simply put, grading means shaping your land to make a slight slope that guides rainwater safely away from your house.
Think of it as a natural shield for your foundation. Without this gentle slope, rain can pool up against your home. Over time, that pressure can lead to some very expensive and stressful problems.
The Dangers of Bad Grading
When water has nowhere to go, it can cause real damage. Many homeowners deal with issues that proper grading could have easily prevented. These are not just looks-based problems; they can harm the structure of your house.
A few common problems I see include:
- Foundation Damage: Constant water is bad for concrete. It weakens the material, which can lead to cracks and serious structural problems. In fact, studies show that 80-90% of foundation damage is caused by water.
- Basement Flooding: Water is powerful. It will always find the easiest path, which often means leaking through small cracks in the foundation and into your basement or crawlspace.
- Unhealthy Lawns: Standing water drowns grass roots. This leads to muddy, bare patches and creates a perfect place for mosquitoes to breed.
- Erosion: Water that flows too fast can wash away your topsoil, damaging your landscape and exposing tree roots.
A properly graded yard is one of the smartest things you can do to protect your biggest investment. It's not just about landscaping; it's about keeping your home healthy and valuable for a long time.
Creating a Protective Barrier
When we talk about grading a yard for drainage, we are trying to create a "positive grade." This just means the ground slopes down and away from your foundation walls. That simple slope makes sure that water from rain or melting snow is sent to a safe place, like the street or a drainage ditch.
This is especially important if you have patios or walkways. A poorly sloped yard can trap water on these surfaces. If you are planning an outdoor living area, learning about patio drainage solutions is key to avoiding a new water problem right next to your home. By getting the grade right, you build a complete defense system that keeps your property dry, stable, and healthy.
How to Find Your Yard's Water Problems
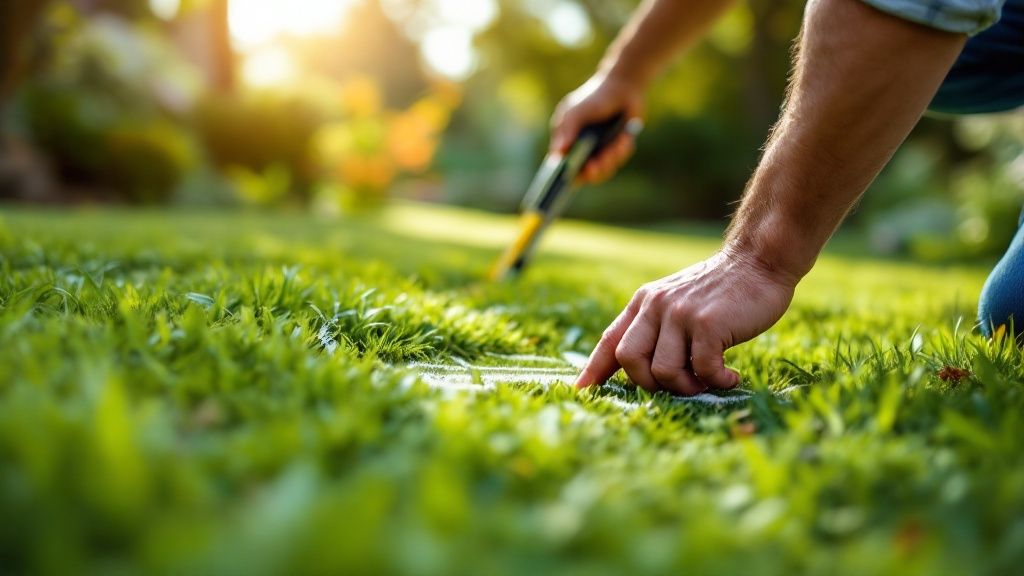
Before you move any dirt, you need to be a detective. The first step in grading your yard is to find out exactly how and where water is causing trouble. It’s not enough to know you have a soggy lawn; you need to know why it’s soggy and where the water is coming from and going.
The best time to do this is during or right after a heavy rain. Put on some rain boots and go outside. Walking around your property while water is still moving shows you a real-time map of the flow and reveals problem spots you can't see on a dry day.
Finding the Warning Signs
As you walk around, look for specific clues that show you have poor drainage. These signs might seem small, but together, they paint a clear picture of what is going wrong. Water problems usually leave behind evidence.
Look for:
- Puddles that Don't Go Away: Where does water collect and sit long after the rain stops? Pay close attention to spots near your foundation, walkways, and patios.
- Mossy Patches: Moss loves damp, shady spots. If you have moss in your lawn, it means the soil underneath is staying wet.
- Bare Spots: Is grass not growing in certain areas? It’s often because the soil is too packed with water for the roots to breathe.
- Erosion Trails: Look for small channels where the topsoil has been washed away. This shows you the exact path water is taking.
These signs are more than just ugly. Bad yard grading is a top cause of major home and landscape problems. Poor drainage leads to spongy lawns, standing water that attracts mosquitoes, and a constant fight with mud. As explained in this helpful article on common lawn problems from This Old House, these issues don't just look bad; they can lead to real costs and even health risks.
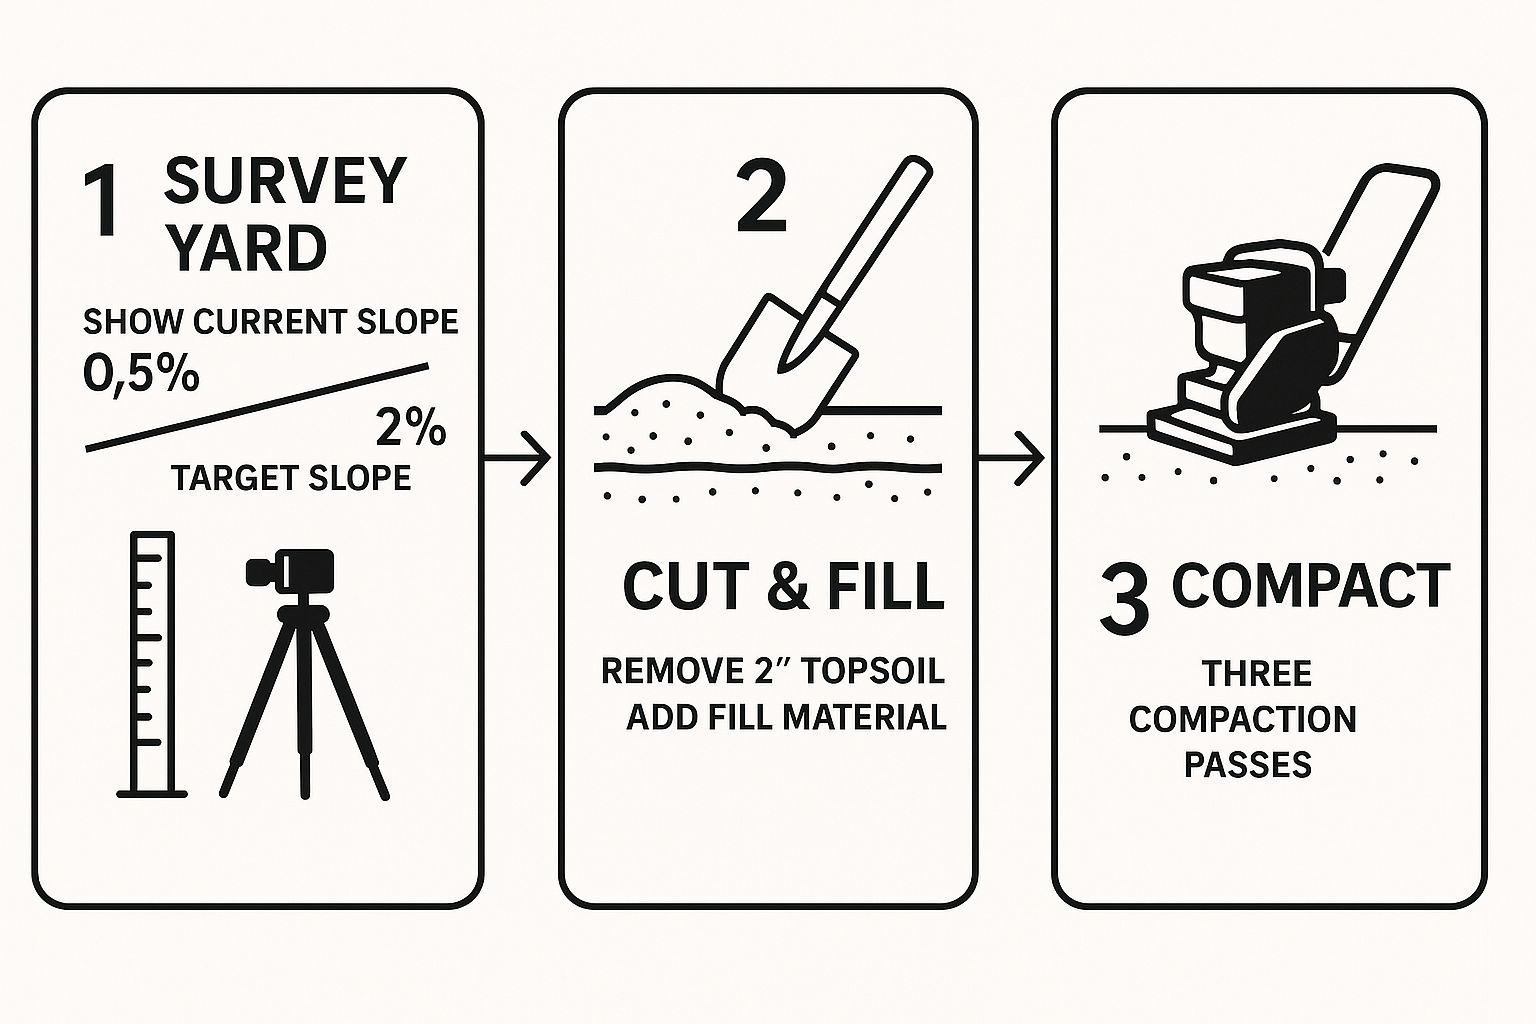
Measuring Your Current Slope
Once you've seen where the water goes, it's time to get some numbers. You need to know your yard's current slope, especially in the important area around your foundation. The good news is you don't need fancy tools—you can get a good measurement with a simple method.
This check gives you real data instead of just guessing. It will help you understand how big the grading project will be.
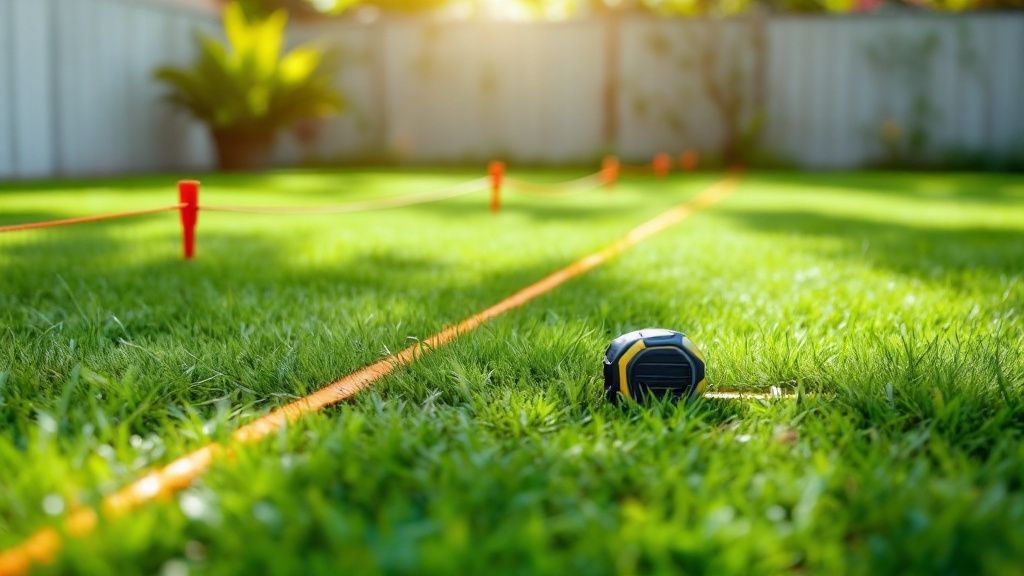
You just need a few basic tools:
- Two stakes
- A ball of string
- A line level (the small kind that hooks onto a string)
- A tape measure
Here’s how to do it. First, hammer one stake into the ground right next to your foundation. Now, measure 10 feet away from the house in a straight line and hammer in the second stake.
Tie your string to the first stake (the one by the house) at ground level. Walk the string to the second stake, hook the line level on the middle of the string, and pull it tight. Move the string up or down on the second stake until the bubble in the level is perfectly in the middle. This means your string is level.
With the string level, use your tape measure to check the distance from the string down to the ground at the second stake. This measurement is your "drop"—it tells you how much your yard falls over that 10-foot distance.
For example, if you measure a 3-inch gap, your yard has a 3-inch drop over 10 feet. If the ground at the second stake is higher than your level string, you have a negative grade. That’s a big problem, as it means water is flowing back toward your foundation. This simple test gives you the information you need to plan your next step.
Getting the Slope Just Right for Proper Drainage
So, you’ve found the trouble spots and measured your yard’s current slope. Now for the big question: what slope should you be aiming for? When it comes to grading a yard for drainage, there is a perfect range. You need a slope that is steep enough to move water but not so steep that it washes your soil away.
It’s all about creating a gentle, reliable path for rainwater to follow.
The main rule that professionals follow is to have a slope of at least 2% away from your home's foundation. While that percentage might sound a bit technical, the real-world measurement is much easier to picture. A 2% grade simply means the ground should drop about 6 inches over the first 10 feet away from your house.
This steady, gradual slope is what keeps water from pooling against your foundation.
Understanding Slope Percentages
Thinking in percentages helps make the grading process standard. It removes the guesswork and gives you a clear goal. A 2% slope is usually the minimum for grassy areas. It makes sure water moves slowly enough for the soil to soak some of it up—which prevents erosion—but fast enough to stop puddles from forming.
Of course, different areas of your yard have different needs. Hard surfaces, like patios, don't absorb any water, so they need a slightly different approach.
Here’s a quick guide to help you understand the right slope for different areas of your property.
Recommended Yard Slope Percentages
| Area of Yard | Recommended Slope (%) | Practical Measurement (Drop per 10 feet) |
|---|---|---|
| Foundation Area (First 10 ft) | 2% to 5% | 6 inches to 1 foot |
| Lawns & Turf | 1% to 2% | 1.2 to 2.4 inches |
| Patios & Walkways | 1% to 2% | 1.2 to 2.4 inches |
| Garden Beds | 1% to 2% | 1.2 to 2.4 inches |
As you can see, the area right around your foundation is the most important. Getting that part right is your best defense against water damage.
Why Different Areas Need Different Grades
Thinking about your yard in different zones is a smart plan. A gentle lawn might handle a slow-moving sheet of water just fine, but that same flow could be a problem on a paved patio. For hard surfaces, managing runoff is even more important because the water has nowhere to go but downhill.
This is where other drainage solutions can help. For example, you might grade your lawn at 2% but direct that runoff toward an area with permeable pavers. These special pavers are designed to let water seep through the surface and back into the ground, which greatly reduces runoff. You can learn more about how permeable pavers work in our detailed guide.
The goal isn't just to move water away from the house; it's to manage that water smartly across your whole property. By setting the slope for each specific area, you create a complete and effective water management system.
For example, a walkway should be graded to direct water off its surface and into a nearby lawn where it can be absorbed. A garden bed near the house should slope away from the foundation but might be designed to hold more water than a patch of grass. This kind of careful planning makes sure every part of your landscape works together to keep your property dry, healthy, and looking great.
A Practical Guide to Regrading Your Yard
Alright, you have a solid plan. Now it’s time to get your hands dirty and make it happen. This is where you will physically change your yard, turning that soggy, problem ground into a healthy, well-drained space. We will break down the actual work to make this big project feel easier to handle.
The whole process comes down to a few key steps: removing the existing grass, bringing in new soil to build up low spots (especially against your foundation), and then carefully shaping that soil to create the perfect slope. It's hard work, but seeing the result is very rewarding.
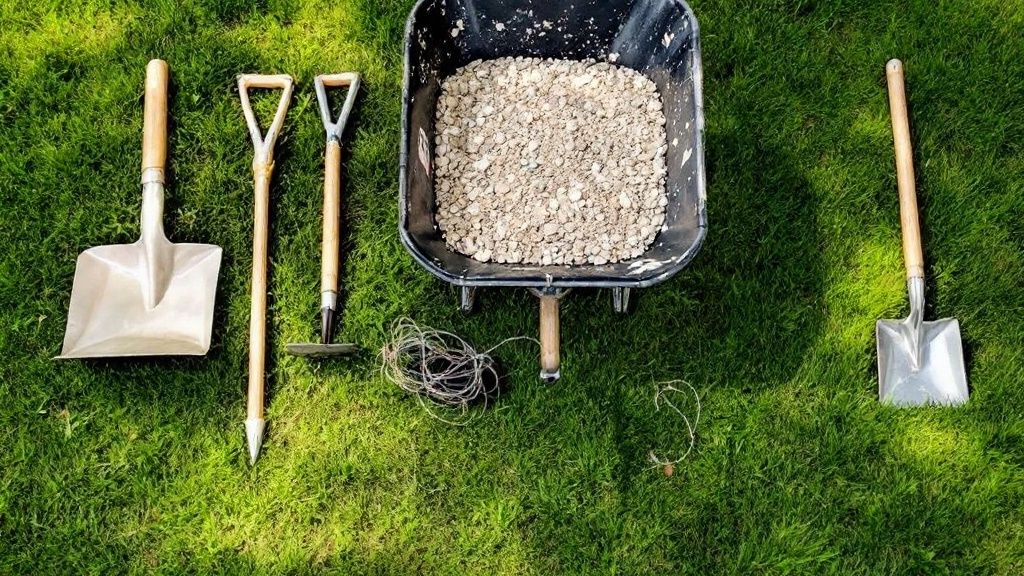
Getting Your Grading Tools
You don't need to rent a bulldozer for most home grading jobs. A few good hand tools will work perfectly. Having the right equipment is half the battle—it makes the work go more smoothly and helps you get a clean, professional look.
Here's what you'll want to have:
- A Sturdy Shovel or Spade: This is your main tool for digging and moving soil. A flat-head spade works well for cutting under sod.
- A Wheelbarrow: Don't try this without one. You'll be moving a lot of dirt, and a good wheelbarrow will save your back and a ton of time.
- A Landscaping Rake: This is your primary shaping tool. The wide, flat back of the rake is what you'll use to smooth the topsoil.
- A Hand Tamper: You need this tool. It’s a heavy, flat steel plate on a stick, and it's used for packing down the new soil.
For bigger or more complex properties, getting a very precise map of the land is important before you start. In those cases, professionals often use modern aerial surveying techniques to create very accurate maps.
The Cut and Fill Process
The main part of any regrading project is called "cut and fill." It sounds technical, but it just means taking soil from high spots (the "cut") and using it to build up low spots (the "fill"). For most homeowners fixing drainage around their house, it's mostly a "fill" job—you're adding soil to create a slope away from the foundation.
First, you need to carefully lift the grass in the area you're working on. Use your spade to slice under the roots and peel the sod away in sections. If the grass is in good shape, you can set it aside on a tarp and replant it later.
Now, bring in the dirt. You’ll want a good quality fill dirt or topsoil. Start by dumping wheelbarrow loads against the foundation to create a pile you can work with. This pile of soil is the material for your new slope.
This picture shows exactly what we're aiming for: taking a problem slope and building it up with new, packed soil to create one that works.
Shaping and Packing the New Grade
With a pile of fresh soil ready, the real work begins. Grab your landscaping rake and, using the flat back side, start pulling the soil away from the foundation. You’re trying to spread and smooth it out to create that gentle slope we talked about—a drop of about 6 inches over the first 10 feet.
Keep your string line and level nearby. You’ll want to stop every so often to check your work. This makes sure you're building the correct grade and not just guessing.
A big mistake people make is skipping the packing step. Loose topsoil is fluffy and full of air. If you don't pack it down, it will settle after a few rainstorms, and all your hard work will wash away.
Once you have the basic shape, it's time to tamp. Work your way across the entire area with your hand tamper, packing the soil down. You'll be surprised how much the soil level drops. You will probably need to add another thin layer of topsoil and tamp it again to get your final grade. Don't skip this; it's what makes the grade last.
Final Touches for a Smooth Finish
The last step is to make your work blend in. You need to "feather" the edges of the new grade so it connects smoothly with the rest of the lawn. Use your rake to create a gradual, natural-looking slope instead of a sharp ridge.
After everything is shaped and packed, you can either put your saved sod back down or spread fresh grass seed and a light layer of straw. Water the area gently but regularly to help the new grass grow roots.
A proper grade is the start of a dry yard, but it’s one part of a bigger system. To see how this fits into a full plan, check out our guide on other https://tamuradesigns.com/backyard-drainage-solutions/ that work well with a graded landscape. When you combine these methods, you build a powerful defense against water problems.
When Grading Needs Extra Help
Sometimes, even after you’ve worked to perfect your yard's slope, water problems don't go away. This often happens on properties with heavy clay soil that doesn't absorb water well, or in yards that get a lot of runoff from other areas. If you still see soggy spots that won't go away, it’s time to bring in some help.
Think of your new grade as the main road for water. Now, you’re just adding some special exits and lanes to handle the traffic. These drainage systems work with your grading to create a complete water management plan that finally fixes those tough problems.
Adding a French Drain
One of the best tools in the drainage world is the French drain. It's a great solution for catching groundwater before it can make your lawn soggy or get into your foundation. The name might sound fancy, but the idea is simple.
A French drain is a hidden, gravel-filled trench with a special pipe in it.
- The trench is dug at a slight downhill angle to guide the water.
- A pipe with holes in it is laid in the bottom.
- The trench is then filled with gravel, which lets water easily filter down to the pipe.
This whole system acts like an underground sponge. As water moves through the soil, it enters the gravel, goes into the pipe, and is carried away to a safe spot, like a storm drain or a dry well far from your house. It’s a huge help for a lawn that always feels spongy or for a damp basement.
Fixing Puddles with Catch Basins
But what if your problem isn't a large soggy area, but one specific puddle that appears in the same low spot every time it rains? For that, a catch basin is your best friend. A catch basin is a simple box, usually 12×12 inches, with a grate on top that sits level with the grass.
You install it at the lowest point of the problem area. Water flows across the lawn, drops through the grate, and is then carried away by a solid underground pipe. It’s a direct and powerful fix for standing water on patios, lawns, or near downspouts.
The real magic happens when you combine special drainage systems with proper grading. These systems work best when the land around them is shaped to direct water right to them. This prevents bigger problems like soil erosion and foundation damage.
Knowing When to Call a Professional
While the ideas behind these systems are simple, installing them can be complex and requires a lot of work. You have to dig large trenches, figure out the exact slopes for the pipes, and make sure everything is connected correctly. For difficult grading issues or if you're not sure where to start, looking into hiring a professional landscaping company can be a huge help.
A professional can check your property's specific challenges—from soil type to the path water takes—and design a system that solves your drainage problems for good. They have the right equipment and experience to get the job done right the first time, giving you peace of mind.
Common Questions About Yard Grading
Even with a good plan, it's normal to have a few questions before you start moving dirt. Let's answer some of the common concerns that often come up. Getting these sorted out will help you feel more confident and avoid common mistakes.
How Much Dirt Do I Actually Need?
One of the first challenges is figuring out how much topsoil to order. Luckily, there’s a simple formula that gets you very close to the right amount.
Just multiply the Length (ft) x Width (ft) x Depth (ft) of the area you need to fill. Once you have that, divide the total by 27 to turn it into cubic yards.
Let's use an example. Say you're building up a section next to your foundation that is 10 feet wide by 40 feet long. You need to add an average of 4 inches of soil (which is 0.33 feet).
The math would be: 10 x 40 x 0.33 = 132 cubic feet.
Then, 132 / 27 = 4.9 cubic yards.
Pro tip: I always suggest ordering about 10% extra. Soil packs down more than you think, and it's frustrating to run out of material just before you finish the job.
What’s the Best Time to Grade, and What Tools Will I Need?
The timing of your project can make a big difference. The best times are usually spring or early fall. The weather is mild, and the ground isn't too wet or frozen solid. Trying to grade soggy soil is a muddy mess, and working with dry, hard ground in the summer heat is very difficult.
The tools you’ll need depend on the size of your project. For most foundation grading jobs you can do yourself, a sturdy shovel, a wheelbarrow, and a good landscape rake will be enough.
But for bigger jobs that involve moving a lot of earth, you'll see professionals bring in large equipment. This could include specialized heavy-duty dozers that can reshape large properties with accuracy.
Before you put a shovel in the ground, make the call. Dial 811 to have your local utility companies come out and mark any underground lines. It’s free, it’s easy, and it can prevent a dangerous—and very expensive—accident.
Getting Your Lawn Green Again
After all that hard work, the final step is bringing your lawn back to life. With the new grade set, you have two main options.
- Laying Sod: This is your "instant lawn" option. It costs more, but it gives you immediate ground cover. This is a big plus, as it protects your hard work from washing away in the first heavy rain.
- Seeding: This is the less expensive choice. Once you spread a quality grass seed mix, you'll want to cover it with a thin layer of straw or peat moss. This simple step helps hold in moisture and keeps birds from eating the seeds.
No matter which way you go, watering is very important. The first few weeks are key for the roots to get established. A light, daily watering schedule is much better for new grass than a deep soak every few days.
Ready to create an outdoor space that is both beautiful and functional? The award-winning team at Tamura Designs Landscape and Construction has over 30 years of experience transforming yards into stunning, sustainable landscapes. Find out how we can solve your drainage issues by visiting us at https://tamuradesigns.com.