A waterlogged backyard is so much more than just an eyesore—it's a serious threat that can compromise your home's foundation, kill your lawn, and turn your outdoor space into a swampy mess. The good news is that there are fantastic backyard drainage solutions available, from simple grading fixes to more robust systems like French drains and rain gardens. All are designed to capture and move that excess water somewhere it won't cause problems.
Putting an End to Your Soggy Yard Problems
That squishy, saturated feeling under your feet after a good rain is one of the most common headaches for homeowners. It’s more than just an inconvenience keeping you from enjoying your yard; it’s a red flag. Your property is telling you it can't handle the water, and ignoring that message can lead to some seriously expensive headaches down the road.
Standing water will absolutely destroy your grass, create a five-star resort for mosquitos, and turn your beautiful garden into a mud pit. Even more worrying, when water pools up against your house, it exerts immense hydrostatic pressure on your foundation. Over time, that pressure can cause cracks, create leaks, and lead to major structural failures.
Why Managing Water Is So Critical
Proper water management is really about protecting your single largest investment: your home. The whole point of a good drainage system is to take control of water flow, guiding it away from your foundation and other critical areas so it can disperse safely. It’s your best defense against:
- Foundation Damage: Keeping water from soaking the soil right next to your foundation is priority number one.
- Landscape Destruction: The right drainage gives your lawn, trees, and plants the moisture they need without literally drowning them.
- Pest Infestations: Get rid of the standing water, and you get rid of the breeding ground for mosquitos and other unwanted pests.
Beyond just fixing the puddles you can see, understanding how to prevent basement flooding is a huge piece of the puzzle. A well-drained yard is your first and best line of defense for keeping your basement dry and healthy.
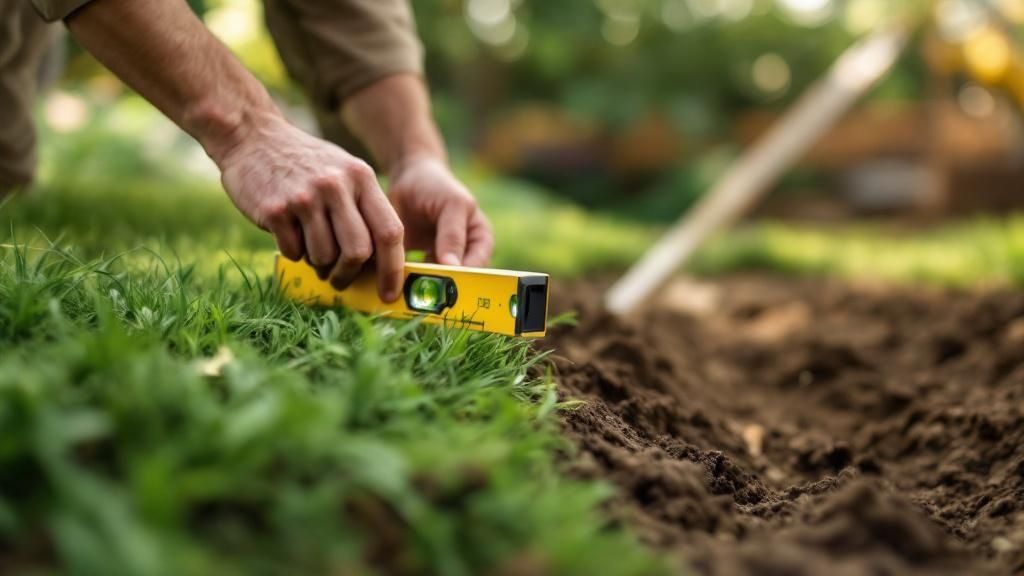
I've seen countless yards fixed with a simple principle: create a subtle 2% grade that slopes away from the house. It doesn't sound like much, but it's often all you need to move surface water toward a safer drainage zone. This is the bedrock concept behind most effective backyard drainage strategies.
Comparing Popular Backyard Drainage Solutions
With a few different ways to tackle a soggy yard, it helps to see them side-by-side. This table gives you a quick rundown of the most common solutions so you can start thinking about what might work best for your specific problem, budget, and how you want your yard to look.
| Solution Type | Best For | Average Cost (DIY) | Maintenance Level |
|---|---|---|---|
| French Drain | Moving large amounts of subsurface water away from foundations or low spots. | $10 – $20 per linear foot | Low |
| Dry Creek Bed | Managing surface runoff from downspouts or slopes in an aesthetic way. | $5 – $15 per linear foot | Low |
| Swale | Redirecting surface water across a lawn with a gentle, wide channel. | $2 – $5 per linear foot | Low to Medium |
| Rain Garden | Collecting and absorbing runoff in a designated, planted depression. | $5 – $25 per square foot | Medium |
Ultimately, the right choice depends on whether your water issue is on the surface or underground, and what kind of look you're going for.
Think of this guide as your roadmap to reclaiming your outdoor space. We’ll walk through the options, from the functional beauty of a dry creek bed to the heavy-lifting power of a French drain. By the end, you'll have the knowledge to pick the right approach and finally transform that soggy patch of grass into a healthy, beautiful, and usable part of your home.
How to Properly Diagnose Your Drainage Issues
Before you start digging trenches or buying supplies, you have to play detective. I've seen it time and again: homeowners rush to install a French drain only to find out the real problem was a misdirected downspout. Simply picking a solution without understanding the root cause is a shot in the dark.
A successful, long-lasting fix begins with knowing exactly what's causing the water to pool, where it's coming from, and where it’s trying to go. This diagnostic phase is the most critical part of the entire project. Taking the time now to observe and test will save you a ton of effort and money later on.
Observe Your Yard During a Rainstorm
The absolute best way to understand what's happening in your yard is to see it in action. The next time a storm rolls in, throw on a raincoat and head outside. Your mission is to trace the water's journey from the moment it hits the ground until it either soaks in or sits on the surface.
You'll want to pay close attention to a few key things:
- Downspout Discharge: Where does all that roof water go? If your downspouts are just dumping it right next to your foundation, you’ve probably found a major source of your soggy yard.
- Hardscape Runoff: Watch how water sheets off your patio, driveway, and walkways. These non-porous surfaces can funnel huge volumes of water into one spot, quickly overwhelming your lawn.
- Natural Low Spots: Make a mental note of where puddles form first and where they stick around the longest. These are your yard's natural collection points and the primary targets for any drainage solution.
- Neighboring Properties: Is water flowing onto your land from a neighbor's higher-elevation yard? This is a common, and often overlooked, source of serious drainage headaches.
Conduct a Simple Soil Percolation Test
Once you know how water moves across the surface, you need to find out how well your soil can actually absorb it. A "perc" test is a simple DIY experiment that reveals your soil's drainage capacity. It tells you whether you're working with sandy soil that drains in a flash or dense, heavy clay that holds water like a bucket.
Here’s the simple way to do it:
- Dig a hole about one foot wide and one foot deep in the problem area.
- Fill the hole completely with water and let it drain out. This pre-saturates the surrounding soil, giving you a more accurate reading.
- Refill the hole with water and pop a ruler or tape measure inside.
- Check it every hour to see how much the water level drops.
If the level drops by less than one inch per hour, you've got poor drainage. This is a classic sign of compacted soil or a high clay content and tells you that a subsurface solution like a French drain will likely be needed to physically carry that water away.
Pro Tip: Don't just test one spot. I always recommend digging a few test holes in different areas—the sogginess, but also some higher ground. Soil can change quite a bit across a single property.
Identify the Underlying Cause
Now you can connect the dots. With your rainstorm observations and soil test results, a clear picture should start to emerge. Maybe that beautiful new patio accidentally created a dam that traps water. Or perhaps years of the kids and dog running the same path has compacted the soil, turning it into a muddy highway after every rain.
Sometimes, the issue points to a different kind of solution. For areas with consistently poor soil, you might explore our guide on drought-tolerant landscaping ideas, which are much better suited for the challenging soil conditions we often see here in California.
By the end of this process, you'll have a complete "drainage map" of your property. This map is your blueprint for success, pointing you directly to the most effective backyard drainage solutions for your unique situation.
When you're dealing with more than just a few puddles—I'm talking about widespread, swampy conditions—it’s time to bring out the big guns of backyard drainage: the French drain.
This subsurface system is the absolute workhorse for handling serious water issues. It works by capturing water underground before it gets a chance to saturate your lawn or, worse, creep toward your home's foundation. It’s definitely an intensive project, but it’s also a permanent fix for those persistently soggy yards.
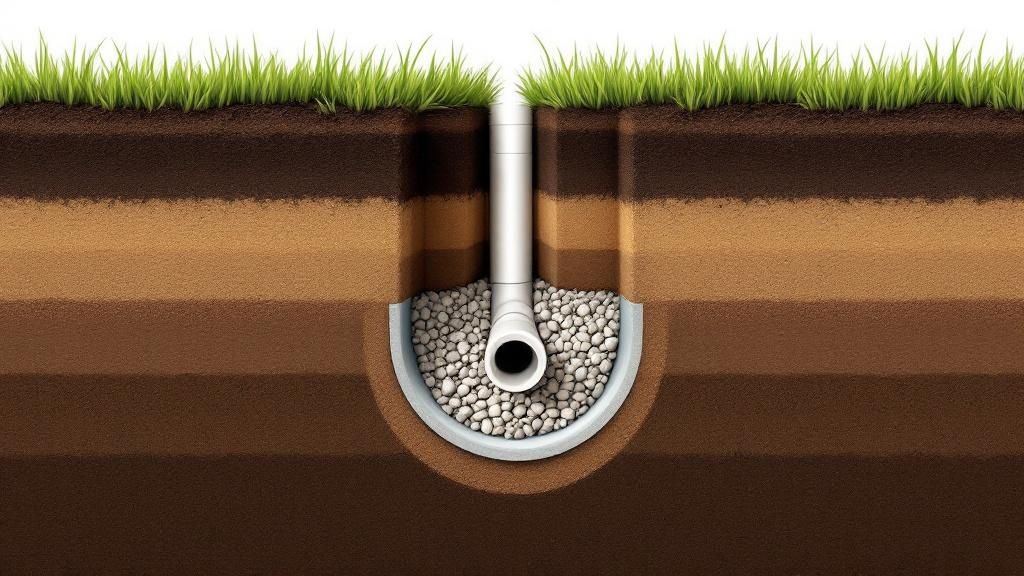
The concept behind it is actually pretty simple. A French drain is just a slightly sloped trench filled with gravel that houses a perforated pipe. Water from the ground and surface seeps into the trench, finds its way into the pipe, and then gravity does the rest, carrying it away to a safe spot. It's a completely invisible solution that works around the clock right under your feet.
Planning Your French Drain Path
Before you even think about grabbing a shovel, you need a solid plan. Mapping the drain's path is the most critical part of the whole process. The idea is to intercept water where it starts and give it an easy, downhill escape route. Go back to the "drainage map" you made earlier to figure out the best layout.
- Pinpoint the Problem Zones: Your trench needs to cut right through the wettest parts of your yard, those areas where water just sits and never seems to leave.
- Start High, End Low: This is non-negotiable. The drain has to start at a high point within the problem area and run downhill, without interruption, to an outlet. Gravity is the engine here, so a proper slope is everything.
- Think About the Source: If you’re dealing with a leaky retaining wall or a waterlogged slope, your best bet is to run the trench parallel to the base of that feature. This will catch the water as it seeps out.
A classic mistake I see is people digging a perfectly level trench. A French drain must have a slope, or what we call "fall," of at least 1% to drain properly. That breaks down to a one-foot drop for every 100 feet of pipe. The best way to get this right is with a string line and a level to keep your trench on that crucial gradient.
Gathering the Right Materials
Once you've marked your path with stakes or spray paint, it’s time to get your materials together. The components are straightforward, but using the right type and quality will make a massive difference in how well your drain works and how long it lasts.
Here’s a quick rundown of what you’ll need:
| Material | Key Specifications & Purpose |
|---|---|
| Perforated Pipe | Go with a 4-inch rigid PVC pipe that has pre-drilled holes. It's much tougher than the flexible corrugated stuff, which can get crushed or clogged over time. Just remember to install it with the holes facing down. |
| Non-Woven Geotextile Fabric | This is the secret sauce. It’s a special landscape fabric that lets water in but keeps out the silt and dirt that would otherwise clog your gravel. Do not use a standard weed barrier—it will clog up and fail. |
| Drainage Gravel | You're looking for clean, washed rock, usually ¾-inch to 1½-inch in diameter. Steer clear of pea gravel or any stone that has "fines" (tiny particles and dust), as they'll just compact and kill your permeability. |
| Catch Basins | While they’re optional, I highly recommend them. Putting a catch basin at the start of the drain or where a downspout connects helps filter out leaves and debris before they can get into the pipe. |
Choosing quality materials is a real investment in your property's health. It's no surprise that the market for drainage aids—which includes things like the geotextile fabric and filters—is booming. It was valued at around USD 3.15 billion in 2025 and is expected to hit USD 5.06 billion by 2033. That tells you just how seriously homeowners are taking drainage to protect their investments. You can dive deeper into these trends in this detailed drainage aid report.
This infographic gives a great visual summary of the planning stages for any big backyard drainage job.
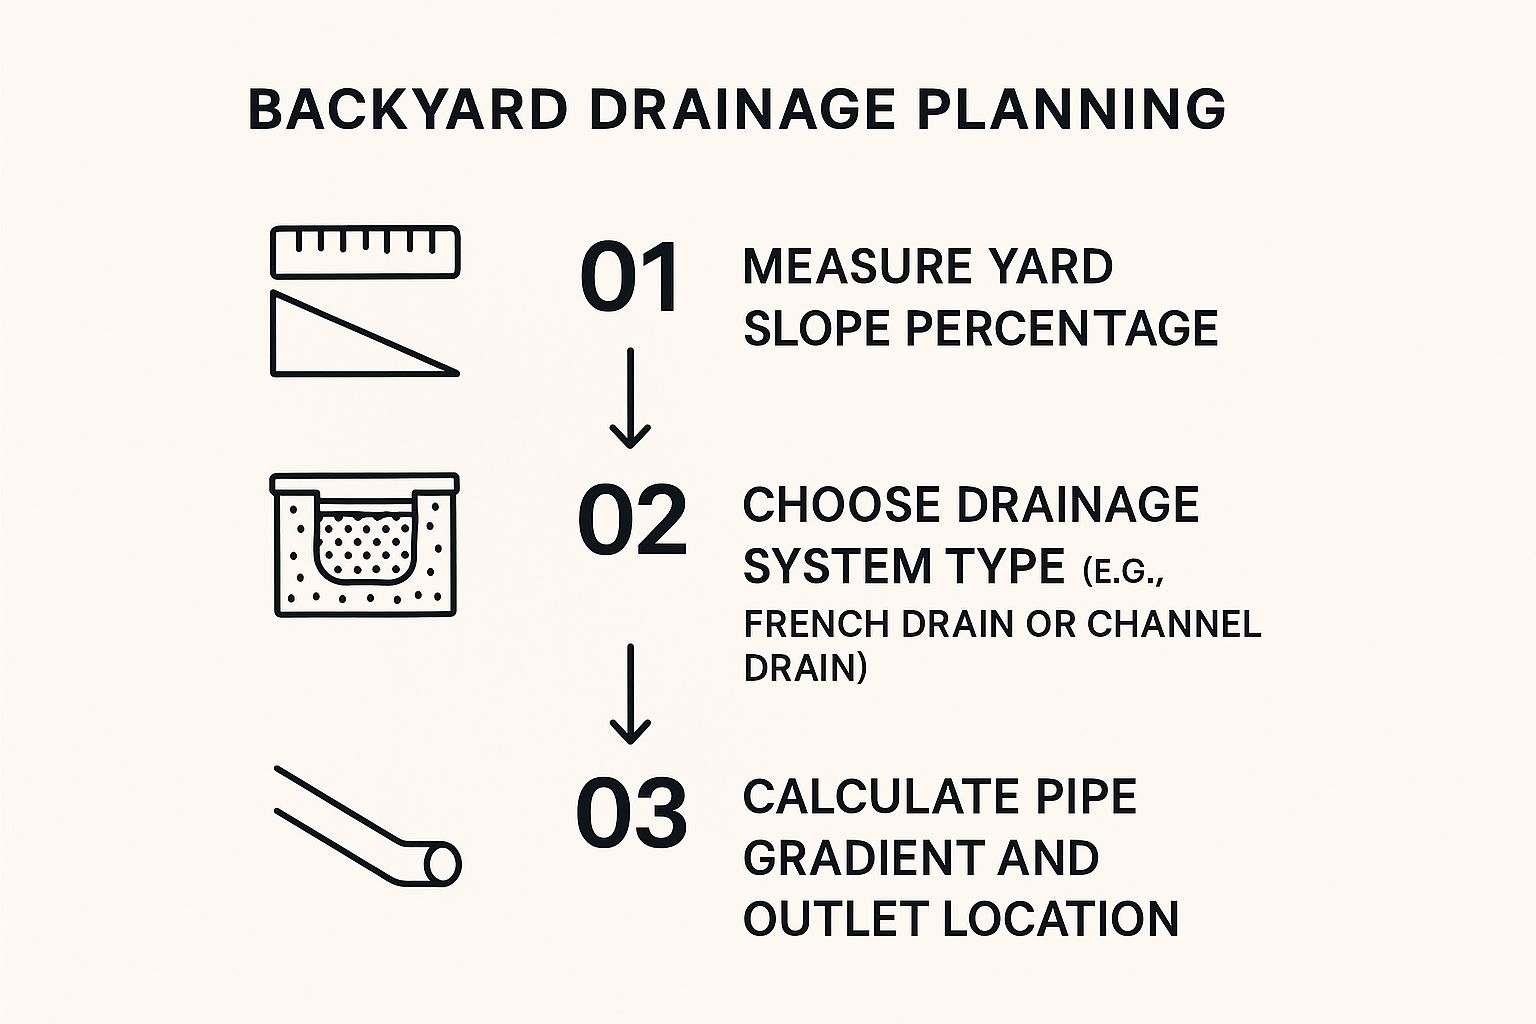
As it shows, success really comes down to following a logical sequence: get your slope measurements right, pick the correct system for your specific problem, and then map out the technical details like the gradient and where the water will ultimately go.
The Installation Process Explained
Alright, with your path marked and your materials ready, it's time to get digging. The process isn't complicated, but be warned—it is physically demanding.
First up is digging the trench. A width of 10 to 12 inches is usually about right. As for depth, it depends on your yard, but you should aim for at least 18 to 24 inches deep for it to be effective. As you dig, keep checking that slope with your string line and level.
Next, you'll line the entire trench with the non-woven geotextile fabric. Be sure to leave plenty of extra fabric hanging over both sides. You’re going to fold this over the top later, creating a "burrito" that protects the whole system from being choked by dirt. This is what gives your drain a long life.
Now, add a base layer of about two inches of your drainage gravel into the bottom of the fabric-lined trench. Lay your perforated PVC pipe right on top of this gravel bed, making sure those little holes are facing down. This allows water rising up from the ground to enter the pipe easily.
With the pipe nestled in place, go ahead and fill the rest of the trench with gravel, stopping about four inches shy of the surface. Fold the excess fabric over the top of the gravel to completely seal the pipe and stone.
Finishing the Job and Choosing an Outlet
The last piece of the puzzle is deciding how to finish the top of your drain and—most importantly—where all that water is going to go. For the surface, you've got a few choices:
- Sod: You can add a layer of topsoil over the fabric and plant grass to make the drain completely invisible.
- Decorative Rock: Fill in the last few inches with river rock to create a nice-looking dry creek bed.
- Mulch: If the drain runs through a garden bed, you can just cover it with mulch to blend right in.
The discharge point is the final, critical decision. All that water you've collected needs a safe place to exit. Some effective outlets include:
- A Pop-Up Emitter: This little fitting sits flush with your lawn and pops up with water pressure to release water, then disappears again when it's dry. Just be sure to place it far from your house.
- A Dry Well: This is basically an underground pit filled with gravel. It lets the collected water slowly and safely soak back into the deeper subsoil.
- Daylighting: This is the simplest method. You just run the pipe until it emerges on a steep slope or at your property line, letting the water flow away naturally where it won't cause any new problems.
Whatever you do, never route your drain to a neighbor’s yard or connect it to a sanitary sewer line. Always check with your local building department about rules for stormwater discharge before you start. Follow these steps, and you'll have a powerful, long-lasting solution that finally puts an end to your water woes.
Using Natural and Aesthetic Drainage Solutions
Not every drainage problem calls for a complex, buried system. Sometimes, the most elegant and effective backyard drainage solutions are the ones that work with your landscape, adding beauty and function all at once. These natural approaches are all about managing water smartly while enhancing your outdoor space.
Instead of just hiding water in an underground pipe, you can guide it with a stunning dry creek bed or absorb it with a vibrant rain garden. I love these methods because they turn a drainage issue into a true focal point, proving that practical fixes can also be beautiful.
Crafting a Dry Creek Bed for Artistic Water Management
A dry creek bed is easily one of the most popular and attractive ways to handle surface runoff. It’s essentially a shallow, winding channel we line with stones and boulders to mimic the look of a natural streambed. When it rains, this channel comes to life, filling with water and directing it safely away from trouble spots.
The real beauty of a dry creek bed is its dual purpose. When it’s dry, it’s a striking landscape feature that adds texture and visual interest to your yard. Then, during a storm, it transforms into a functional waterway. It's perfect for managing heavy runoff from downspouts or a sloped yard.
Building one is a totally manageable DIY project. You’ll start by digging a shallow, meandering trench—usually 6 to 12 inches deep and about twice as wide. The key is to make sure the path follows the natural flow of water, leading from where the runoff starts to a safe discharge point.
A common pitfall I see is making the creek bed too straight or uniform. The most convincing designs have gentle curves and vary in width, just like a real creek. This doesn't just look better; it also helps slow the water down, which reduces erosion.
Once you’ve dug the trench, line it with landscape fabric. This is a crucial step to prevent weeds from taking over and to keep the stones from gradually sinking into the soil. Then comes the fun part—the artistry. Place larger boulders along the edges to define the banks, and fill the center with a mix of different-sized river rocks. That variation is what makes it look truly natural.
Designing a Rain Garden to Absorb and Filter Runoff
Where a dry creek bed moves water, a rain garden holds it. A rain garden is a specially designed depression in your landscape, filled with water-loving plants that soak up stormwater runoff from surfaces like your roof, driveway, and patio.
This is a fantastic eco-friendly solution. Instead of sending polluted runoff straight into the storm drains, a rain garden captures, cleans, and filters it. The plants and soil work together to remove up to 90% of nutrients and 80% of sediments from the water before it slowly recharges the local groundwater. It's a small change that makes a big difference.
The process starts with excavating a shallow basin, typically about 4 to 8 inches deep, in a low-lying spot in your yard. It's critical to place it at least 10 feet away from your home's foundation to be safe. The shape can be anything you like—a kidney bean, an oval, or a more freeform design that complements your existing landscape beds.
Next, you have to amend the soil. Most residential soil, especially if it's heavy with clay, needs to be mixed with sand and compost to improve its porosity. This creates a spongy, absorbent base that can hold water while the plants do their work. A typical recipe is about 50-60% sand, 20-30% compost, and 10-20% of your existing topsoil.
Choosing Between a Dry Creek and a Rain Garden
So, when do you choose one over the other? The decision really comes down to your specific problem and what you want to achieve. Each one excels in different scenarios.
A dry creek bed is your best bet when:
- You need to move a lot of fast-moving water across your property, especially on a slope.
- The main goal is simply to redirect water from a source (like a downspout) to an outlet (like the street).
- Your soil drains very poorly, which would make a rain garden's absorption difficult.
On the other hand, a rain garden is the ideal choice when:
- You want to manage smaller amounts of runoff from hard surfaces and let the water soak back into the ground.
- Your goal is to improve water quality and create a beautiful habitat for pollinators like bees and butterflies.
- You have a relatively flat area that can accommodate a shallow basin.
Sometimes, the best solution is actually a combination of both. You can use a dry creek bed to channel water from a downspout directly into a rain garden, creating a complete water management system that’s both highly effective and beautiful.
Selecting Plants for Maximum Performance
The success of any rain garden really hinges on choosing the right plants. You need species that can handle both periods of being waterlogged and the drier conditions between storms. Native plants are almost always the best choice because they're already adapted to your local climate and soil. You can find some excellent ideas for our area in this guide to California native and drought-tolerant plants, as many of them have the deep root systems needed for these specialized gardens.
When you're planting, think in zones:
- Wet Zone: In the lowest part of the garden, use plants that love having "wet feet," like certain rushes and sedges.
- Mesic Zone: Along the sloped sides, plant species that can handle occasional standing water but also some dryness. Think daylilies or certain types of iris.
- Dry Zone: Around the upper edge or berm, use more drought-tolerant perennials that will be happy in the drier conditions there.
This tiered planting strategy ensures that every part of the garden has plants perfectly suited to its specific moisture level. The result is a healthier, more resilient, and much more effective rain garden. These natural solutions offer a way to solve water problems thoughtfully, creating a landscape that is as smart as it is beautiful.
Maintaining Your Drainage System for Lasting Success
Getting a new drainage system installed is a huge win for your yard, but the job isn't quite finished once the last rock is laid. Think of it like any other important feature of your home—it needs a little upkeep to keep working perfectly for the long haul.
Without some basic care, you risk clogs, slowdowns, and eventually, a return of the very soggy mess you worked so hard to eliminate. The good news? The maintenance is usually pretty straightforward and won't eat up your weekends.
A Seasonal Maintenance Checklist
The trick is to make it routine. A few simple checks each season can help you spot small issues before they snowball into major headaches. It's all about protecting your investment and keeping the water flowing where it should.
Here’s a practical, season-by-season guide to keep things on track:
- Spring Cleanup: Once the winter thaw is over, it's time for a quick inspection. Clear out any leaves, sticks, and gunk that have collected in your French drain inlets, catch basins, or on the surface of your dry creek bed. This is also the perfect time to top up the mulch in your rain garden to keep weeds down.
- Summer Monitoring: During the next big summer downpour, step outside and watch your system work. Is water flowing into the drains like it should? Do you see any surprise puddles? That could signal a clog. For rain gardens, a little weeding and some water during dry spells will keep the plants happy.
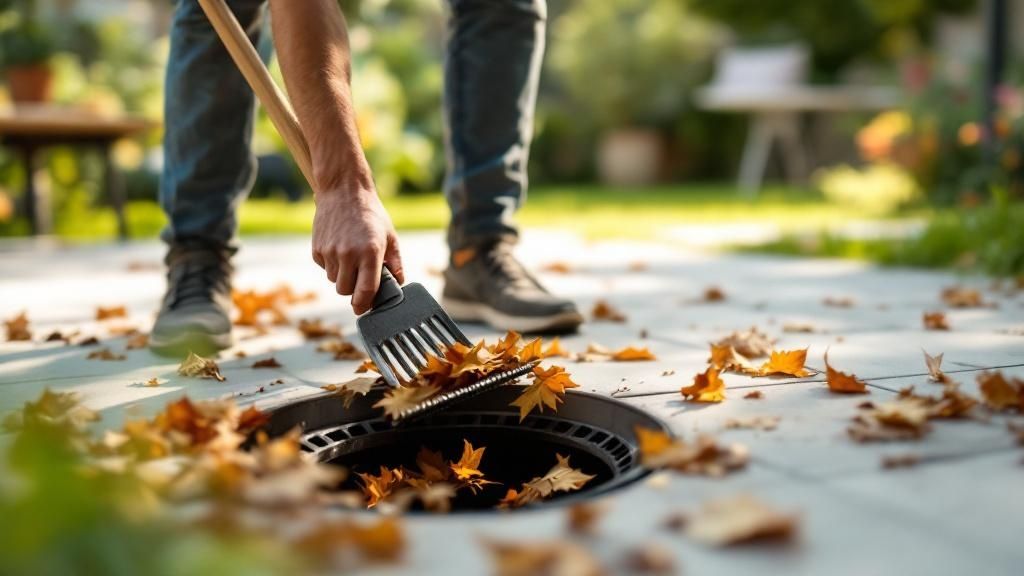
- Fall Preparation: This is probably the most critical time for maintenance. Falling leaves are the number one cause of clogs. Make a point to regularly clear debris off grates and out of creek beds to prevent blockages from forming over the winter. Trim back any overgrown plants in your rain garden once they’re done for the season.
One of the most common mistakes I see is people forgetting about the exit point of their drainage system. A pop-up emitter can easily get hidden by overgrown grass, or the end of a dry creek bed can get blocked by debris. If the water can't get out, it's going to back up the whole system.
Advanced Care for Specific Systems
While that seasonal checklist covers the basics, different systems have their own unique needs.
French drains, for instance, are mostly buried, but their entry and exit points are key vulnerabilities. If you have catch basins connected to your drain, scooping out the sediment that collects in them a few times a year will stop that gunk from getting into the pipe and causing a deeper clog.
For dry creek beds, the biggest challenge over time is silt building up between the rocks, which can slow down water absorption. Every few years, you might need to pull up some of the smaller rocks, clear out the gunk underneath, and put them back. It’s a bit of work, but it restores the bed's ability to handle a torrent of water.
Rain gardens are more about horticulture. Thinning out plants that are getting a little too aggressive or dividing perennials every few years keeps the garden healthy and ensures the soil doesn't become compacted. By doing this, you're also following great principles of eco-friendly landscaping that help your yard and the local environment.
The Future of Yard Drainage Maintenance
Looking ahead, technology is starting to change how we manage yard water. Smart home systems are branching out into the garden, with sensors that can monitor soil moisture and even control water flow automatically.
It’s part of a much bigger trend. The global market for smart drainage systems was valued at around $2.5 billion in 2025 and is expected to climb. This shift toward proactive, data-driven maintenance is making it easier than ever for homeowners to stay ahead of problems. By following these maintenance steps, you can ensure your drainage solution keeps your yard dry, healthy, and beautiful for years to come.
Common Questions About Backyard Drainage
Even with the best game plan, it's totally normal to have a few questions before you start digging up your yard. Tackling backyard drainage solutions can feel like a huge undertaking, but getting clear answers to a few key things can give you the confidence to move forward. Let’s walk through some of the most common questions we hear from homeowners.
One of the most delicate issues is dealing with water flowing onto your property from a neighbor's yard. This happens all the time, especially in hilly neighborhoods or subdivisions where lots are graded differently. Before you start piling up dirt to build a berm, your first move should always be a friendly chat. Your neighbor might not even realize it’s happening.
If that conversation doesn't lead to a solution, you might need to check your local city ordinances. Most places have rules about how property owners can (and can't) alter the natural flow of water if it negatively impacts someone else. In these cases, installing a swale or a French drain right along the property line is a great way to catch that runoff before it turns your yard into a swamp.
Do I Need a Permit for My Drainage Project?
This is a big one, and the answer really boils down to your location and the scope of your project. For simpler fixes, you can usually breathe easy. A small rain garden or a shallow dry creek bed that doesn't significantly change your property's grade typically won't require a permit.
However, once you get into more substantial work, the city will likely want to be involved. You'll probably need a permit for projects like:
- Installing a French drain that ties into the city's storm drain system.
- Regrading large portions of your yard.
- Building large retaining walls that affect how water moves.
Do yourself a huge favor: always check with your local city or county building department before a shovel hits the ground. Getting caught without a permit can lead to hefty fines and even an order to tear out all your hard work. It's a quick phone call that can save you a world of headaches.
Remember, you are ultimately responsible for where all that water you've collected goes. You can't just send it flooding into your neighbor's yard. A proper, legal discharge point—like a dry well on your own property or a street curb outlet—is non-negotiable for a successful and compliant project.
Should I DIY or Hire a Professional?
Figuring out whether to tackle this yourself or call in a pro usually comes down to three things: how complex the problem is, how much time you have, and your physical ability to do the work. The good news is that many backyard drainage solutions are definitely within reach for a handy homeowner.
- Great DIY Projects: Building a dry creek bed, digging a simple swale, or planting a rain garden are all very manageable. They take some sweat equity but don't require a lot of specialized equipment.
- When to Call a Pro: If your yard needs serious regrading, a complex French drain system, or if you're dealing with steep slopes or tricky access, hiring a professional is the smarter, safer bet.
Pros bring the right equipment and, more importantly, the experience to do the job right the first time. They understand soil mechanics, can calculate the precise slopes needed for proper flow, and know the local codes inside and out, ensuring your drainage system is built to last.
At Tamura Designs, we specialize in crafting custom landscape and construction solutions that are both beautiful and highly functional. If you're facing complex drainage challenges, our team has over 30 years of experience creating elegant, lasting fixes for homeowners across Silicon Valley. Explore our work and see how we can transform your outdoor space by visiting us at https://tamuradesigns.com.