When you're thinking about landscape lighting, the term "low voltage" comes up a lot. And for good reason. It’s a safe, incredibly efficient, and budget-friendly way to light up your property, making it a perfect project for most Morgan Hill homeowners. The whole system works by using a transformer to take your home's standard 120-volt power and step it down to a much safer 12 volts, allowing you to beautifully and securely enhance your yard after dark.
Why Low Voltage Lighting Is Your Best Choice
Before you start sketching out a design or picking fixtures, it’s worth understanding why low voltage has become the gold standard for residential outdoor lighting. This isn't just a fleeting trend; it’s a practical and smart approach that transforms your property by touching on everything from safety and cost savings to environmental responsibility.
At the heart of any low-voltage landscape lighting installation is the transformer. Think of this device as the system's brain. It takes the potent 120-volt current from an outdoor outlet and dials it way down to a harmless 12 volts. This massive power reduction is exactly what gives the system all its advantages for homeowners like you.
Enhanced Safety for Family and Pets
Honestly, the biggest reason to go with a 12V system is peace of mind. The current running through the wires is so low that it poses almost no risk of a serious electrical shock. This is true even if a wire is accidentally nicked by a shovel or chewed on by a curious pet. For any of us with kids or animals tearing around the yard, that kind of safety is priceless.
Unlike their high-voltage (120V) counterparts, which need to be buried deep inside a protective conduit by a licensed electrician, low-voltage wires can be safely tucked just a few inches under the soil or mulch.
Key Takeaway: The biggest win for a 12V system is its built-in safety. The reduced voltage dramatically minimizes any risk of electrical shock, making it the clear winner for homes where kids and pets play.
To put it in perspective, let's look at a quick comparison.
Low Voltage vs High Voltage: A Quick Comparison
This table breaks down the main differences, showing why low-voltage systems are almost always the right call for residential projects.
| Feature | Low Voltage (12V) | High Voltage (120V) |
|---|---|---|
| Safety | Very safe; low shock risk | Higher shock risk; requires professional installation |
| Installation | DIY-friendly; simple shallow burial for wires | Complex; requires conduit, deep burial, and a licensed electrician |
| Energy Efficiency | Highly efficient, especially with LEDs | Less efficient; consumes significantly more power |
| Cost | Lower installation and operational costs | Higher upfront and long-term costs |
| Flexibility | Easy to move and adjust fixtures | Fixtures are difficult and costly to relocate |
As you can see, the benefits of a 12V system really stack up, making it a more practical and accessible choice for homeowners.
Superior Energy Efficiency and Cost Savings
Today's low-voltage systems almost always use modern LED bulbs, and for good reason—they consume up to 80% less energy than the old-school halogen or incandescent bulbs they replaced. That massive drop in energy use shows up right on your monthly electricity bill.
This efficiency is a huge part of why the low-voltage lighting market is booming. It hit about $1.462 billion in 2025 and is set to keep growing, mostly because people want energy-saving solutions that look great. You can dive deeper into the numbers in this market analysis of low-voltage lighting trends.
When you pair low-wattage LEDs with the right-sized transformer, you get an incredibly efficient lighting setup. It’s a smart investment that boosts your home’s curb appeal while also being a more sustainable choice. For more tips on making your yard a bit greener, take a look at our guide on eco-friendly landscaping.
Designing Your Outdoor Lighting Scene

Great lighting is absolutely an art form, but it’s one you can definitely get the hang of. This is the fun part, where your vision for a completely transformed outdoor space starts to become real. A successful low voltage landscape lighting installation isn't about just sticking fixtures in the ground; it's about thoughtful design that turns your yard into a living canvas after dark.
Before you even think about touching a wire or a fixture, grab a pencil and paper. Seriously. A simple, hand-drawn sketch of your property is the most powerful tool you have at this stage. You don't need to be an architect. Just a rough "bird's-eye view" of your yard will do, marking key features like your home's foundation, the patio, big trees, garden beds, and walkways.
This simple map is your blueprint for everything that comes next.
With your sketch in hand, walk your property and start dreaming. What do you want to see when the sun goes down? This isn't just about lighting a path. It’s about creating an experience.
Layering Light for Depth and Interest
From my experience, the biggest mistake homeowners make is creating a flat, one-dimensional scene. This usually happens when they use only one type of light, like lining a walkway with path lights, which creates that dreaded "airport runway" effect.
The secret to a professional-looking design is to think in layers.
Your lighting plan should have three main layers, all working together:
- Ambient Light: This is your foundation—the general, soft glow that makes the space feel welcoming and usable without being harsh. Think of wide-angle wash lights gently grazing a stone wall or "moonlighting" cast down from high up in a tree.
- Task Light: This is all about function. Its job is to ensure safety and visibility along paths, on stairs, and around your outdoor kitchen or grill. Path lights and step lights are your go-to fixtures here.
- Accent Light: This is where the magic really happens. Accent lighting is what draws the eye to specific features, creating drama and visual pop. Use spotlights to show off the beautiful bark of a Japanese maple or the unique texture of a stone facade.
When you combine these layers, you build a rich, immersive scene with real depth and character. The dance between light and shadow is what truly makes a landscape come alive at night.
Mastering Essential Lighting Techniques
Once you understand layering, you can start playing with specific techniques to get different effects. Each method uses light in a unique way to highlight beauty. Think of these as the different brushes in your artistic toolkit.
Uplighting
This is probably the most popular technique, and for good reason. By placing a spotlight at the base of an object—like a tree, a column, or a statue—and aiming it upward, you create a striking, dramatic look. It emphasizes texture and form, turning an ordinary feature into a nighttime focal point. For a mature oak tree in your Morgan Hill yard, uplighting can reveal the incredible structure of its branches against the dark sky.
Downlighting or Moonlighting
I love this technique because it mimics the natural glow of the moon. We mount a fixture high up in a tree or on an eave, letting it cast a wide, gentle light downward. The effect is subtle and natural, creating soft shadows and dappled light on the ground—perfect for illuminating a patio or a garden area without a single fixture being obvious.
Silhouetting
If you want bold drama, this is your move. You place a spotlight behind a feature, like an interesting sculpture or a feathery ornamental grass, and aim the light at a wall or fence behind it. This technique hides the feature's details and color, focusing your attention entirely on its unique shape.
A key to a dynamic design is balancing these techniques. Try uplighting your home's architectural columns while using silhouetting for the ornamental grasses in front of them. This contrast adds incredible depth.
Planning for Function and Flow
With your artistic techniques chosen, let's circle back to your sketch and get practical. Where do people walk? Where are the potential tripping hazards? Use your map to plot out exactly where your task lighting needs to go.
- Pathways: Space your path lights about 8-10 feet apart, and try staggering them on opposite sides of the walkway. This avoids the runway look and provides balanced, glare-free light.
- Stairs: Safety is non-negotiable here. Install small step lights directly into the risers or on the side walls to clearly define each tread.
- Entrances: Make sure doorways and gates are well-lit. This not only looks welcoming but also adds a crucial layer of security.
This final step ensures your beautiful design is also a safe and functional one. By merging artistic vision with practical planning, you're setting the stage for a flawless installation that will bring you joy for years to come.
Selecting the Right Lighting Hardware

Alright, with your lighting plan in hand, it's time to get the gear. Walking into the hardware aisle can feel a bit overwhelming, but picking the right components is actually pretty simple once you know what you’re looking for.
Think of this as your personal buyer’s guide. We’ll break down the three core components every system needs: the transformer, the fixtures, and the wire. Making smart choices here is what ensures every light shines bright and your system holds up to Morgan Hill’s seasonal weather for years. Honestly, investing in quality hardware from the start saves you from a world of future headaches.
Choosing Your Transformer
The transformer is the heart of your entire system. It’s the magic box that takes your home's standard 120-volt power and steps it down to a much safer 12 volts for your landscape lights.
Figuring out the right size is just a bit of simple math. First, add up the total wattage of all the light fixtures in your plan. Let's say you have ten 5-watt spotlights and five 3-watt path lights. Your total wattage would be (10 x 5) + (5 x 3) = 65 watts.
Pro Tip: Never max out your transformer. A solid rule of thumb I always follow is to make sure your total wattage uses no more than 80% of the transformer's capacity. This buffer prevents overloading, gives you room to add more lights later, and just helps everything run cooler and more reliably.
So for our 65-watt setup, a 100-watt transformer is the perfect fit. It gives you plenty of power with a comfortable cushion to expand down the road.
Selecting Fixtures and LED Bulbs
Your fixtures are where the design really comes to life. While how they look is important, durability is what truly matters in the long run. I always tell my clients to look for fixtures made from solid brass, copper, or a heavy powder-coated aluminum. These materials resist rust and corrosion way better than the cheap plastic or composite stuff you'll see.
The light source itself is another huge decision. The switch to LED technology has been a game-changer; LED-based low voltage lights now make up over 80% of new installations for a good reason. They're the undisputed winner, slashing energy use by up to 80% compared to old halogen bulbs. This makes them a no-brainer for anyone who's cost-conscious or just wants a more eco-friendly setup.
You’ll see two main types: integrated LED fixtures (where the LED is built-in) and fixtures that take replaceable LED bulbs. Both are great options. Integrated fixtures are often sealed better against moisture, but replaceable bulbs give you the flexibility to swap one out if it fails or if you decide you want to change the light's color or brightness.
These fixtures are also fantastic for highlighting the unique textures in a low-water garden. For some great ideas on what to illuminate, check out our guide on drought-tolerant landscaping ideas.
Understanding Wire Gauge and Voltage Drop
Here’s a concept that trips up a lot of DIYers: voltage drop. Think of it like water pressure in a long hose. As electricity travels down a wire, it loses a tiny bit of its power along the way. Over a long enough run, this loss can be enough to make the last light in a chain look noticeably dimmer than the first.
This is where wire gauge comes in. The "gauge" is just a number that refers to the wire's thickness—and weirdly, a lower number means a thicker wire. Thicker wires have less electrical resistance, so they can carry power over longer distances with less voltage drop.
Here’s a quick-and-dirty guide I use for choosing wire:
- 14-Gauge Wire: Perfect for shorter runs (under 100 feet) and lower wattage loads (under 100 watts).
- 12-Gauge Wire: This is the go-to for most projects. It’s ideal for runs between 100-200 feet and can handle loads up to 200 watts.
- 10-Gauge Wire: For really long runs (over 200 feet) or systems with a very high total wattage, this is the wire you need to make sure the lights at the far end get enough juice.
When you're not sure, always go with the thicker wire (lower gauge). The small extra cost is cheap insurance against the frustration of dim, sad-looking lights. Trust me, the quality of your wire is just as important as the transformer and the fixtures for a system that will perform well for years.
Your Hands-On Installation Walkthrough
You've got a solid plan and a pile of quality hardware. Now comes the best part—the actual installation. This is where the paper-and-pencil sketches start to feel real and your vision for your Morgan Hill home comes to life. Let's walk through the physical process, step by step, with some real-world advice to get you through it.
The goal isn't just to make lights turn on. It's about building a bulletproof, professional-grade system that will last for years. That means being smart about where you place your transformer, how you run your cables, and creating connections that can laugh off a California winter.
Lay Out Everything First
Before you even think about grabbing a shovel, do a "dry run." Place your transformer near the GFI outlet you plan to use. Unroll your low-voltage cable and lay it right on top of the ground, tracing the paths you mapped out. Set each light fixture on the ground next to its intended spot along that cable run.
I know, it feels like an extra step, but trust me on this one—it’s a total lifesaver. This simple mock-up lets you see the whole system in context. You can tweak fixture positions, see if you’ve got enough slack in the wire, and catch any design flaws. It’s a heck of a lot easier to move a path light two feet to the left now than it is after you’ve already buried the wire.
Mount the Transformer Securely
The transformer is the heart of your entire system, so it deserves a good home. It needs to be mounted firmly to a solid, vertical surface, like the stucco on your house or a sturdy fence post.
- Get It Off the Ground: Mount it at least 12-18 inches high. This keeps it clear of sprinklers, rainwater that might pool up, and curious critters.
- Safety First: The transformer must plug into a Ground Fault Circuit Interrupter (GFCI) outlet. This is non-negotiable. It’s a critical safety device that protects against electrical shock.
- Easy Access: Make sure you can get to the timer and controls without having to perform gymnastics through your rose bushes.
Once it's securely on the wall, connect your main low-voltage cable runs to the terminals on the bottom of the transformer. You'll notice most have multiple voltage taps (like 12V, 13V, 14V). For the initial connection, just use the standard 12V tap. We can always come back and use a higher voltage tap later if we see any dimming on the furthest lights.
Running and Connecting the Cable
Okay, let's talk wiring strategy. How you lay out your cable has a massive impact on your system's performance and how bright your lights are. For a low voltage landscape lighting installation, there are really two main ways to go.
Wiring Layout Options
| Method | Description | Best For |
|---|---|---|
| Daisy Chain | The simplest way. A single cable runs from the transformer, with each light connected one after the other along the wire. | Short runs with just a few low-wattage lights. It's easy and uses the least amount of cable. |
| Hub or T-Method | A heavier "feeder" wire runs to a central spot. From this "hub," smaller wires branch off to different lighting zones. | The clear winner for longer runs, systems with lots of fixtures, or distinct areas. It's the best way to minimize voltage drop. |
For most properties here in Morgan Hill, which often have separate front yard, backyard, and patio areas, the hub method is the way to go. It delivers professional, consistent results and makes sure the spotlights on your oak tree in the back are just as bright as the path lights near your front door.
Crucial Tip: Always, and I mean always, test the full system before burying a single inch of wire. Connect every fixture, plug in the transformer, and fire it up at night. Walk the property. Is every light on? Is the beam aimed correctly? This is your golden opportunity to fix a bad connection or a dead bulb with zero digging involved.
Making Secure, Waterproof Connections
If there's one place a lighting system will fail, it's at the connections. A weak connection will corrode from moisture, leading to flickering lights or entire sections going dark after the first rainy season. Don't cheap out here.
Those little clip-on "vampire" connectors that come with many DIY kits? Throw them out. They are notoriously unreliable. I only recommend using waterproof wire nuts that are filled with silicone. They create an airtight, watertight seal that protects the copper wiring from our clay soil and irrigation. The process is straightforward: strip about half an inch off the wire ends, twist them together with pliers, and screw on the waterproof nut until it's snug.
This image shows a great visual of how to lay the cable in a shallow trench for a clean, protected installation.
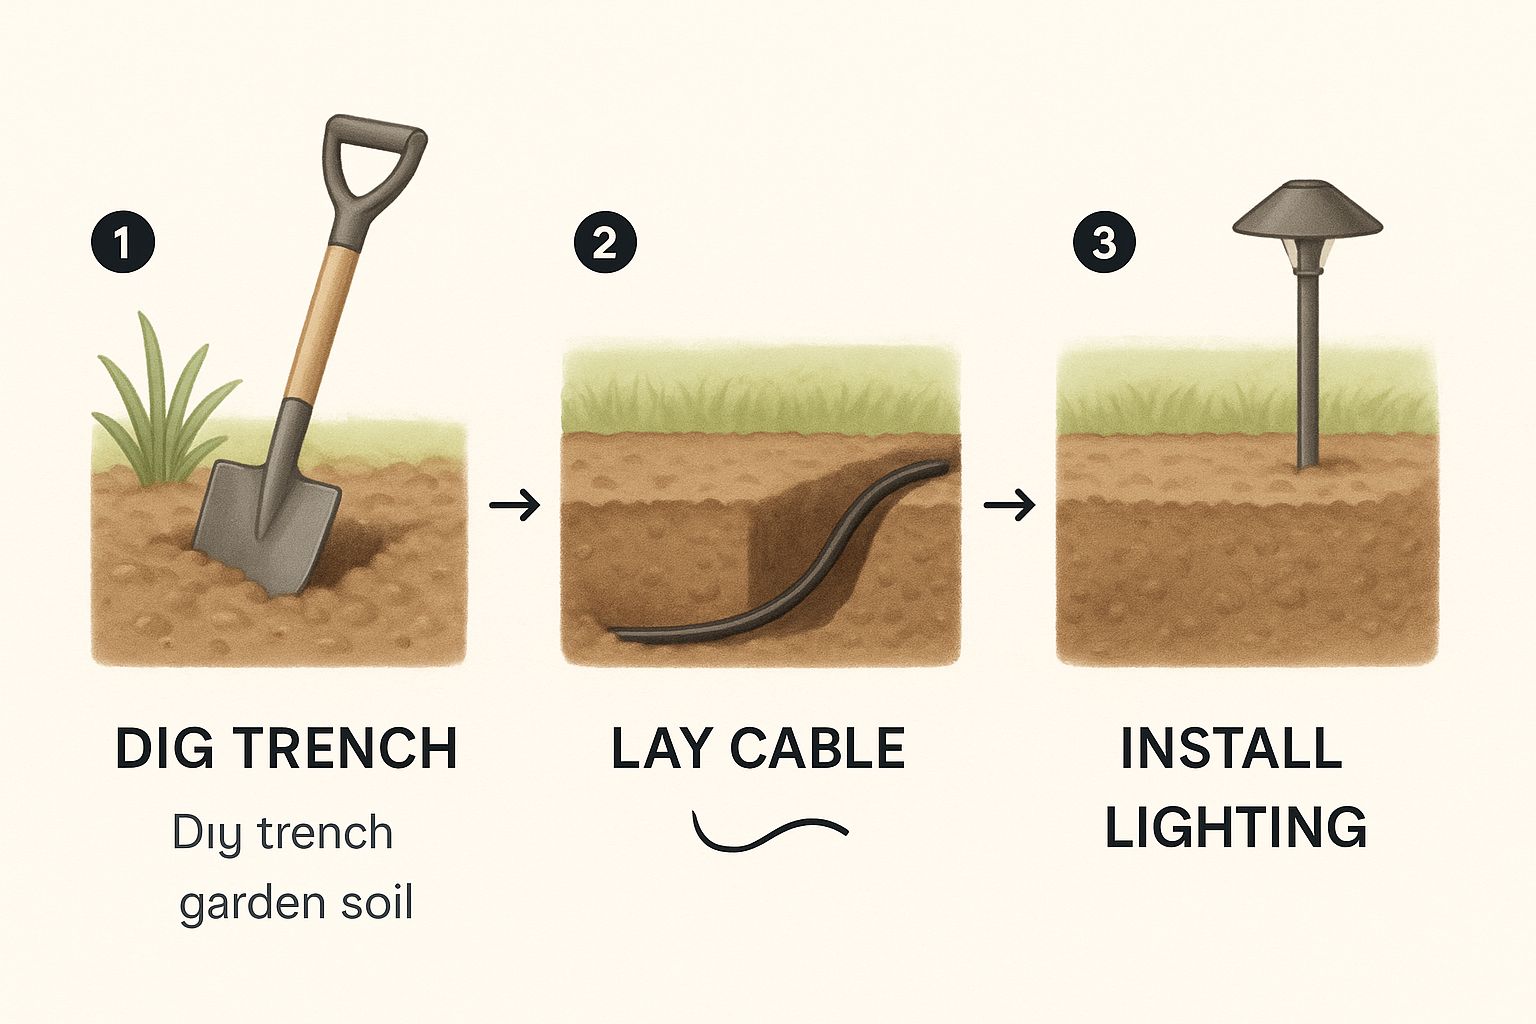
Creating a dedicated, shallow channel like this is key to protecting your wiring from accidental cuts during future gardening projects.
Digging the Trench and Burying the Wire
Once you’ve tested everything and it’s all working perfectly, you can finally bury the cable. The good news is that because this is a low-voltage system, you don’t have to dig to China. A simple trench that's about 4 to 6 inches deep is all you need. That’s just enough to protect the wire from lawn aerators, weed whackers, and the occasional misplaced trowel.
I find a flat-end spade or a dedicated trenching shovel works best to create a clean, narrow channel. Lay the wire gently in the bottom—don’t ever try to jam it in with the shovel, as you can easily slice the insulation. After the wire is in, just backfill the trench with the soil you removed and tamp it down lightly with your foot.
By taking your time with these hands-on steps, you’re not just installing lights; you’re building a beautiful, reliable system that will make your home shine for years.
Fixing Common Lighting Installation Problems
https://www.youtube.com/embed/3iLkmGRFiuM
So you’ve meticulously planned and installed your new landscape lighting, but something’s not quite right. A fixture won't turn on, or a light is noticeably dimmer than the one next to it. It’s frustrating, I know, but don't reach for the phone just yet.
You’d be surprised how often these glitches are simple fixes. Think of this as your personal troubleshooting guide. Before you even think about calling a pro, let's walk through the most common culprits. With a little patience, you can solve over 90% of these issues yourself.
A Whole Section Is Dark
If an entire group of lights has gone dark, the issue is almost certainly "upstream"—somewhere between the non-working lights and the transformer. Your best bet is to start at the power source and work your way out.
First, take a look at the transformer. Is it plugged into a GFCI outlet that's actually working? Try pressing the "Test" and then the "Reset" button on the outlet to make sure it hasn't tripped. If the outlet has power, your next stop is the transformer's terminal block. A loose wire here is a classic rookie mistake. Make sure the bare copper ends are clamped down tight.
Still no luck? Follow that specific wire run from the transformer. The very first connection point where the main cable splices is your prime suspect. One bad connection there will knock out every single light down the line.
Key Takeaway: When a group of lights fails, the problem is almost always "upstream." Start at the power source (the outlet and transformer) and methodically check each connection point moving toward the dark fixtures.
One Light Is Flickering or Out
When just a single light is acting up, the problem is localized, which is great news. This is usually a quick fix. The issue is almost certainly with the bulb, the socket, or that light's specific wire connection.
Always start with the simplest solution: the bulb. Just swap it with a bulb from a neighboring fixture that you know is working. If the good bulb lights up in the faulty fixture, you've found your culprit. It was just a dead bulb.
If a new bulb doesn't do the trick, the connection is the next thing to check.
- Inspect the Socket: Over time, a little corrosion can build up inside the socket and prevent a solid connection. A quick scrub with a small wire brush usually clears it right up.
- Check the Splice: Find where that fixture's wire connects to the main low-voltage cable. Unscrew the wire nut and look for any corrosion or a loose wire, then remake the connection so it's clean and snug.
Nine times out of ten, one of those two steps will bring a single misbehaving light back to life.
Lights Are Dim at the End of the Run
Ah, the classic symptom of voltage drop. As electricity travels down a long cable, it naturally loses a little power. This means the fixtures at the tail end of a long run get less voltage, making them appear dimmer than the lights closer to the transformer.
You can confirm this is the problem with a multimeter. Test the voltage at the first light in the run, and then test it at the very last one. A drop of more than one or two volts is significant. For example, if you're getting 11.8V at the first light but only 9.5V at the last, you've definitely got voltage drop.
If that's your situation, you have a couple of solid options. The easiest fix is right at your transformer. Most professional-grade transformers have multiple voltage taps (e.g., 12V, 13V, 14V, 15V). Simply move the wire for that dim run from the 12V tap to a higher one, like 13V or 14V. This gives the line an extra boost to counteract the loss.
For very long runs or more complex layouts, a better solution is to reconfigure the wiring into a "hub" or "T" design. Instead of one long daisy chain, you create shorter, more balanced runs coming from a central point. This is a fantastic way to light large areas evenly, and you can see how this balanced approach elevates big spaces in our guide to hardscaping and patio ideas.
To help you diagnose problems on the fly, here’s a quick reference table for the issues we see most often in the field.
Common Landscape Lighting Problems and Solutions
This table is your quick-glance guide to diagnosing and fixing the most frequent hiccups you might encounter during an installation.
| Problem | Likely Cause | How to Fix |
|---|---|---|
| No lights work | No power to the transformer. | Check the GFCI outlet; reset the circuit breaker; ensure the transformer is securely plugged in. |
| A single light is out | Burned-out bulb or bad connection. | Swap with a known good bulb. If that fails, clean the socket and remake the wire splice. |
| Lights are flickering | Loose connection at the fixture or transformer. | Tighten the wire connections at the problematic fixture(s) and at the transformer terminal block. |
| Lights at the end are dim | Voltage drop due to a long wire run. | Move the wire to a higher voltage tap on the transformer (e.g., from 12V to 13V or 14V). |
| GFCI outlet keeps tripping | Water intrusion or a nicked wire. | Check wire splices for moisture. Carefully inspect the entire cable run for any damage to the insulation. |
Keep this guide handy, and you'll be able to tackle most lighting issues like a pro, keeping your Morgan Hill landscape beautifully illuminated for years to come.
Common Questions About Landscape Lighting
Even with a solid plan, a few questions always pop up. That's perfectly normal. A low voltage landscape lighting installation is a real investment in your home, and it’s smart to get all the details straight before you dive in. Let's walk through some of the most common questions we hear from homeowners right here in Morgan Hill.
Getting clear, practical answers to these questions will give you the confidence to move forward, whether you decide to make it a weekend project or call in a pro.
How Deep Should I Bury Low Voltage Wire?
For any 12V low-voltage system, the sweet spot for burying your cable is 4 to 6 inches deep. That’s really all you need. This depth is more than enough to protect the wire from the usual suspects: lawnmower blades, foot traffic, and even your annual lawn aeration.
This is one of the biggest perks compared to high-voltage (120V) wiring, which demands being buried deep inside a protective conduit. That shallow trench makes the whole installation process so much faster and less back-breaking, especially for a DIYer. While it never hurts to be aware of local codes, a six-inch depth is the go-to standard for most residential projects.
Can I Mix Different Brands of Fixtures?
Yes, you absolutely can! This is one of the best things about working with 12V lighting—its incredible flexibility. You can mix and match fixtures from different companies on the same transformer, as long as they are all designed for a 12V AC system.
The one thing you absolutely must pay attention to is the total wattage. Just add up the watts for every single light you plan to connect, no matter the brand. Make sure that grand total doesn't go over 80% of your transformer's maximum rating.
Staying under that 80% capacity threshold is the golden rule of landscape lighting. It keeps the transformer from getting overloaded, guarantees every light has enough juice to shine brightly, and even leaves you a little wiggle room to add a fixture or two down the road.
One other quick tip: just double-check that the wire connectors are compatible. If you find they aren't, it's no big deal. You can always grab some universal waterproof wire nuts to create a secure, weatherproof splice for any brand of light.
Should I Hire a Professional for My Installation?
This is the big one, and honestly, the answer depends on your project's scale, your own comfort level with this kind of work, and your budget.
If you're looking at a straightforward layout on a smaller, relatively flat yard, this can be an incredibly rewarding weekend project for a handy homeowner. The process itself is safe and doesn't demand any specialized electrical training.
However, calling a professional is a very smart move in a few key situations:
- Complex Designs: If your dream lighting plan involves multiple zones, really long or tricky wiring runs, or advanced lighting techniques across a large property.
- Serious Elevation Changes: Homes with steep slopes or several retaining walls require a lot more thought to manage wire runs and avoid voltage problems.
- If You're Just Not Comfortable: Hey, if you're not confident messing with wiring—even low-voltage—a pro brings peace of mind and ensures the job is done right the first time.
A professional brings years of design expertise to the table, knows how to manage voltage drop for optimal performance, and will almost always stand behind their work with a warranty on both the materials and the labor.
For a truly stunning, custom-designed outdoor space without the hassle, the team at Tamura Designs Landscape and Construction has over 30 years of experience creating breathtaking and functional landscapes in Morgan Hill. Let us handle the details so you can simply enjoy the result. Learn more about our award-winning landscape and construction services.