A good landscape lighting plan is your map for turning a dark yard into a special place. It's more than just putting a few lights in the ground. It's about using light to make your home safer, look better, and let you enjoy your yard for more hours. When you have a solid plan, every light has a purpose.
Why Good Landscape Lighting Matters
Think of your yard like a painting. At night, that painting goes dark. A good lighting design is like picking up a paintbrush to bring it back to life. You can show off the parts you love and hide the parts you don't. It's how you get the most out of your yard after the sun goes down.
Good lighting does more than just look pretty. It's also a smart choice for your home. The right lights make guests feel welcome, make your paths safer to walk on, and can even scare away unwanted visitors. It’s all about creating a good feeling—whether it's a soft glow for a quiet night or a bright scene for a party.
Making Your Home Look Better and Worth More
You might be surprised to learn that good landscape lighting can make your home look better and increase its value. It creates a great first impression. It shows off nice parts of your house and garden that would disappear in the dark. This helps your home stand out.
More and more people want these kinds of outdoor improvements. The landscape lighting business in the U.S. is expected to grow from $3.55 billion in 2024 to $5.42 billion by 2030. This big jump shows that homeowners care about making their yards beautiful and safe. You can learn more about the growth of the landscape lighting market to see for yourself.
A well-lit yard doesn't just light up your home; it makes it better. It's the difference between a house that's just there at night and one that really shines.
Creating a Safe and Usable Outdoor Space
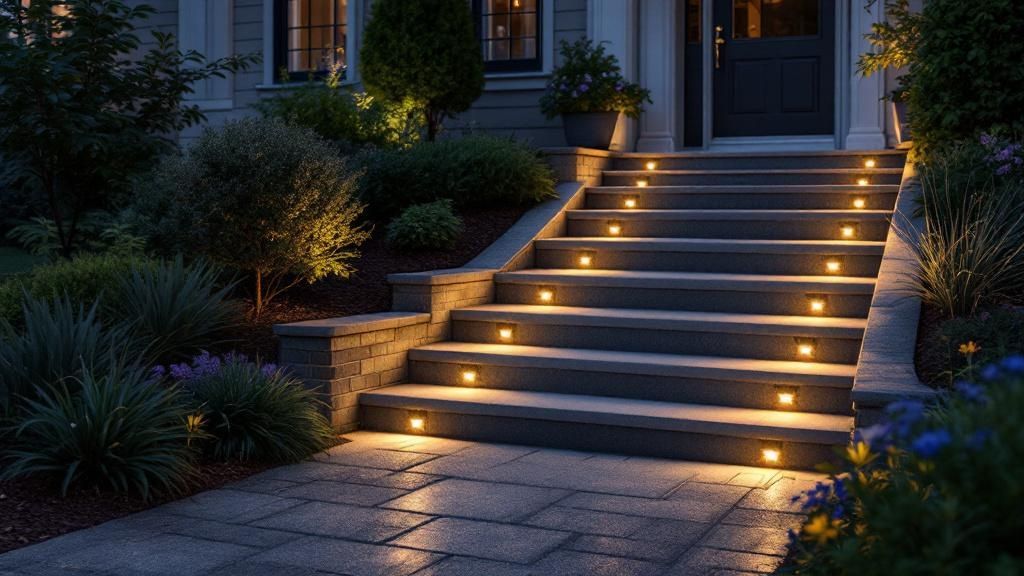
Besides looking good, the most important job of any lighting design is safety. Lights on paths, stairs, and doorways are key to preventing trips and falls. They help you and your guests move around safely at night.
Think about these key areas where lighting makes a big difference:
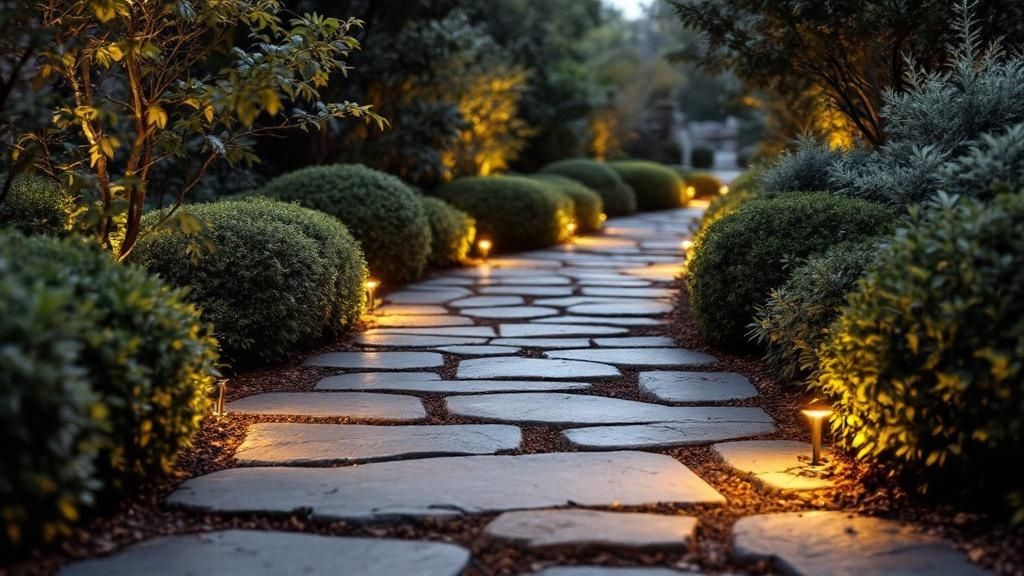
- Walkways and Paths: Soft pools of light are great for showing the way without being too bright. Every step feels safe.
- Stairs and Decks: Small step lights or post lights make sure you can see any changes in height. This greatly lowers the risk of an accident.
- Patios and Hangout Areas: The right amount of light turns these spots into cozy places where you can relax and have fun late into the evening.
By focusing on these simple ideas, you're not just adding lights. You're adding more time to enjoy your yard and giving yourself peace of mind.
How to Plan Your Outdoor Lighting Design
Before you buy any lights, you need a plan. Think of it like a blueprint for your own nighttime masterpiece. A good plan makes sure every light has a reason for being there and that the final look is both beautiful and useful.
Jumping right into installing lights without a plan is the biggest mistake people make. It's like trying to build a house without drawings. You might end up with something, but it probably won't be what you wanted. Planning is the most important part of this landscape lighting design guide because it saves you time, money, and headaches.
Start With a Simple Sketch
Let's start with the basics. Get a piece of paper and a pencil, and draw a rough map of your yard. It doesn't have to be perfect. The goal is just to see what you have to work with.
Walk around your yard with your map and mark these key things:
- House Details: Note any cool features on your home, like stone pillars, brick walls, or a neat roofline you want to show off.
- Favorite Plants: Mark the trees, shrubs, and garden beds you like the most. That cool maple tree? Mark it. The row of bushes? Mark it.
- Useful Areas: Mark all the places you actually use—walkways, stairs, patios, decks, and the driveway.
- Main Features: Look for anything you want people to notice at night. This could be a statue, a fountain, or a big old tree.
Once you have everything on paper, you can start thinking about what you want to do. This simple map will be your guide for placing lights in the right spots.
Decide the Job for Each Light
Now, look at your sketch. For every spot you marked, decide what you want the light to do. Every light should have a clear job. Most jobs fall into three main types. A great design mixes these types of light to create a scene with balance and interest.
Think of it like painting. An artist uses different colors and strokes to create depth. In lighting design, you use different types of light for the same reason. This keeps your yard from looking like a flat, boring blob of light.
For example, a path light's job is to keep people from tripping. But a spotlight on a tree? Its job is to create a dramatic main feature. Giving each light a purpose helps you choose the right one for the job.
This table can help you think about the "why" behind your lighting choices.
Matching Lighting Goals to Your Yard
| Lighting Goal | What It Does | Best For | Example Light |
|---|---|---|---|
| Safety | Lights up paths and things you could trip on. | Walkways, stairs, driveways. | Path Light, Step Light |
| Security | Scares away intruders by getting rid of dark spots. | Around the house, dark corners. | Motion-Sensing Floodlight |
| Beauty | Shows off nice house and landscape features. | Special trees, stone walls, statues. | Uplight, Well Light |
| Usefulness | Makes outdoor areas usable after dark. | Patios, decks, outdoor kitchens. | Downlight, String Light |
Thinking about these goals for each part of your yard will give your design a clear, professional direction.
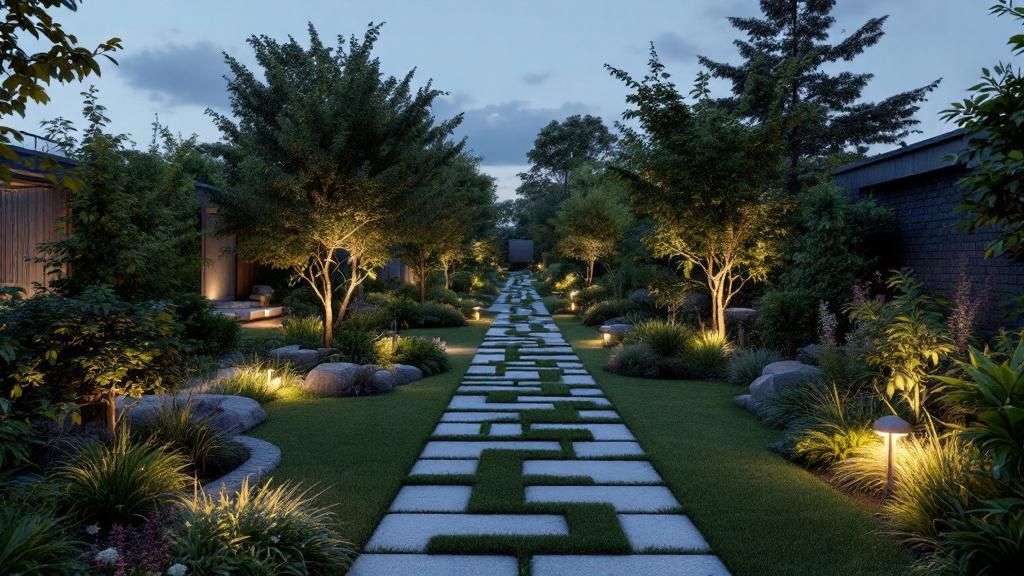
Layering Light for Depth and Drama
The very best outdoor lighting designs use three different layers of light. Mixing them correctly is what makes a yard look truly amazing. As you plan, think about how these layers can work with your other inspiring landscaping ideas to create one complete look.
- Ambient Lighting: This is your main layer of light. It's the general glow that makes an area feel usable. It often comes from soft lights placed high up in trees or on the house.
- Task Lighting: This light is all about function. It's aimed at helping you do specific things safely. Think of lights on the grill, step lights on a dark staircase, or path lights on a walkway.
- Accent Lighting: This is where you get the "wow" factor. Accent lights are used to highlight your yard's best features—the things you marked on your sketch. This is where you shine a light up a beautiful tree or along a stone wall to show off its texture.
By mixing these three layers, you create a rich look that guides the eye through your yard. It makes the whole space feel more planned and professional.
This picture shows the types of lights used to create these layers.
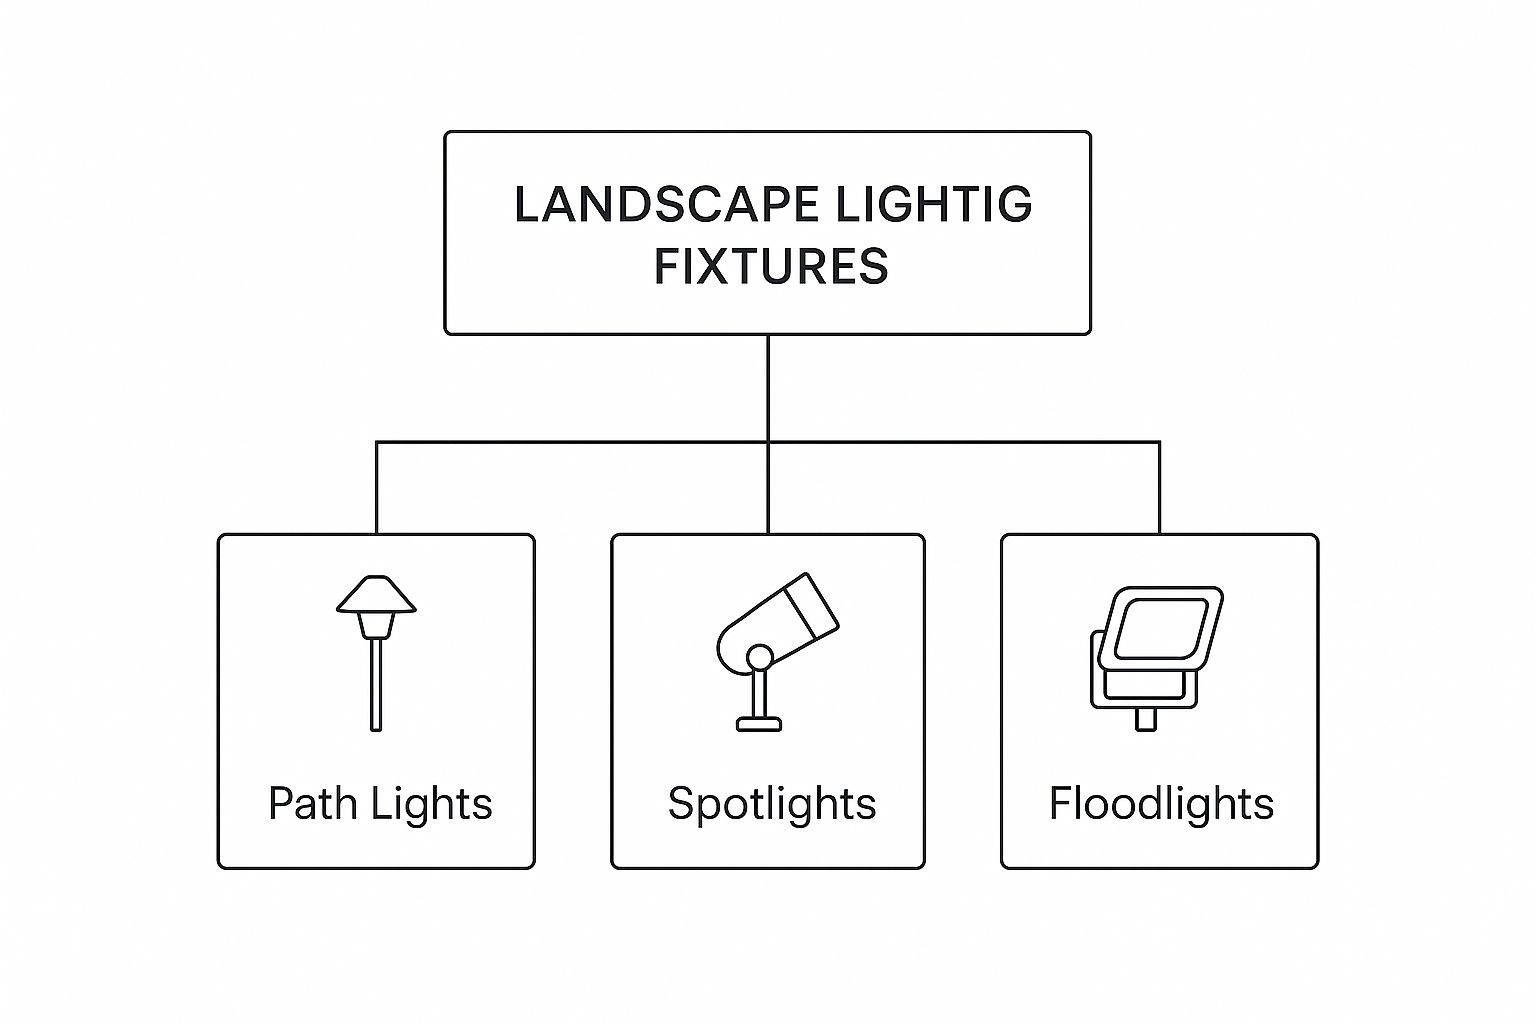
Understanding these basic types of lights is the first step in choosing the right tool for the right job in your plan.
Choosing the Best Lighting Fixtures
With your plan ready, it's time for the fun part—choosing the lights. Looking at all the different lights online or in a store can feel like a lot. But don't worry, it's easier than it looks.
Think of light fixtures like tools in a toolbox. Each one is made for a specific job. This part of our guide will show you which tool to use for which task. We'll cover the most common types of lights and explain the key things to look for.
Understanding Low-Voltage Versus Line-Voltage
Before we talk about the lights, we need to talk about power. Landscape lighting systems are usually either low-voltage (12V) or line-voltage (120V). Line-voltage is the same power that runs your fridge, but it's almost never the right choice for outdoor lights.
Low-voltage systems are what most people use, for good reason. They use a part called a transformer to lower your home's electricity to a much safer 12 volts. This makes them much safer to work with and easier to install. That's why they are used for almost all home projects. You can learn more about low-voltage landscape lighting installation to see how easy it is.
Common Fixture Types and Their Jobs
Once you know the look you want, picking the right light is easy. Each type of light is made to shape and point light in a certain way.
Here are the main lights used in any good design:
- Path Lights: These are probably what you think of first. Their job is to shine light down and out to light up walkways and driveways so people can get around safely.
- Spotlights and Uplights: These create drama. They make narrow beams of light to highlight specific things like trees, statues, or pillars on your house. You aim them up to create cool focal points.
- Floodlights: These are like spotlights but with a much wider beam. You use a floodlight when you want to cover a whole surface with light, like a big stone wall or the side of your house.
- Well Lights: These are installed right in the ground, so you can barely see them during the day. They're great for lighting trees from the bottom without creating something to trip over in your lawn.
By matching these lights to the goals in your plan, you make sure every light has a clear and useful purpose.
Choosing the Right Fixture Material
Outdoor lights have to handle rain, sun, and changing temperatures. So, the material they're made from is very important. A light's material affects not just how it looks but also how long it will last.
Your lighting is a long-term investment. Choosing a strong, high-quality material from the start will save you from being disappointed when lights break or fade after just a few years.
Here's a quick look at the most popular options:
| Material | Durability | Appearance | Best For |
|---|---|---|---|
| Solid Brass | Excellent | Turns a beautiful dark color over time. Very classic. | Areas near the coast or anywhere you want it to last a long time. |
| Copper | Excellent | Turns a special blue-green color over time. | People who want a unique look that changes. |
| Aluminum | Good | Often coated in black or bronze. Can chip. | Projects on a budget in places with mild weather. |
| Composite | Fair | A type of strong plastic. Can get brittle. | The cheapest option for simple or temporary setups. |
For most high-quality designs, we recommend solid brass. It's very strong and looks better as it gets older.
Understanding Beam Spread and Color Temperature
Finally, there are two technical details you need to get right: beam spread and color temperature. These two things have a huge effect on how your landscape looks and feels.
Beam spread is just how wide the cone of light is that comes out of the fixture. It's measured in degrees. A narrow beam (15-30 degrees) is great for a tall, thin tree. A wide beam (60-120 degrees) is what you need for a wide wall.
Color temperature is the actual color of the light. It's measured on the Kelvin (K) scale.
- Warm White (2700K – 3000K): This is the best choice for landscape lighting. It creates a cozy, golden glow that looks great with natural things like wood and stone.
- Neutral White (3500K – 4000K): This is a cleaner, more modern white light. It can make green plants really stand out but can sometimes feel a bit cold.
- Cool White (5000K+): This is a crisp, blue-ish light that looks like moonlight. It's best used for special effects, as it can feel harsh in a home setting.
Choosing the right mix of fixture, material, beam spread, and color is how you turn a design on paper into a beautiful, glowing reality.
Applying Professional Lighting Techniques
Now that you have a plan and know your lights, we get to the fun part. This is where we go from a blueprint to a piece of art. Think of yourself as a painter. But instead of paint, you're using light and shadow to change your yard completely.
Learning just a few key techniques is what makes a lighting setup look truly magical. Each method creates a different mood and highlights your landscape in a unique way. Let's go over the techniques the pros use to get that polished look.
Uplighting for Dramatic Effect
Uplighting is one of the most powerful tools for a designer. It's just what it sounds like: you place a light at the bottom of an object and aim it up. This is the opposite of how sunlight works, creating a cool effect that gets attention.
This is the perfect way to make trees and parts of your house look grand at night. The light from below creates long, interesting shadows that bring out texture. For example, putting a spotlight at the base of a tall, old tree can turn it into a living sculpture.
Uplighting is the best way to create a main feature in your yard. It tells the eye exactly where to look and makes whatever it lights up feel important.
Downlighting for a Natural Glow
If uplighting is about drama, downlighting is its soft, natural partner. This technique, also called moonlighting, means placing a light high up—in a tree or on your house—and aiming it down. The idea is to copy the soft, gentle light of a full moon.
This is great for lighting up larger areas like patios and gardens without any bright, annoying glare. The light feels like it's coming from everywhere at once, casting soft shadows on the ground. It’s the best way to create a calm, relaxing feel for your outdoor spaces.
To do this well:
- Place Lights High: Put them at least 20-25 feet up in a strong tree or under the roof.
- Use a Wide Beam: A floodlight with a wider beam will cast a broad, even light.
- Keep it Soft: Use a warm color (2700K) and lower brightness to keep that soft, natural feel.
Silhouetting and Shadowing
Sometimes, the most interesting thing to light isn't the object itself, but the wall behind it. Silhouetting is a creative trick where you put a light behind a plant with a cool shape and aim it at a wall or fence. This turns the plant into a dark outline against a glowing background.
It works best with plants that have a clear, open shape, like a Japanese maple. In a similar way, shadowing uses the same light placement but focuses on the shadow the object makes on the wall. By changing the light's distance, you can make the shadow bigger or smaller, adding a bit of artistic mystery to your garden. These are great ways to get creative and find unique outdoor lighting ideas for your backyard.
Grazing to Reveal Texture
Finally, there’s a technique called grazing, which is perfect for showing off surfaces with a lot of texture. Think of a rough stone wall, a brick house, or a tree with peeling bark. To graze a surface, you put a light very close to it and aim the beam almost flat against the wall.
This sharp angle of light catches every little bump on the surface. It creates deep, dramatic shadows that show off its texture. The effect is amazing. It adds a lot of depth and character to flat surfaces that might look boring at night. It’s a simple trick that gives a high-end, custom look.
Using Smart and Eco-Friendly Lighting
A great landscape lighting plan is about more than just looking pretty. It's also about being smart and good for the environment. New technology lets you create an amazing outdoor space while saving energy, helping the planet, and making your life easier.
The biggest change has been the LED (Light Emitting Diode). LEDs have taken over the lighting world for a good reason. They use very little energy compared to old halogen bulbs and can last an incredible 50,000 hours or more. That means you won't be climbing a ladder to change them for a very long time.
Embracing Sustainable Solutions
Besides just using LEDs, other eco-friendly options are becoming popular. People want solutions that are beautiful, save money, and are good for the earth. Because of this, solar and even battery-powered systems are getting more common. You can see how much this is growing in the latest landscape lighting market analysis.
Solar-powered lights are a great choice if you don't want to deal with wires. They are super easy to install—you just stick them in the ground where they can get sun. But they have downsides. They are often not as bright as wired lights, and they only work well if they got enough sun the day before. This focus on green technology is a key part of any good sustainable landscape design plan.
Sustainable lighting isn't a step down; it's an upgrade. It works better, costs less over time, and is better for the planet, making it the smartest choice for any modern home.
The Convenience of Smart Lighting Control
This is where your lighting plan gets really cool. Smart lighting systems connect your outdoor lights to your home’s Wi-Fi. This puts total control in your hand through a phone or tablet.
Think about it: you can use an app to dim the patio lights for a party or set a schedule so your lights turn on at sunset and off at sunrise. This kind of control has some big benefits:
- Convenience: Change the feel of your outdoor space without getting up from your chair.
- Security: Program your lights to turn on and off like you're home, even when you're on vacation.
- Energy Savings: Make sure lights are only on when you need them, which means a lower electricity bill.
Most smart systems also let you group lights into "zones," so you can control the front and back yards separately. You can even create custom scenes—like "Party," "Relax," or "Secure"—and turn them on with one tap. This is how your beautiful lighting becomes not just smart, but a part of your lifestyle.
Common Lighting Design Mistakes to Avoid
They say you can learn from other people's mistakes. When it comes to landscape lighting, that's true. Even a good plan can be ruined by a few common mistakes, turning a beautiful idea into a mess.
By knowing about these common problems ahead of time, you can avoid them and create a lighting design that looks great for all the right reasons.
One of the most common mistakes is what designers call the "airport runway" effect. This happens when someone lines up path lights in a perfectly straight, evenly spaced row. It might seem like a good idea, but it looks stiff and unnatural, more like a landing strip than a garden path.
Overlooking Glare and Light Pollution
Glare is the enemy of good lighting. It's that bright, uncomfortable feeling when a light shines right in your eyes. It completely ruins the magical feeling you're trying to create.
Along with glare, there's light pollution. This is when your lights end up shining in your neighbor’s window instead of your own yard. Neither one will make your neighbors happy.
Luckily, both problems are usually caused by bad light placement, and the fix is easy:
- Aim with care: Always point your lights away from windows, seating areas, and sidewalks.
- Use glare shields: These simple covers fit over the bulb to direct light where you want it and stop it from shining where you don't.
- Choose the right light: Use path lights that shine light down, not out. This keeps the light on the ground where it's needed.
Creating Hot Spots and Dark Voids
Another problem I see is using too much light. This creates bright "hot spots" where the light is too strong. It often happens when people use a few very powerful lights instead of several softer ones. The real goal is to create gentle, overlapping pools of light that blend together smoothly.
The best landscape lighting is subtle. You should notice the beautifully lit tree or path—not the super bright bulb that’s lighting it.
On the other hand, forgetting to light key areas creates "dark voids." These can feel unsafe and make the whole design feel disconnected. Walk around your yard at night and look for these dark spots. Adding a soft light to connect the different lit-up areas makes a big difference.
Forgetting About Future Growth and Maintenance
Finally, it’s easy to forget that yards are alive. Plants grow. That small bush you lit up perfectly today could completely block the light in just two or three years. This will ruin the effect.
When you place your lights, always think about how big the plants will get. Leave enough room for everything to grow. I also suggest using lights with adjustable stakes that can be raised as the garden gets bigger. A little planning now will make sure your landscape lighting looks great for years to come.
Of course. Here is the rewritten section, crafted to sound completely human-written and natural, following the style of the provided examples.
Your Landscape Lighting Questions Answered
When you're starting a new project, you're going to have questions. Let's go over some of the most common ones about landscape lighting design. Think of this as a quick Q&A to help you get started with confidence.
How Far Apart Should My Pathway Lights Be?
This is a great question. A good rule is to place path lights about 8 to 10 feet apart.
The real goal is to create soft, overlapping pools of light, not just light the way. You want to avoid that "runway" look of bright dots in a straight line. For a more natural look, try placing them on different sides of the path. The best advice? Always test the spacing at night before you install them for good to see how it really looks and feels.
Can I Really Install Low-Voltage Lighting Myself?
Yes, you definitely can. Low-voltage (12V) systems are made for DIY projects. A transformer plugs into a normal outdoor outlet. It lowers your home's electricity to a much safer level.
Just be sure to read the instructions carefully and bury the wire at the right depth. It’s a simple and fun project for many homeowners.
Doing it yourself is great for low-voltage lighting, but always trust your gut. If you find something confusing or feel unsure, calling a professional is the smartest choice. Your safety is most important.
What's The Best Material For Light Fixtures?
For something that will last a lifetime and look great, you can't beat solid brass. It's very tough, won't rust, and gets a beautiful, natural color over time that gets even better with age. It's the perfect choice for areas near the coast.
If you're on a budget but still want something that lasts, powder-coated aluminum is a good second choice. It holds up well against the weather and is a solid option for most projects.
How Do I Choose The Right Brightness For My Bulbs?
It all depends on what the light needs to do. Brightness is measured in lumens. Matching the lumens to the job is key.
Here’s a simple guide:
- Pathways: 100-200 lumens is usually enough for safe, soft light.
- Small trees or shrubs: 200-400 lumens gives a nice, gentle highlight.
- Large trees or a wall: You'll want to use 400-800 lumens or more for a big effect.
Remember, it’s almost always better to use several lower-lumen lights than one very bright one. This creates a much more balanced and professional look.
Ready to bring your vision to life with an expert touch? The team at Tamura Designs Landscape and Construction has been creating stunning, award-winning outdoor spaces for over 30 years. Contact us to start your design journey today. https://tamuradesigns.com